When you pick up a ring terminal, you might notice tiny numbers or codes stamped on it. These markings tell you important details like the stud size in inches or millimeters, and sometimes the wire gauge. If you want to know how to read ring terminal sizes, start by checking these markings. Use a caliper to measure for extra accuracy. Choosing the right size keeps your electrical connections safe and reliable.
Key Takeaways
- Always check the markings on ring terminals. Look for wire gauge and stud size to ensure a proper fit.
- Use calipers for accurate measurements. They help you avoid mistakes when markings are hard to read.
- Match the terminal to your wire and stud size. A correct fit prevents loose connections and safety hazards.
- Keep a quick reference chart nearby. This saves time and helps you double-check sizes easily.
- Double-check your measurements before crimping. This habit ensures safe and reliable electrical connections.
Ring Terminal Markings Overview
Millimeter and Stud Size Formats
When you look at ring terminals, you’ll see numbers that show the size of the stud hole. Sometimes, these numbers use millimeters. Other times, you’ll see US stud sizes like #6, #8, or 1/4″. These markings help you match the right lugs to the bolts or screws you plan to use. For example, if you see “M4” on a lug, that means the hole fits a 4mm stud. If you see “#10,” it fits a #10 screw. You want to check these markings before you crimp lugs onto wires. This step keeps your connections tight and safe.
Wire Gauge and Insulation Codes
You’ll also find markings that tell you which wire gauge works with each lug. In the US, you’ll see numbers like 12-10 AWG or 22-18 AWG. These numbers show the range of wire sizes that fit inside the lugs. Some lugs have extra codes for insulation type, like “N” for nylon or “V” for vinyl. You should always match the wire gauge to the lug size. This match makes sure your lugs hold the wire tightly and don’t slip. The National Electrical Code (NEC) sets standards for wire and lug sizes. These rules help keep your electrical work safe and reliable.
Color Coding Basics
Color coding makes it easy to pick the right lugs for your project. You’ll notice red, blue, and yellow lugs in most kits. Each color matches a wire gauge range:
- Red lugs: 22-18 AWG wires
- Blue lugs: 16-14 AWG wires
- Yellow lugs: 12-10 AWG wires
This system helps you grab the right lugs fast. The NEC recommends using the same color for all wires in a circuit. This practice keeps things organized and safe. Color coding also helps you spot the function of each wire at a glance. When you use the right color and size, your lugs will fit perfectly and last longer.
How to Read Ring Terminal Sizes
Locating Markings on the Terminal
When you want to know how to read ring terminal sizes, you need to start by finding the markings on the lugs. Most lugs have these numbers or codes stamped right on the flat part near the ring. Sometimes, you’ll see them on the barrel where the wire goes in. These markings can look small, so grab a flashlight if you need better light. You might see something like “M5” for metric or “#8” for US stud size. If you’re working with a bunch of lugs, line them up and check each one for these codes. This habit helps you avoid mistakes and makes your work faster.
Decoding Width and Opening Diameter
Now, let’s break down how to read ring terminal sizes by looking at the width and opening diameter. The opening diameter tells you what size bolt or screw the lug will fit. The width helps you see if the lug will fit in tight spaces. You’ll often see both millimeter and US stud size formats, so pay attention to the markings.
To measure these parts accurately, you need the right tools. Here’s what works best:
- Calipers: These give you the most accurate measurement for both width and opening diameter.
- Tape Measure or Ruler: These work if you just need a rough idea.
If you want to see the difference between measuring tools, check out this table:
| Measurement Tool | Accuracy |
|---|---|
| Digital Vernier Caliper | 0.01 mm |
| Manual Vernier Caliper | 0.02 mm |
| Digital Micrometer | 0.001 mm |
| Manual Micrometer | 0.01 mm |
| Vernier Depth Gauge | 0.02 mm |
| Steel Rule | 0.50 mm |
You can see that digital calipers and micrometers give you the best accuracy. If you want a quick look at how calipers compare to just eyeballing the size, here’s a handy chart:
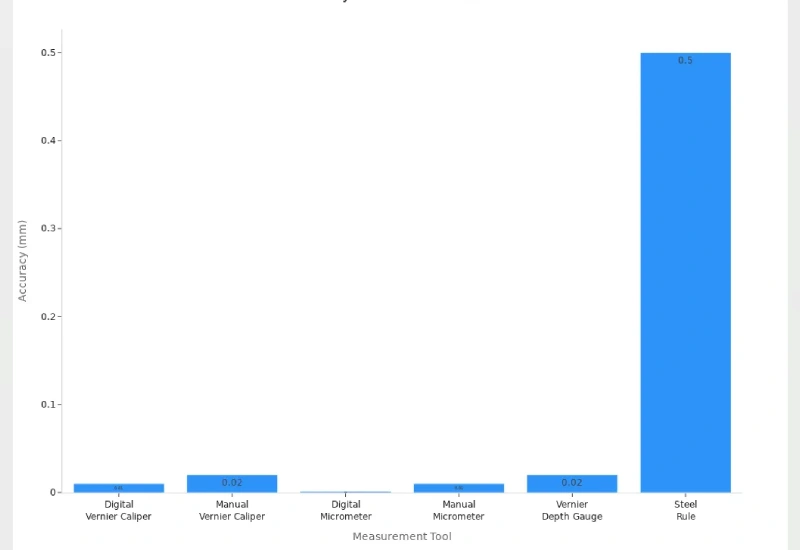
When you use calipers, you can measure the inner diameter, the width, and even the thickness of the lugs. This step makes sure you pick the right size every time. Visual inspection can trick you, so always measure if you want to get it right.
Matching to Wire Gauge and Stud Size
The last step in how to read ring terminal sizes is matching the lug to your wire and stud. You need to check two things: the wire gauge and the stud size. The markings on the lugs will tell you both. For example, a lug might say “12-10 AWG / #10.” That means it fits 12 to 10 gauge wire and a #10 stud.
Here’s a simple process to follow:
- Find the marking on the lug.
- Check if it matches your wire gauge.
- Check if the opening fits your stud or bolt.
- Use calipers to double-check the size if you’re not sure.
Let’s look at why this matters. If you use the wrong size, you can end up with a loose connection. That can cause voltage drops, overheating, or even a fire. Safety standards say you must match the wire gauge and stud size for a secure connection. Here’s why:
- Picking the right size keeps your connection tight and safe.
- The wire gauge and stud size must match for a firm hold.
- Using the right lugs prevents failures in both home and industrial projects.
- If the lug is too big or too small, you get poor conductivity.
- Bad connections can cause voltage drops and unreliable performance.
- Loose lugs can overheat and start a fire.
Tip: Always double-check your lugs with calipers before crimping. This habit saves you time and keeps your project safe.
If you want to see how calipers stack up against just looking at the size, check out this table:
| Measurement Method | Accuracy Level | Key Dimensions Measured |
|---|---|---|
| Calipers | High | Inner diameter, width, thickness, wire barrel diameter |
| Visual Inspection | Low | General size estimation only |
When you follow these steps, you’ll know exactly how to read ring terminal sizes. You’ll pick the right lugs every time, and your electrical connections will stay safe and strong.
Common Marking Variations
Manufacturer Differences
You might notice that not all lugs look the same. Different companies use their own style for size markings. Some brands stamp the numbers deep into the metal. Others print them with ink. You may see a clear “M6” on one set of battery cable lugs, but another brand might use just “6” or even a symbol. If you work with a mil-spec connector, you’ll find that milspec lugs often follow strict military standards. These lugs usually have extra codes or part numbers. You can spot these details if you look closely. Always check the packaging or the datasheet. This habit helps you match the right lugs to your project.
Unusual Codes and Symbols
Sometimes, you’ll run into codes that look confusing. You might see a mix of letters and numbers, like “AWG12-10” or “M8-1.25.” Some lugs have a triangle or a star stamped next to the size. These symbols can show the type of material or the level of insulation. If you use a mil-spec connector, you’ll see milspec codes that tell you about the quality and testing. For example, a milspec lug might have a “QPL” mark, which means it passed military inspection. You can always check the legend on the box or ask the supplier if you get stuck.
Note: If you see a code you don’t recognize, don’t guess. Take a minute to look it up. This step can save you from using the wrong lugs.
Tips to Avoid Mistakes
You want your connections to last. Here are some quick tips to help you avoid common mistakes with lugs:
- Always read the markings before you crimp.
- Use calipers to measure the opening if you’re not sure.
- Keep a chart of stud sizes and wire gauges near your workbench.
- Double-check the specs for battery cable lugs and mil-spec connector lugs. These types often have unique markings.
- Don’t mix up milspec lugs with standard ones. The standards are different.
If you follow these steps, you’ll pick the right lugs every time. Your electrical work will stay safe and reliable.
Conclusion
You’ve learned how to read ring terminal size markings, and now you can tackle any wiring project with confidence. Let’s wrap up the main points so you can keep your connections safe and reliable every time.
- Always check the markings on each ring terminal. Look for wire gauge, stud size, and any special codes. These tiny numbers and letters hold all the info you need.
- Use calipers for precise measurements. Don’t trust your eyes alone. Calipers help you avoid mistakes, especially when the markings are hard to read or missing.
- Match the terminal to your wire and stud. The right fit means a strong, safe connection. If you use the wrong size, you risk loose wires, voltage drops, or even fire hazards.
- Keep a quick reference chart nearby. This chart saves you time and helps you double-check sizes fast. You can print one out or save it on your phone.
Tip: If you ever feel unsure, measure twice before you crimp once. This habit keeps your work neat and safe.
Here’s a simple table you can use as a cheat sheet:
| Color | Wire Gauge (AWG) | Common Stud Sizes |
|---|---|---|
| Red | 22-18 | #6, #8 |
| Blue | 16-14 | #8, #10 |
| Yellow | 12-10 | #10, 1/4″ |
You don’t have to memorize every marking. Just get comfortable with the basics, and you’ll make fewer mistakes. When you take the time to read and measure, you protect your project and everyone who uses it.
So grab your calipers, check those markings, and enjoy wiring with confidence!
You’ve got the basics down for reading ring terminal size markings. Always double-check the codes and use calipers for a perfect fit. Keep a quick reference chart handy for fast checks. Picking the right terminal matters because:
- Loose or tight fits can cause poor connections and overheating.
- Wrong sizes may lead to stress, failure, or safety hazards.
- Reliable connections need the right wire gauge and stud size.
Stay safe and make your electrical work last by choosing the right terminal every time!
FAQ
How do I know which ring terminal fits my wire?
Check the wire gauge marking on the terminal. Match it to your wire size. If you feel unsure, use calipers to measure the wire and terminal barrel. This step helps you avoid loose connections.
What does “#10” or “M5” mean on a ring terminal?
“#10” means the terminal fits a #10 screw or stud. “M5” means it fits a 5mm stud. You can use this quick chart for reference:
| Marking | Stud Size |
|---|---|
| #6 | 3.5 mm |
| #8 | 4 mm |
| #10 | 5 mm |
| 1/4″ | 6 mm |
Can I use a ring terminal with a different color than my wire?
You should match the color to the wire gauge. Color coding helps you pick the right terminal fast. Using the wrong color may lead to a poor fit or unsafe connection.
What tool gives the most accurate measurement for ring terminals?
Digital calipers give you the best accuracy. You can measure the inner diameter, width, and thickness. Visual inspection works for a quick check, but calipers help you avoid mistakes.