Custom Ceiling Fan Junction Box Manufacturer in China
Our ceiling fan junction boxes provide secure and reliable support for your ceiling fans and light fixtures. These robust boxes are engineered to meet or exceed safety standards, ensuring stable mounting and safe electrical connections. Available in various configurations to suit new installations or replacements, they offer durability and ease of installation for any project.
Get Your Desired Ceiling Fan Junction Box to Delight Your Clients
Linkwell Electrics - Your Trusted Ceiling Fan Junction Box Manufacturer from China
Linkwell Electrics, a trusted junction box manufacturer from China, offers a range of reliable ceiling fan junction boxes. While their primary focus appears to be industrial electrical components, they may offer solutions suitable for ceiling fan installations. Contact them directly to inquire about their specific ceiling fan junction box products, ensuring they meet your safety and installation requirements.
Various Ceiling Fan Junction Box

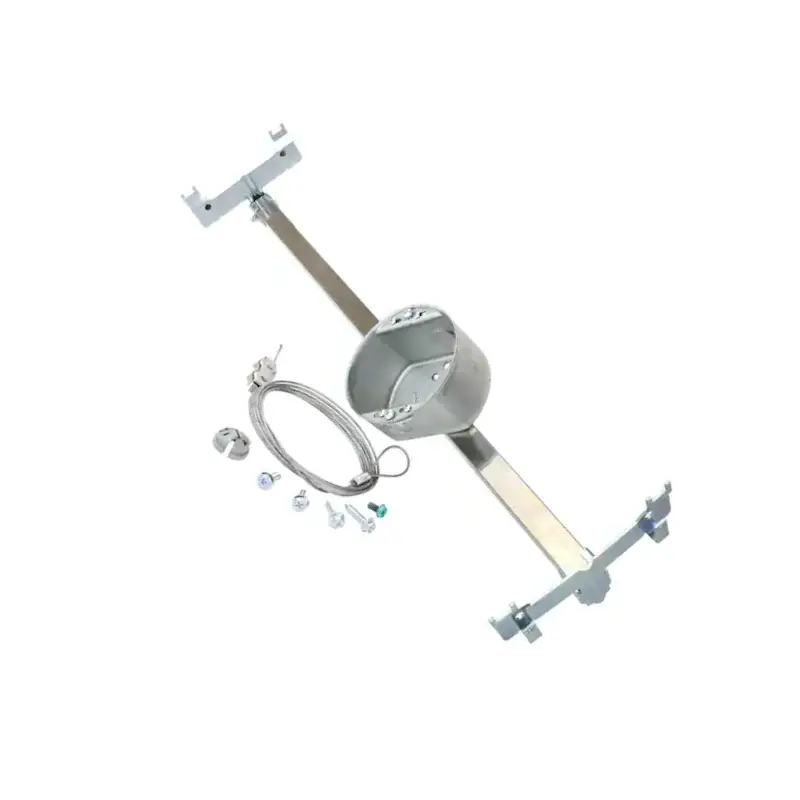
electrical junction box for ceiling fan
Our electrical junction boxes for ceiling fans are specifically designed to safely and securely support the weight and movement of your fans. Built with robust materials and UL-listed for safety, they ensure reliable electrical connections and prevent wobbling. Easy to install and available in various sizes and mounting styles, our boxes are the dependable choice for any ceiling fan project.
drop ceiling junction box
Our drop suspended ceiling junction boxes are specifically designed for suspended ceiling systems. These boxes provide secure mounting and easy wiring for light fixtures and ceiling fans in these applications. Featuring designs that integrate seamlessly with drop ceiling grids, they ensure stability and safe electrical connections above the finished ceiling. Choose from various types to match your specific drop ceiling requirements.
ceiling mounted junction box
We offer a diverse selection of ceiling-mounted junction boxes designed for secure and code-compliant electrical connections. Our range includes options suitable for various wiring needs and ceiling types, ensuring a safe and reliable installation for lighting fixtures and other electrical devices. Built for durability and ease of use, our junction boxes provide the essential foundation for your ceiling electrical work.
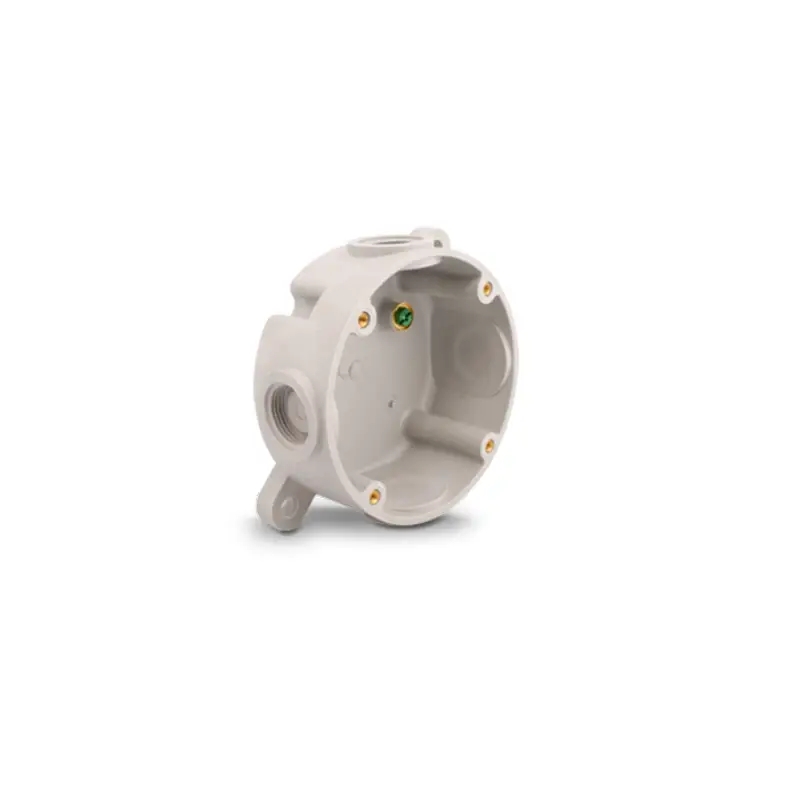
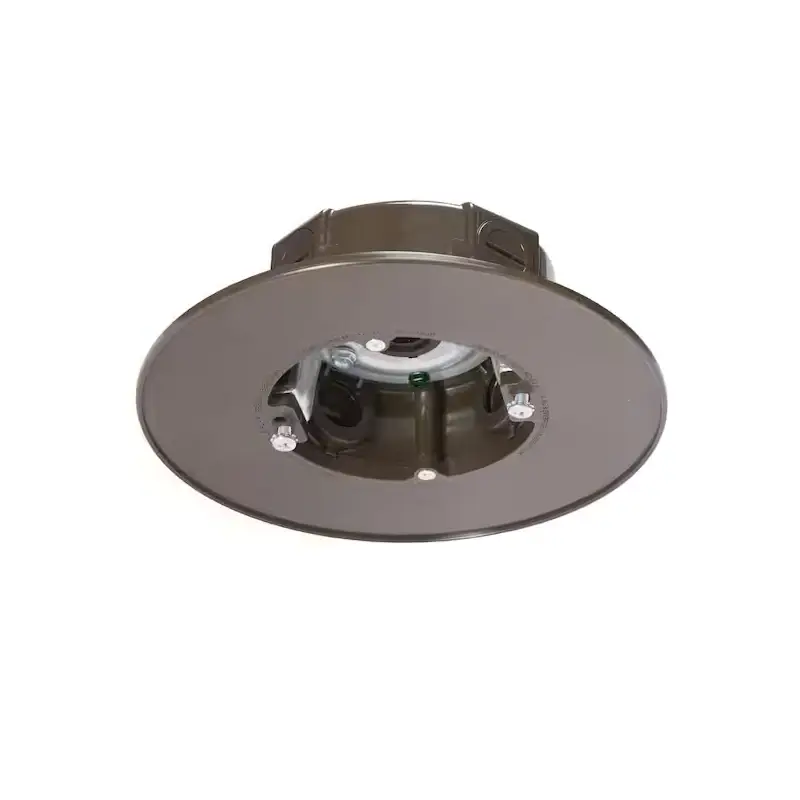
round ceiling junction box
Our round ceiling junction boxes provide a secure and standardized mounting solution for light fixtures and smaller ceiling fans. Designed for straightforward installation in standard ceiling cutouts, these durable boxes ensure safe electrical connections. Available in various depths and knockout configurations, they offer versatility for different wiring needs in residential and commercial applications.
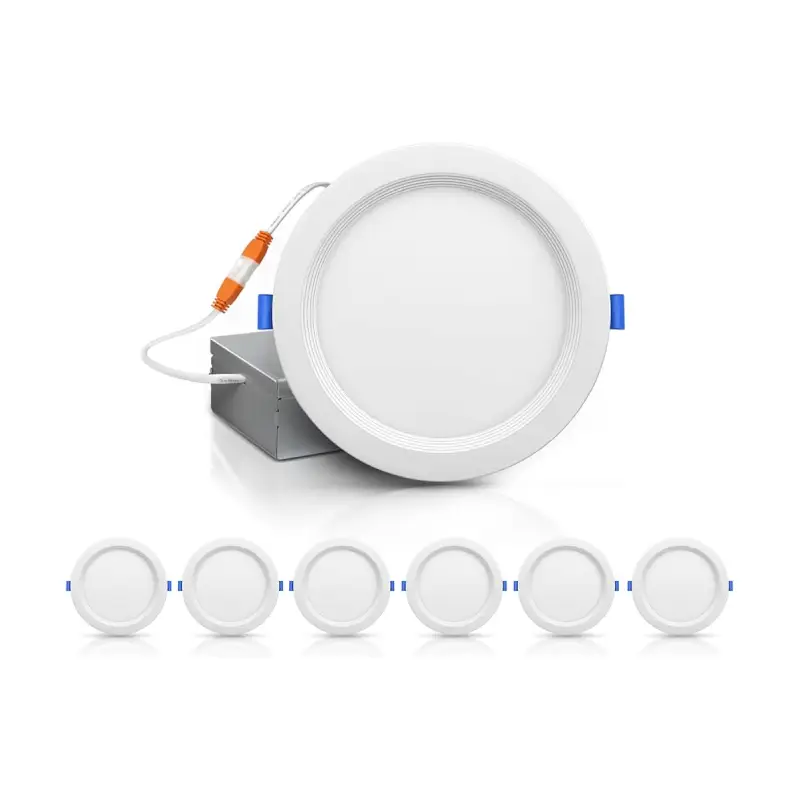
led ceiling light junction box
Our LED ceiling light junction boxes provide a secure and code-compliant electrical connection point for your modern lighting fixtures. Designed for easy installation and durability, these boxes ensure a stable mount and safe wiring for various LED ceiling light styles. Choose from our range of sizes and configurations to perfectly suit your residential or commercial lighting projects.
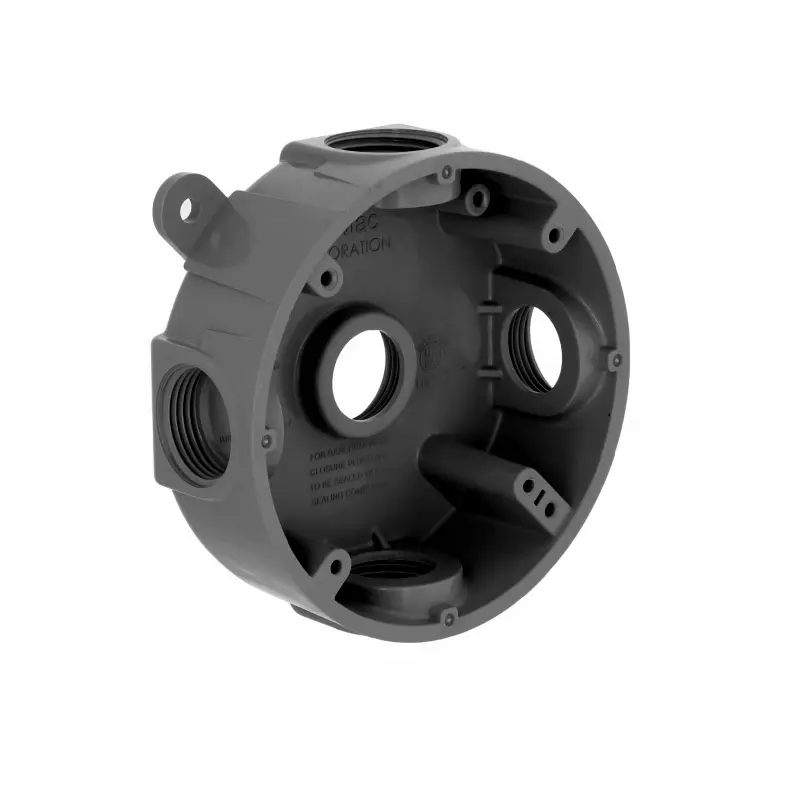
outdoor ceiling fan junction box
Our outdoor ceiling fan junction boxes are specifically designed to withstand the elements. Constructed with weather-resistant materials, they provide a secure and safe mounting solution for your outdoor-rated ceiling fans. These durable boxes ensure protection against moisture, corrosion, and other environmental factors, guaranteeing long-lasting performance and reliable electrical connections in any outdoor setting.
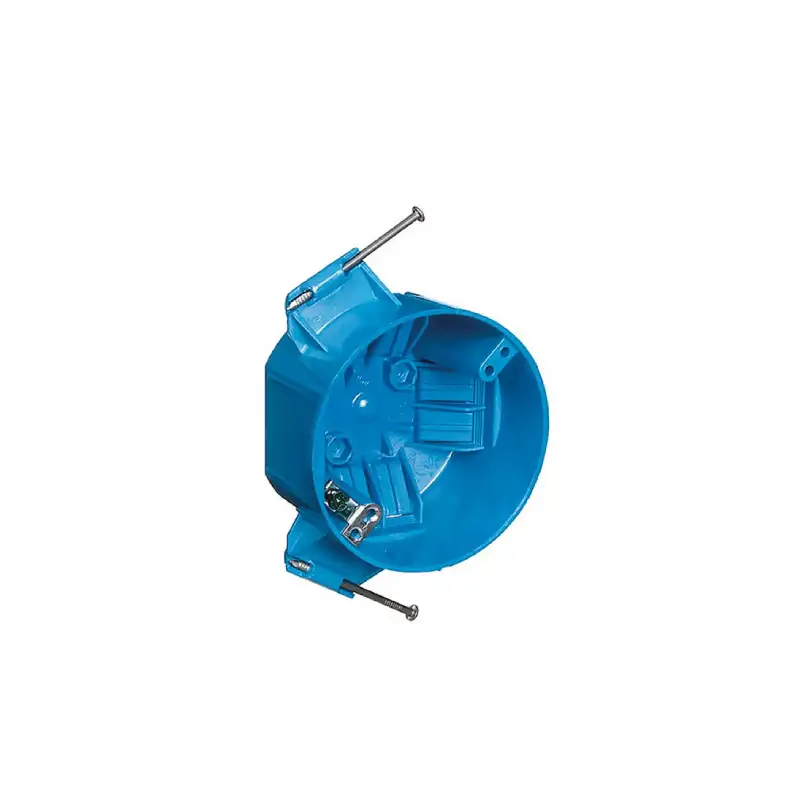
plastic junction box for ceiling fan
Our plastic junction boxes for ceiling fans offer a lightweight yet durable solution for secure mounting and wiring. Engineered for ease of installation, these non-metallic boxes provide excellent insulation and corrosion resistance. While suitable for many installations, ensure your fan’s weight and movement are compatible with plastic options and local electrical codes for safety.
Why Choose Our Ceiling Fan Junction Box
Material and Durability
We offer a range of robust materials, including galvanized steel and heavy-duty plastics, ensuring our junction boxes can withstand various environmental conditions and the weight of different fixtures. We can tailor the material thickness and finish to meet specific project durability requirements, providing long-lasting and reliable performance.
Size and Configuration
We understand that projects have unique spatial constraints. Therefore, we provide customization options for the dimensions, depth, and shape of our junction boxes. We can also incorporate specific numbers and sizes of knockouts or cable entry points to accommodate your wiring needs precisely, ensuring efficient installations.
Mounting Options and Brackets
We recognize the importance of secure and straightforward installation. We can customize the mounting features of our junction boxes, including pre-installed brackets for direct joist mounting or adjustable hanger bars for flexible positioning. Our goal is to provide solutions that integrate seamlessly with your ceiling structure.
Specialized Features and Functionality
Beyond the standard, we can incorporate specialized features into our junction boxes. This includes integrated grounding terminals, built-in surge protection, or even compatibility with smart home device mounting. We work with you to understand your project’s specific functional requirements and engineer solutions that meet those demands effectively.
what are ceiling fan junction boxes?
Ceiling fan junction boxes are specialized electrical boxes designed to securely mount ceiling fans and safely connect their wiring to the home’s electrical system.
Unlike standard junction boxes intended for lighter light fixtures, fan-rated boxes are built to withstand the dynamic forces exerted by a spinning ceiling fan, including its weight and the vibrations it produces.
These junction boxes are typically constructed from more robust materials, such as heavy-gauge metal, and are engineered to be directly and firmly attached to structural elements within the ceiling, like joists or specialized support brackets.
The primary purpose of a ceiling fan junction box is to provide a stable and reliable mounting point for the fan, ensuring it doesn’t wobble, detach, or damage the ceiling over time. Furthermore, they offer a safe enclosure for the electrical connections, protecting the wires from damage and preventing accidental contact.
Building codes in most regions mandate the use of fan-rated junction boxes for ceiling fan installations to ensure the safety and longevity of the installation. Identifying a fan-rated box usually involves looking for specific markings on the box itself indicating its suitability for ceiling fan support and a more robust construction compared to standard junction boxes.
how to install a junction box in ceiling?
Installing a ceiling junction box is a crucial step for safely wiring light fixtures or ceiling fans. It provides a secure enclosure for electrical connections and a stable mounting point. Whether you’re replacing an old box or installing a new one, understanding the process is essential for a successful and safe installation. Remember to always turn off the power at the breaker before starting any electrical work!
Step 1: Preparation and Safety First
Before you begin, ensure the power to the circuit you’ll be working on is completely turned off at the main electrical panel. Gather your necessary tools: a drill with appropriate bits, a stud finder, a drywall saw, wire strippers, screwdrivers, and safety glasses. Identify the location for your junction box, ensuring it’s positioned correctly for your fixture or fan and that there are no obstructions like pipes or ductwork.
Step 2: Locating a Suitable Mounting Point
For secure mounting, especially for heavier ceiling fans, it’s ideal to position the junction box directly against a ceiling joist. Use a stud finder to locate the joists in your ceiling. If you can’t mount directly to a joist, you’ll need to use an appropriate support brace designed for ceiling fans, which will span between two joists to provide adequate support. Mark the location where you intend to install the box.
Step 3: Cutting the Ceiling Opening
Once you’ve identified your mounting location, carefully cut an opening in the ceiling drywall. If you’re replacing an existing box, this step is already done. If it’s a new installation, use a drywall saw to cut a hole just large enough to accommodate your junction box. Be cautious while cutting to avoid hitting any wires or hidden obstructions.
Step 4: Securing the Junction Box
If you’re mounting to a joist, position the junction box so that it’s flush with the ceiling surface and securely screw it into the wood. For installations between joists, install your chosen support brace according to the manufacturer’s instructions. This often involves extending the brace and securing it to the adjacent joists. Then, attach the junction box to the support brace, ensuring it’s firmly in place and can support the weight of your fixture or fan.
Step 5: Wiring the Junction Box
With the box securely mounted, you can now run the electrical wires into it. Typically, you’ll have a cable containing a black (hot) wire, a white (neutral) wire, and a bare copper or green (ground) wire. Strip the ends of these wires to expose about 1/2 to 3/4 inch of bare wire. Feed the wires into the junction box through the provided knockouts and secure them with cable clamps to prevent them from being pulled out. Inside the box, connect the wires according to the wiring instructions for your fixture or fan, typically using wire connectors to join like-colored wires together. Ensure the ground wire is properly connected to the grounding screw inside the junction box.
Step 6: Finalizing the Installation
Carefully tuck the connected wires back into the junction box, ensuring they are not pinched or damaged. If you’re installing a new fixture or fan, now is the time to attach it to the junction box according to its specific instructions. Finally, restore power at the breaker and test your installation to ensure everything is working correctly and safely. If you’re uncomfortable with any part of this process, it’s always best to consult a qualified electrician.
how to remove ceiling junction box from ceiling?
Removing a ceiling junction box is often necessary when replacing a light fixture or ceiling fan, or when rewiring. It’s a straightforward process, but as with any electrical work, safety is paramount. Always ensure the power to the circuit is turned off before you begin.
Step 1: Ensuring Power is Off
The very first and most crucial step is to completely disconnect the power to the circuit at your home’s main electrical panel. Locate the breaker that controls the wiring for the junction box you intend to remove and switch it to the “off” position. It’s a good practice to double-check with a non-contact voltage tester to confirm that no power is running to the wires connected to the box.
Step 2: Removing the Light Fixture or Fan
Before you can access the junction box itself, you’ll need to detach any light fixture or ceiling fan that is currently connected to it. This usually involves unscrewing a mounting canopy or removing bolts that secure the fixture to the box.
Carefully support the weight of the fixture as you detach it to prevent it from falling. Once detached, gently disconnect the wiring from the fixture, noting which wire was connected to which (you might want to take a picture for reference if you’ll be reinstalling a fixture later).
Step 3: Accessing the Junction Box
With the fixture removed, you should now have clear access to the junction box. It’s typically a metal or plastic box mounted to the ceiling structure. There might be a cover plate secured with screws that you’ll need to remove to expose the wiring inside the box.
Step 4: Disconnecting the Wires
Inside the junction box, you’ll find the electrical wires connected with wire connectors (often plastic caps twisted onto the wire ends). Carefully untwist and remove these connectors to separate the wires. You’ll likely see a black (hot) wire, a white (neutral) wire, and a bare copper or green (ground) wire. Once the connectors are off, gently pull the wires apart.
Step 5: Unscrewing and Detaching the Junction Box
The junction box itself is usually secured to a ceiling joist or a mounting bracket using screws. Locate these screws and use the appropriate screwdriver to remove them. If the box is attached to a support brace, you might need to loosen or detach the brace as well. Once the screws are removed, the junction box should be free to be taken down. Be mindful of any remaining wires as you detach the box.
Step 6: Inspecting and Preparing for the New Installation (if applicable)
Once the old junction box is removed, inspect the wiring and the ceiling opening. If you are installing a new junction box, ensure the opening is the correct size and that you have the necessary mounting hardware for the new box.
If you are simply removing the box and capping the wires (which is generally not recommended for future use unless done according to code), ensure each wire end is individually capped with an appropriately sized wire connector and then safely tucked back into the ceiling cavity. It’s always best practice to install a new, appropriate junction box for any future light fixture or fan. If you’re unsure about any part of this process, consult a qualified electrician.
how to connect ceiling fan to junction box?
Connecting a ceiling fan to a junction box requires careful attention to both electrical safety and proper mounting. Ensuring the junction box is rated to support the fan’s weight and movement is crucial. Always turn off the power at the breaker before starting any wiring!
Step 1: Ensuring Power is Off and Preparing the Fan
Before you begin, go to your home’s electrical panel and turn off the circuit breaker that controls the ceiling junction box where you’ll be installing the fan. Double-check with a non-contact voltage tester to confirm the power is off.
Unpack your ceiling fan and identify all the parts, including the motor housing, mounting bracket, downrod (if used), blades, light kit (if applicable), wire connectors, and screws. Refer to the manufacturer’s instructions for your specific fan model.
Step 2: Attaching the Mounting Bracket to the Junction Box
The ceiling fan will come with a mounting bracket that needs to be securely attached to the junction box. Typically, this bracket will align with screw holes on your existing junction box. Use the screws provided with the fan to firmly attach the mounting bracket to the junction box.
Ensure the bracket is flush against the ceiling and doesn’t wobble. If your existing junction box isn’t rated for ceiling fans or isn’t securely mounted, you’ll need to replace it with a fan-rated box properly anchored to a ceiling joist or support brace.
Step 3: Hanging the Fan Motor Assembly
Most ceiling fans use a downrod system where the fan motor assembly hangs from the mounting bracket. Attach the downrod to the motor housing, feeding the fan’s wiring through the downrod.
Then, carefully lift the motor assembly and hook it onto the mounting bracket. This allows you to have both hands free for wiring. Some fans might have a different mounting system, so always consult the manufacturer’s instructions.
Step 4: Wiring the Fan to the Junction Box Wires
Now, you’ll connect the fan’s wires to the wires coming from the ceiling junction box. Typically, you’ll have the following wires:
- From the Ceiling: Black (hot), White (neutral), and Green or bare copper (ground).
- From the Fan: Black (for the motor), White (neutral), Blue (for the light kit, if present), and Green or bare copper (ground).
Using the wire connectors provided with the fan, connect the wires of the same color together: black to black, white to white, and green/bare copper to green/bare copper. If your fan has a blue wire for a light kit, connect it to the black wire from the ceiling if you want the light to be controlled by the same switch as the fan, or to a separate hot wire if you have one for a separate switch. Ensure all wire connections are secure by twisting the wire connectors tightly.
Step 5: Tucking Wires and Attaching the Canopy
Carefully tuck all the connected wires back into the junction box, ensuring they are not pinched or hanging down. Slide the canopy (the decorative cover) of the fan up to conceal the mounting bracket and the junction box. Secure the canopy to the mounting bracket using the screws provided.
Step 6: Attaching the Blades and Light Kit (if applicable)
Once the motor housing and canopy are securely in place, you can attach the fan blades. This usually involves screwing the blades into the designated spots on the motor housing. If your fan has a light kit, follow the manufacturer’s instructions to connect the wiring for the light kit (typically a plug-in connector) and then attach the light fixture to the fan.
Step 7: Final Checks and Testing
After all the components are securely attached, double-check all screws and connections. Restore power at the circuit breaker. Test the fan’s operation at different speeds and test the light kit (if installed) to ensure everything is working correctly and safely. If you encounter any issues, immediately turn off the power and re-check your wiring and connections. If you’re uncomfortable with any part of this process, it’s always best to consult a qualified electrician.
how to cover a junction box in the ceiling?
Covering a junction box in the ceiling is essential for safety and aesthetics. Leaving exposed wires is dangerous and doesn’t look finished.
Here’s how to properly cover a ceiling junction box:
Step 1: Ensuring Power is Off
Before you do anything, head to your electrical panel and turn off the circuit breaker that controls the junction box you’ll be working on. Use a non-contact voltage tester to confirm that the power is indeed off at the box. Safety first!
Step 2: Identifying the Type of Junction Box
Look closely at the junction box. Is there a light fixture or fan currently attached? If so, you’ll need to remove it first by unscrewing any mounting hardware and carefully disconnecting the wires (remembering or noting which wire goes where). If it’s an unused junction box, it might already have a temporary cap or nothing attached.
Step 3: Assessing the Wiring
Once you have access to the inside of the junction box, take a look at the wires. Are they properly connected with wire connectors? Are there any loose or exposed wires? If the wiring is messy or unsafe, it’s a good idea to address it before simply putting on a cover. Ensure all wire connections are secure with wire connectors.
Step 4: Selecting the Correct Cover Plate
You’ll need a cover plate that is appropriately sized for your junction box. Junction boxes come in various shapes (round, square, octagonal) and sizes. Measure your junction box or bring it to a hardware store to find a cover plate that matches. There are also different styles of cover plates, some are flat, and some have a center hole for mounting a light fixture. Choose one that suits your needs or the existing aesthetic of your ceiling.
Step 5: Attaching the Cover Plate
Most junction box cover plates attach with screws. Align the screw holes on the cover plate with the screw holes on the junction box. Insert the appropriate screws (usually provided with the cover plate or already on the box) and tighten them until the cover plate is snug against the ceiling. Don’t overtighten, as this could crack a plastic cover plate or strip the screw holes.
Step 6: Ensuring a Flush and Secure Fit
Once the screws are tightened, double-check that the cover plate is sitting flush against the ceiling surface. There shouldn’t be any gaps or loose areas. A properly installed cover plate should be secure and provide a clean, finished look.
Step 7: Restoring Power
After the cover plate is securely in place, you can go back to your electrical panel and turn the circuit breaker back on.
Important Considerations:
- Unused Junction Boxes: If you have a junction box that is no longer in use, it still needs to be covered. Don’t just leave the wires exposed in the ceiling cavity. Cap the individual wires with wire connectors and then install a blank cover plate.
- Future Use: If you think you might use the junction box in the future for a light fixture, make sure the box is rated for the type of fixture you might install (especially if it’s a heavier fixture like a ceiling fan).
- Damaged Boxes: If the junction box itself is damaged, cracked, or not securely mounted, simply covering it won’t solve the underlying problem. It’s best to replace a damaged junction box.
- Electrical Code: Always follow local electrical codes when dealing with junction boxes and wiring.
By following these steps, you can safely and effectively cover a junction box in your ceiling, ensuring both safety and a neat appearance. If you are uncomfortable with any part of this process, don’t hesitate to call a qualified electrician.
how to fix a loose ceiling junction box?
A loose ceiling junction box can be a safety hazard, especially if it’s supporting a light fixture or ceiling fan. A wobbly box can strain wire connections and potentially fall.
Here’s how to try and fix a loose ceiling junction box:
Step 1: Ensuring Power is Off
As with any electrical work, your absolute first step is to turn off the power to the circuit at the main electrical panel. Locate the correct breaker and switch it off. Use a non-contact voltage tester to confirm that there is no power running to the junction box.
Step 2: Assessing the Situation
Carefully examine how the junction box is loose. Does it wobble? Can you see where it’s attached to the ceiling structure (joist or support bracket)? Try to gently move the box to understand the extent of the looseness.
Step 3: Removing the Fixture (if applicable)
If a light fixture or ceiling fan is attached to the loose junction box, you’ll need to carefully remove it. Support the weight of the fixture as you unscrew any mounting hardware and disconnect the wiring. Make sure to note or photograph the wire connections before disconnecting.
Step 4: Inspecting the Mounting
Once the fixture is removed (or if there wasn’t one), look inside the junction box to see how it’s mounted.
- Mounted Directly to a Joist: The box might be screwed directly into a wooden ceiling joist. If the screws are loose, try tightening them. If the wood is stripped, you might need to use longer or thicker screws to get a better grip. In some cases, you might need to drill new pilot holes slightly offset from the old ones.
- Mounted to a Support Bracket (Hanger Bar): Many ceiling fan-rated boxes are attached to a metal support bracket that spans between two joists. Check if the bracket itself is loose or if the box is loose on the bracket. Tighten any screws or bolts connecting the box to the bracket and the bracket to the joists. If the bracket is loose in the joists, you might need to reinforce its attachment with longer screws or by adding wood blocking between the joists for better support.
- Old Work Box (Expansion Tabs): If it’s an “old work” box installed in existing drywall, it likely uses expansion tabs that clamp onto the back of the drywall. These tabs can sometimes become loose or fail. Try tightening the screws that control these tabs. If they are stripped or broken, the box might need to be replaced with a new old work box or a different type of box secured to a more substantial structure.
Step 5: Tightening Screws and Bolts
Using the appropriate screwdriver or wrench, carefully tighten any loose screws or bolts you find that secure the junction box to the joist or support bracket. Be firm but avoid over-tightening, which could strip the screws or damage the box.
Step 6: Adding Reinforcement (if necessary)
If tightening the existing hardware doesn’t solve the problem, you might need to add some reinforcement.
- For Joist Mounting: If the wood is stripped, you could try using wood glue and wood shims along with longer screws. Let the glue dry before re-tightening.
- For Support Brackets: You might be able to add wood blocking between the joists near the bracket and then screw the bracket into this additional support.
- For Old Work Boxes: If the drywall opening is too large or the tabs are failing, you might need to cut a slightly larger opening and install a larger old work box or, ideally, cut back to a joist and install a box directly attached to it.
Step 7: Reinstalling the Fixture and Testing
Once the junction box feels secure, carefully reinstall the light fixture or ceiling fan, making sure the wire connections are correct and secure. Restore power at the breaker and test the fixture to ensure it’s working properly and that the junction box remains stable.
Important Considerations:
- Ceiling Fan-Rated Boxes: If the loose box is supporting a ceiling fan, it must be a junction box specifically rated for ceiling fans. These boxes are designed to handle the extra weight and movement. If your current box isn’t fan-rated and is loose, it’s crucial to replace it with a properly installed fan-rated box.
- Weight Limits: Be aware of the weight limits for different types of junction boxes. Don’t try to support a heavy fixture with a box that isn’t designed for it.
- Electrical Code: Always adhere to local electrical codes when working with junction boxes.
- When to Call an Electrician: If you’re uncomfortable with any part of this process, if the box is severely damaged, or if you’re unsure how it’s properly mounted, it’s always best to call a qualified electrician. Dealing with potentially loose electrical connections can be dangerous.
By carefully assessing the situation and taking the appropriate steps, you can often fix a loose ceiling junction box and ensure the safety and stability of your lighting or ceiling fan installation.
how to tell if junction box can support ceiling fan?
Determining if an existing junction box can safely support a ceiling fan is crucial for preventing accidents and ensuring proper operation. Simply attaching a fan to any box can lead to the fan wobbling, damaging the ceiling, or even falling. A properly supported fan requires a robust junction box specifically designed and rated for the dynamic loads that fans exert.
Here’s how to assess your existing junction box.
Look for Specific Ratings and Markings
The most reliable way to determine if a junction box can support a ceiling fan is to look for specific markings on the box itself. Fan-rated junction boxes are typically made of metal and will be clearly labeled.
You might find phrases like “Ceiling Fan Rated,” “Suitable for Ceiling Fans,” or a similar indication stamped or printed on the box. The box will also likely be larger and more robust than a standard light fixture junction box. If you don’t see any such markings, it’s highly probable that the existing box is not designed to support a ceiling fan.
Assess the Box Material and Construction
Standard junction boxes for light fixtures are often made of plastic or thin metal. Ceiling fan-rated boxes, on the other hand, are typically constructed from heavy-gauge metal to withstand the weight and vibrations of a spinning fan.
They are also usually larger and more deeply set to provide a more secure mounting point. If your existing box feels lightweight or flimsy, or if it’s made of plastic, it’s likely not strong enough to support a ceiling fan safely.
Check How the Box is Mounted
Even a sturdy, metal junction box won’t be safe if it’s not properly mounted. Fan-rated boxes should be directly and securely attached to a ceiling joist or to a fan-rated support bracket that is itself firmly anchored between two joists. Try gently wiggling the box.
If it moves at all, it’s not adequately supported. Standard light fixture boxes are often simply attached to the drywall with expansion tabs, which are not designed to handle the weight and movement of a ceiling fan. You might need to carefully remove the existing light fixture to fully inspect how the box is attached to the structural framing.
Consider the Size and Screw Placement
Ceiling fan-rated junction boxes often have specific screw patterns designed for securely attaching fan mounting brackets. They typically have more robust mounting points and screw holes that are spaced wider apart than those on standard light fixture boxes.
If the screw holes on your existing box seem small or if they don’t align well with the mounting bracket that came with your ceiling fan, it’s another indication that the box may not be appropriate for a fan. Always use the hardware provided with the fan, and ensure it securely attaches to the junction box’s mounting points. If you are unsure at any point, consulting a qualified electrician is always the safest course of action.
how much weight can a ceiling junction box hold?
The amount of weight a ceiling junction box can hold varies significantly depending on its type, construction, and how it is mounted. Standard junction boxes designed for lightweight light fixtures are typically rated to hold around 50 pounds or less. These boxes are often made of plastic or thinner metal and may be attached to the drywall itself using expansion tabs. It’s crucial to understand that these standard boxes are not suitable for supporting ceiling fans due to the dynamic forces exerted by the spinning blades.
For ceiling fans, a fan-rated junction box is required. These boxes are specifically engineered to handle the extra weight and the constant vibrations produced by a ceiling fan. They are typically constructed from heavy-gauge metal and are designed to be directly and securely mounted to a ceiling joist or a fan-rated support bracket that spans between joists.
Fan-rated boxes are often labeled as such and can typically support weights up to 70 pounds or more, although you should always check the manufacturer’s specific rating for the box you are using. Some heavy-duty fan boxes designed for very large or ornate fans might have even higher weight capacities.
Therefore, to determine how much weight a specific ceiling junction box can hold, you must carefully inspect the box for any weight ratings or markings indicating its suitability for ceiling fans or heavier fixtures.
If there are no such markings, or if the box appears to be made of lightweight material and is not securely attached to a structural member, it should not be used to support a ceiling fan.
Overloading a junction box can lead to serious safety hazards, including the fixture falling and potential electrical damage. When in doubt, it is always best to consult with a qualified electrician to ensure the safe and proper installation of your lighting and ceiling fan fixtures.
Send Your Inquiry Now
All-in-one Ceiling Fan Junction Box Solutions for Your Project
Streamline your ceiling fan installations with our all-in-one junction box solutions. These comprehensive units often include integrated mounting brackets and secure wiring compartments, simplifying the process and ensuring a stable, safe setup. Designed for various fan weights and ceiling types, our solutions offer convenience and reliability for both new constructions and replacements. Choose the right all-in-one box to make your project efficient and code-compliant.