How to Build a Plc Cabinet: Step-by-Step Guide 2025
Share this:
Table of Contents
Designing a plc cabinet takes more than just picking parts and wiring them up. You want every panel to meet strict safety requirements and deliver top efficiency for your automation projects. When you start plc cabinet and control panel building, you need to focus on how each panel supports reliable power flow, smooth system control, and easy troubleshooting. Each panel must follow industry standards like NFPA 70, UL 60947-4-1, and NFPA 79, which cover everything from circuit protection to wiring and clear labeling. Here’s a quick look at what these standards mean for your panel:
Standard
What It Covers
Why It Matters for Your Panel
NFPA 70
Safe wiring and clearances
Keeps your panel safe and compliant
UL 60947-4-1
Control equipment requirements
Ensures your panel wiring is reliable
NFPA 79
Machine panel wiring guidelines
Helps with panel installation quality
Linkewell brings decades of experience in plc cabinet and control panel building, offering you trusted solutions like their electrical control panel and electrical power distribution box. With every panel, you get a product designed for industrial automation, tested for harsh environments, and built to last.
Plc Cabinet Key Takeaways
Design your PLC cabinet to meet safety standards like NFPA 70, UL 60947-4-1, and NFPA 79 for reliable and safe operation.
Plan your system carefully by setting clear control objectives, matching power and communication needs, and preparing for future expansion.
Choose modular, certified components such as PLCs, power supplies, and HMIs to ensure easy upgrades and long-lasting performance.
Use clear schematics, proper labeling, and organized wiring to simplify installation, troubleshooting, and maintenance.
Select the right enclosure material and cooling system to protect your cabinet from environmental hazards and extend its lifespan.
System Requirements
Control Objectives
When you start planning your plc cabinet, you need to set clear control objectives. The panel acts as the brain of your automation system. It houses the plc, safety plc, and other control devices. These components help you manage processes, monitor safety, and keep everything running smoothly. You want your panel to handle process control, motor control, and real-time feedback. The plc cabinet also protects sensitive components and ensures reliable operation. With the right design, you can automate tasks, improve accuracy, and boost efficiency in your industrial automation projects.
Power and Communication Needs
Your panel must deliver stable power and reliable communication. Power supplies in the plc cabinet should match the voltage and current needs of all components, including the plc, relays, and peripherals. You need protection against over-voltage and short circuits. For communication, most panels use protocols like Modbus RTU, Ethernet/IP, or Profibus. Keep communication wiring separate from power lines to avoid interference. Use terminal blocks to organize wiring by function—power, signal, or control. Always ground all components at a single point to reduce electrical noise. Safety features like emergency stops and circuit breakers are essential for compliance.
Component Inventory
A well-organized component inventory makes panel building easier. Your plc cabinet will include wires, cables, connectors, and terminal blocks. You need controllers, such as the plc and safety plc, for process and safety control. Add push buttons, nameplates, and marking materials for easy identification. Ferrules and cable terminals help with reliable connections. Keep tools like crimpers and wire strippers handy for installation and maintenance. These components ensure your panel supports proper wiring, clear labeling, and smooth operation.
Planning for Expansion
Think about the future when you design your plc cabinet. Choose systems that let you add modules or new processes later. Make sure your panel can handle more input/output points and higher application complexity. Check that your plc supports the right communication protocols for future upgrades. Pick components that match your operating environment and offer easy programming. Consider the total cost, including integration and maintenance. Map out your current equipment and look for any legacy issues. Design your panel for easy service and safety. Test your layout with simulations before going live. Stay ready for trends like wireless communication and IIoT to keep your industrial automation system future-proof.
Component Selection
PLCs and I/O Modules
When you start building a plc cabinet, you want to make sure you pick the right plc and I/O modules. The right choice keeps your panel running smoothly and makes future upgrades easier. Here’s how you can select electrical components for your system:
Count the number of I/O points you need. Decide if you need digital, analog, or special function modules.
Check the processing power and speed of the plc. Make sure it can handle your control tasks and has enough memory.
Look at the communication protocols. Your plc should connect easily with other devices and support future expansion.
Choose a modular design. This lets you add more modules later without changing the whole panel.
Pick trusted brands that offer strong technical support and clear documentation.
You also want to use modules with diagnostic features like LEDs. These help you spot issues fast. For safety, always follow best practices for wiring and labeling.
Power Supplies and Protection
Your plc cabinet needs reliable power. Always match the input voltage and current ratings to your panel’s load. Use surge protection devices that meet UL1449 standards to guard against power spikes. Add circuit breakers and temperature controls to keep your panel safe. Think about backup power, like a UPS, to protect your plc during outages. Make sure your power supplies and protection devices have certifications like UL, CE, and IP ratings. This keeps your control system safe in tough environments.
Communication and HMI Devices
Modern plc control panels use both basic and advanced communication devices. You’ll see indicator lights and push buttons for quick status checks. Most panels now include HMIs, which are touchscreens that let you control and monitor your system. HMIs support many protocols, like Ethernet/IP and Modbus TCP. They make your configuration easier and reduce wiring. Always check that your plc and HMI work well together.
Device Type
Examples / Details
Human Machine Interfaces (HMIs)
Touchscreen, Wi-Fi, Web-based, High-brightness
Communication Protocols
Ethernet/IP, Modbus TCP, OPC UA, Legacy Modbus
Basic Devices
Indicator lights, Push buttons
Linkewell Electrical Control Panel
You want your plc cabinet to last and meet all safety rules. Linkewell’s electrical control panel and electrical power distribution box give you certified, high-quality solutions. These panels meet UL, CE, and IEC standards. They use modular layouts, so you can expand or reconfigure your system as needed. Certified components mean your panel will work safely in any environment. Modular, standardized, and certified parts make your plc control panels easier to install, maintain, and upgrade. You save time, reduce costs, and get a flexible configuration that fits your needs.
Tip: Always choose modular and certified components for your plc cabinet. This makes your control system safer, more reliable, and ready for the future.
Schematics
When you start building PLC cabinets, you need clear schematics. These drawings show every connection, device, and wire in your panel. Good schematics help you avoid mistakes and make troubleshooting much easier.
Wiring Diagrams
Wiring diagrams are the heart of your schematics. They show how every part connects inside your cabinet. Here’s what you should include:
You also want to show digital and analog I/O, relays, and communication cables. Organize your wiring so you can trace each signal easily. A neat layout makes future changes simple.
Standards and Labeling
You must follow strict standards when you create schematics. These rules keep your wiring safe and your cabinet compliant. Here’s a quick look at the most important standards:
Standard / Code
Description / Relevance to PLC Cabinet Schematics
UL 60947-4-1
Applies to industrial control equipment, including PLC cabinets.
NFPA 70 (NEC)
Covers safe installation and wiring of electrical equipment.
NFPA 79
Focuses on wiring for industrial machinery.
UL 218, 1203, 698A, 845, 891
Specialized standards for fire pumps, hazardous locations, motor control, and switchboards.
NEC Article 409
Requires SCCR marking on control panels.
Label every wire and device in your schematics. Use clear names and numbers. This makes installation and maintenance much faster.
Specification Sheets
Specification sheets give you the details for every component in your cabinet. You want to include:
Electrical ratings like voltage and current.
Ambient temperature and de-rating info.
Mounting details for racks or rails.
Functional descriptions for CPUs, I/O modules, relays, and transformers.
Connection methods, such as terminals or fieldbus networks.
Organizational features like wire ducts and grounding panels.
These specifications help you pick the right parts and ensure your design meets all requirements.
Design Software
You can use design software to create accurate schematics and cabinet layouts. Popular tools include Solidworks and Alibre Design. These programs offer:
Feature Category
Details
Electrical Diagram Creation
Symbol libraries, automatic reports, and wire numbering.
PLC Management
Easy PLC wiring and signal management.
Cabinet Design
2D and 3D layout tools for precise panel design.
Manufacturing Support
Designs that support assembly and service.
Design Rule Checks
Automatic checks for errors and compliance.
With the right software, you can speed up your design process and make sure your schematics follow all standards.
Tip: Always keep your schematics up to date. This helps everyone on your team work safely and efficiently.
Enclosure
Material and Ratings
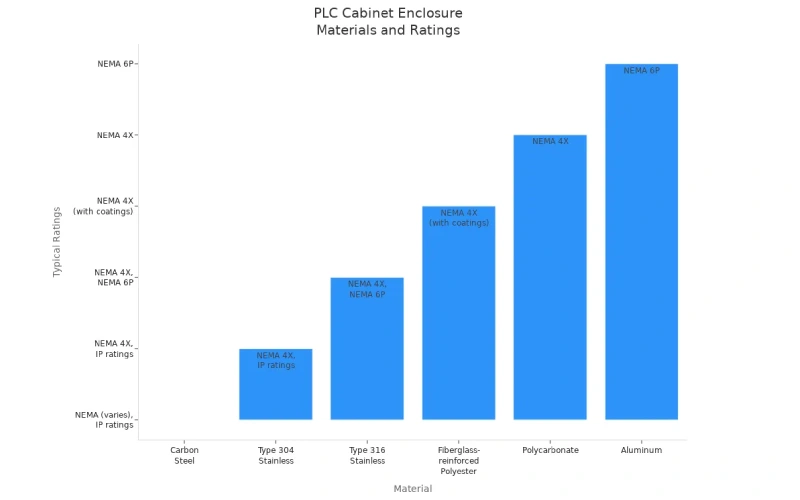
When you pick an enclosure for your plc cabinet, you want to match the material to your environment. Some materials work better indoors, while others handle harsh chemicals or outdoor weather. Here’s a quick look at common choices:
Material
Use Case
Typical Ratings
Key Properties
Carbon Steel
Indoor factories
NEMA 4X, IP
Strong, low cost, needs coating
Type 304 Stainless Steel
Food, clean rooms
NEMA 4X, IP
Good corrosion resistance
Type 316 Stainless Steel
Marine, chemical plants
NEMA 4X, 6P
Top corrosion resistance
Fiberglass-reinforced Polyester
Chemical, hot environments
NEMA 4X
Lightweight, handles high temps
Polycarbonate
Outdoor, small panels
NEMA 4X
UV and impact resistant
Aluminum
Outdoor, EMI shielding needed
NEMA 6P
Lightweight, shields from RF
You want to check NEMA and IP ratings to make sure your panel stands up to dust, water, and corrosion. Higher ratings mean better protection for your plc cabinet.
Custom vs Pre-Built
You have two main options for your panel enclosure: custom or pre-built. Custom enclosures fit your exact needs, like special cutouts or unique sizes. They work well if you need lots of panels or want your brand to stand out. Pre-built enclosures save time and money, especially for small projects or quick jobs. They come with tested designs and faster delivery. Here’s a quick comparison:
Aspect
Custom Enclosure
Pre-built Enclosure
Fit
Exact to your panel needs
Standard sizes, quick to ship
Cost
Higher for small runs
Lower for small projects
Lead Time
Longer, needs design time
Fast, often in stock
Certification
Takes longer
Easier, already tested
Cooling and Protection
Your plc cabinet needs to stay cool and dry. Overheating can damage your panel and cause downtime. You can use filter fans, air conditioners, or heat exchangers to control temperature. Good seals and gaskets keep out dust, water, and chemicals. Stainless steel hinges and latches add extra protection. Always pick a panel with the right NEMA or IP rating for your environment. This keeps your plc cabinet safe and running longer.
Tip: A well-sealed panel with the right cooling system can double the life of your plc cabinet electronics.
Linkewell Power Distribution Box
If you want a panel that meets strict safety rules, check out the Linkewell electrical power distribution box. It follows IEC 61439 and UL 508A standards, so you know your plc cabinet is safe. The enclosure is tough, resists corrosion, and has IP65/IP66 ratings for dust and water. You get organized power routing, overload protection, and support for custom layouts. Linkewell also offers CAD drawings and technical help, making your panel project easier from start to finish.
Installation
DIN Rails and Ducts
When you start to install the components in your plc cabinet, focus on the basics. DIN rails and wiring ducts help you keep everything organized. Always keep at least 2 inches between wired devices and wiring ducts for 120VAC circuits. For higher voltages, increase this space to 4 inches. Run wires in straight horizontal or vertical lines. Avoid diagonal runs. This makes your panel look neat and helps with troubleshooting. Train wires with gentle bends and avoid crossing them inside the ducts. Leave service loops at entry and exit points so you can make changes later. Use stranded, 600V 90°C rated MTW wire for wiring inside the panel. Good wire management keeps your control system safe and efficient.
Mounting Components
You want to group components by function, heat, and size. Place AC and DC parts on opposite sides of the panel. Put heat-producing devices near cooling fans or vents. Always leave about 20% extra space for future upgrades. Place relays, circuit breakers, and HMIs where you can reach them easily. Use wire ducts and trays to keep wiring neat. Label everything clearly. Follow standards like NEC, UL 508A, and NFPA 79 to keep your panel safe and compliant.
Spacing and Accessibility
Proper spacing in your plc cabinet makes maintenance easy. Choose a panel size that fits your application. Most panels are about 1800 mm tall and 600–1200 mm wide. Place the plc and modules in the center to shorten wire runs. Separate high and low voltage wiring to reduce interference. Add lighting, locks, and labels to improve safety. Neat wiring helps with airflow and cooling.
Layout Principles
When you design the plc cabinet layout, start with detailed schematics. Group components by flow, heat, and function. Separate AC and DC areas to reduce interference. Plan wiring routes with slack loops and clear labels. Use layout software to optimize wiring and reduce costs. Keep the layout compact but not crowded. Make sure you can reach frequently serviced modules. Good layout supports long-term control performance and easy maintenance.
Tip: A well-planned layout saves you time and money during installation and future upgrades.
Wiring
Wiring your plc cabinet is where everything comes together. If you wire the plc cabinet with care, you set yourself up for smooth operation and easy troubleshooting. Let’s break down the best practices for wiring in plc control panels.
Cable Routing
Good cable routing keeps your plc control panels running reliably. Here’s how you can minimize interference and keep your control system organized:
Separate power and control wiring by using different trays or conduits.
Keep high-voltage power cables far from low-voltage control and communication wires.
Cross power and control wires at right angles if they must meet.
Use twisted pair or shielded cables for low-voltage signals.
Ground cable shields at only one end to avoid ground loops.
Make sure all control wiring connections are tight and secure.
Use color-coding and different wire sizes to tell power and control circuits apart.
Tip: Neat cable routing not only looks professional but also makes future upgrades and repairs much easier.
Labeling Wires
Clear labeling is a must in every plc cabinet. It helps you find problems fast and keeps your control system safe. Here’s a quick guide to common wire colors and groupings:
Wire Function
Color (Europe Example)
Terminal Block Grouping
Power
Black
X1
Neutral
Light Blue
N/A
Protection (Ground)
Green-Yellow
Ground Bus
Control Voltage 220V AC
Red
X2
Control Voltage 24V DC
Dark Blue
X3
Analog Input
White
X43
Digital Output
Grey
X42
Always use wire numbers and clear labels. This makes wiring changes and maintenance much faster.
Power and I/O Circuits
When you wire power and I/O circuits in your plc control panels, follow these best practices:
Replace old wiring instead of mixing it with new wires.
Use terminal strips and DIN rail terminals to organize wires at the cabinet entry.
Choose multi-tier terminal blocks for easy upgrades.
Follow color standards, like orange for live wires from remote panels.
Shield cables at one end only.
Keep wiring neat and organized for better troubleshooting.
Use a stable power supply for your plc.
Ground everything at a single point.
Keep power lines at least 10-15 cm away from signal lines.
Use shielded cables for all I/O signals.
Separate analog and digital signal cables.
Protect analog lines with twisted-pair shielded cables.
Label all wires and terminals.
Test wiring before powering up.
Safety Circuits
Safety is always a top priority in plc control panels. You want to protect both people and equipment. Common safety circuit designs include:
Emergency stop switches wired into master control relays to cut power to I/O devices.
Hardwired safety circuits that work even if the plc fails.
Safety relays that cut all power to the cabinet during emergencies.
Dual contactor setups for extra reliability.
Emergency stop buttons placed where operators can reach them quickly.
Note: Always design safety circuits to work independently of the plc controller for maximum protection.
Step-by-Step Guide: Test and Commissioning of PLC Cabinets
Getting your PLC cabinet up and running takes more than just flipping a switch. You need a step-by-step guide to make sure every part works as planned. The test and commissioning of plc cabinets is where you catch problems before they cause downtime. Let’s walk through each stage so you can feel confident about your system’s safety, configuration, and optimal performance.
Initial Power-Up
You want to start with a careful approach. Rushing this step can lead to missed issues or even damage. Here’s how you should handle the initial power-up:
Visual Inspection: Check every part of your plc cabinet. Make sure all modules, terminal blocks, relays, and wiring look right. Look for loose wires, missing screws, or anything out of place.
Check Utilities: Test fans, filters, and other utility items. Make sure the cabinet is grounded properly. This keeps you safe from electrical faults.
Power Up in Stages: Turn on the power supply for the plc controllers and I/O modules. Watch for healthy boot-up indicators. If your system has redundancy, check that backup power supplies and controllers work as expected.
Communication Check: Make sure your plc talks to the HMI or SCADA system. You want error-free data exchange before moving on.
I/O Loop Testing: Activate digital and analog inputs and outputs. Confirm that each one responds as it should. This step helps you spot wiring or configuration mistakes early.
Interlock and Sequence Testing: Follow your process sequence and test all safety interlocks. This ensures your system will shut down safely if something goes wrong.
Tip: Always document each step during initial power-up. Good records help with troubleshooting and future upgrades.
Program Upload
Now you’re ready to load your control program. This is where your configuration work pays off. Here’s what you should do:
Review the Program: Double-check your logic, address assignments, and timer/counter values. Make sure every output device has a matching rung in your program.
Safe Mode First: Put the plc in a safe mode (like STOP or PROGRAM) before uploading. This prevents accidental machine movement.
Upload and Verify: Load the program into the plc memory. Watch for any error messages or warnings. If you see a problem, fix it before moving forward.
Check Indicators: Look for diagnostic lights like AC OK, DC OK, processor OK, and I/O communication OK. These show your configuration is correct and the plc is ready for testing.
Note: If you use Linkewell’s electrical control panel, you get clear documentation and support for every step of the upload process.
Testing Procedures
Testing is the heart of commissioning. You want to make sure every part of your plc cabinet works together. Here’s how you can handle testing and configuration:
Static Input Testing: With power applied, manually activate each input device. Watch the plc’s indicators to confirm the signal reaches the right module.
Static Output Testing: Disconnect mechanical outputs for safety. Force each output ON using your programming device. Check that the right indicator lights up and the device energizes.
Dynamic System Checkout: Load your control program and test the logic in TEST or RUN mode. Start with outputs disabled or disconnected. Check each rung for correct operation. Bring the system under full automatic control in small sections if you have a large setup.
Final Testing: Run the entire system as it would operate in real life. Watch for unexpected behavior or alarms. Make sure all safety circuits and interlocks work as designed.
Testing and Configuration Records: Keep detailed notes on every test. This helps you track what you’ve checked and makes future troubleshooting easier.
Callout: Linkewell provides detailed test and commissioning of plc cabinets documentation. Their support team can help you with testing and configuration, so you never feel stuck.
Troubleshooting
Even with careful planning, you might run into issues during testing. Here’s a quick table to help you troubleshoot common problems in your plc cabinet:
Troubleshooting Method
Key Actions and Considerations
Troubleshooting Ground Loops
Look for multiple grounding paths. Connect shield to ground only on the plc side to avoid interference.
Diagnostic PLC Indicators
Use status LEDs to spot faults like power, memory, or communication errors.
Troubleshooting PLC Inputs
Isolate the problem to the field device, wiring, or input module. Use standby mode and voltage checks. Replace faulty modules.
Troubleshooting PLC Outputs
Check output indicators, verify power supply voltage, inspect fuses, and test output devices independently.
Troubleshooting the CPU
Check the power supply and diagnostic indicators. Replace the CPU if you see memory or communication faults.
Spare Parts Inventory Management
Keep at least 10% spare parts for common components. Have backups for CPU boards and power supplies to reduce downtime.
If you follow these troubleshooting steps, you can quickly find and fix most issues. Always use your configuration records and Linkewell’s documentation to guide your work.
Pro Tip: Good troubleshooting starts with good documentation. Keep your wiring diagrams, configuration files, and test results organized for fast problem-solving.
By following this step-by-step guide, you make sure your plc cabinet delivers reliable operation and optimal performance. Careful testing and configuration at every stage help you catch problems early and keep your automation system running smoothly. With Linkewell’s support and high-quality products, you can handle the final testing and commissioning with confidence.
Quality Assurance
Final Inspection
You want your PLC cabinet to work right the first time. Before you finish, do a final inspection. Check every control device, wire, and terminal. Look for loose screws, missing labels, or anything out of place. Use your checklist to make sure you did not miss a step. Turn on the cabinet and watch for any warning lights. If you see something odd, stop and fix it. This step helps you catch problems before they affect control or system performance.
Compliance Checks
You need to make sure your cabinet meets all industry standards. Review the wiring, labeling, and layout. Compare your work to UL, IEC, and local codes. Use a table to track each compliance item:
Compliance Item
Status
UL 508A
✅ Passed
IEC 61439
✅ Passed
Labeling
✅ Checked
Grounding
✅ Checked
If you find an issue, fix it right away. This keeps your control system safe and ready for operation.
Documentation
Good documentation makes your life easier. Keep all your wiring diagrams, control logic charts, and testing records in one place. Update your files after every change. When you need to troubleshoot or upgrade, you will thank yourself for having clear records. Share these documents with your team so everyone knows how the control system works.
Tip: Always include a copy of your testing checklist and results in your documentation folder.
Client Requirements
Your client may have special needs for control or testing. Ask for their feedback before you finish the project. Make sure the cabinet matches their control goals and performance expectations. If they want extra features, like remote monitoring or special alarms, add them now. Walk through the cabinet with your client and explain how each control part works. This builds trust and shows you care about their system’s performance.
When you follow a step-by-step guide for plc cabinet and control panel building, you set yourself up for success. You make sure every panel meets safety rules and supports strong control. Each panel you build helps your team work with more confidence. You get better control over your system and boost efficiency. Linkewell gives you trusted support for every panel project. Their solutions for plc cabinet and control panel building help you meet your control goals. If you want a panel that lasts, reach out to Linkewell for expert advice.
FAQ
How do I choose the right PLC cabinet size?
Start by listing all your components. Measure their dimensions and add space for wiring and airflow. Leave extra room for future upgrades. If you’re unsure, reach out to Linkewell for expert advice.
What certifications should my control panel have?
You want UL 508A or IEC 61439 certification. These standards ensure your panel meets safety and quality requirements. Always check with your local regulations, too.
Can I customize my electrical control panel?
Absolutely! You can request custom sizes, layouts, and features. Linkewell offers full customization, including branded labels and special enclosures. Just share your requirements with their team.
How often should I inspect or maintain my PLC cabinet?
Inspect your cabinet every six months. Look for loose wires, dust, or signs of wear. Regular checks help you catch problems early and keep your system running smoothly.
Conclusion
Building a PLC cabinet requires careful planning, adherence to safety standards (NFPA 70, UL 60947-4-1), and selecting modular, certified components. Focus on clear schematics, organized wiring, and proper cooling to ensure reliability. Linkewell’s expertise in how to build a PLC cabinet ensures durable, compliant solutions for industrial automation. Prioritize testing, documentation, and future scalability for optimal performance.
Air cooled fan systems prevent overheating in electrical enclosures, ensuring reliable performance and extending equipment lifespan through efficient ventilation.
Voltage used in the United States is crucial for anyone working with industrial electrical equipment. The USA primarily uses 120V and 240V systems, but knowing the differences, applications, and safety
To provide the best experiences, we use technologies like cookies to store and/or access device information. Consenting to these technologies will allow us to process data such as browsing behavior or unique IDs on this site. Not consenting or withdrawing consent, may adversely affect certain features and functions.
Functional
Always active
The technical storage or access is strictly necessary for the legitimate purpose of enabling the use of a specific service explicitly requested by the subscriber or user, or for the sole purpose of carrying out the transmission of a communication over an electronic communications network.
Preferences
The technical storage or access is necessary for the legitimate purpose of storing preferences that are not requested by the subscriber or user.
Statistics
The technical storage or access that is used exclusively for statistical purposes.The technical storage or access that is used exclusively for anonymous statistical purposes. Without a subpoena, voluntary compliance on the part of your Internet Service Provider, or additional records from a third party, information stored or retrieved for this purpose alone cannot usually be used to identify you.
Marketing
The technical storage or access is required to create user profiles to send advertising, or to track the user on a website or across several websites for similar marketing purposes.