
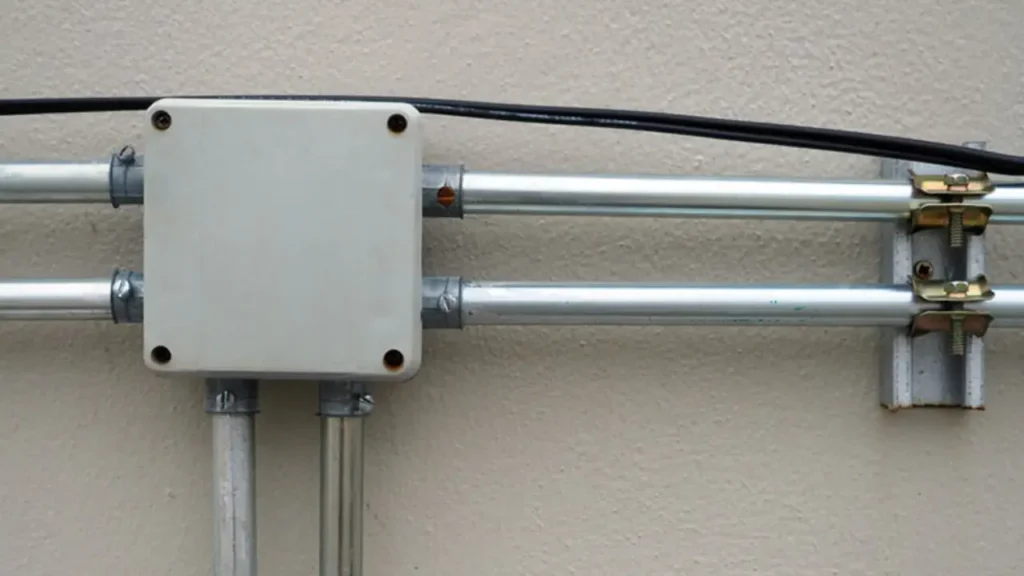
Connecting electrical conduit to junction boxes is a fundamental step in creating a safe and organized wiring system. Conduit protects wires from physical damage and environmental factors, while junction boxes serve as crucial points for splices, taps, or device installations. Mastering this connection ensures the integrity of your electrical raceway.
Properly connecting conduit involves selecting the right fittings and techniques specific to the conduit type being used. A secure connection is vital for maintaining grounding, protecting conductors, and meeting electrical code requirements. This guide will walk you through the essential steps for making reliable conduit-to-box connections.
What is Conduit
Electrical conduit is a durable tube or pipe used in electrical installations to protect and route electrical wires and cables. Made from materials like metal, plastic, or fiber, it shields wiring from physical damage, moisture, chemical vapors, and impacts.
Conduit systems provide a safe and organized pathway for conductors, allowing for easier future upgrades or maintenance compared to unprotected wiring methods.
How to Connect Conduit to a Junction Box
Connecting electrical conduit to a junction box is a fundamental step in safely and effectively routing electrical wiring. This process ensures mechanical protection for the conductors and maintains the integrity of the electrical system, preventing damage and potential hazards.
A secure junction box connection is vital for compliance with electrical codes and the long-term reliability of the installation. Taking the time to perform this task correctly is an investment in safety and functionality.
Step 1: Gather Necessary Tools and Materials
Before beginning the process of connecting conduit to a junction box, it’s crucial to assemble all the required tools and materials.
Here is a list of the necessary tools and materials mentioned for connecting various types of conduit (EMT, rigid, PVC, etc.) to a junction box:
- Conduit: The piping material used to protect electrical wires. This can be EMT (Electrical Metallic Tubing), rigid metal conduit, PVC (Polyvinyl Chloride) conduit, or other types depending on the application.
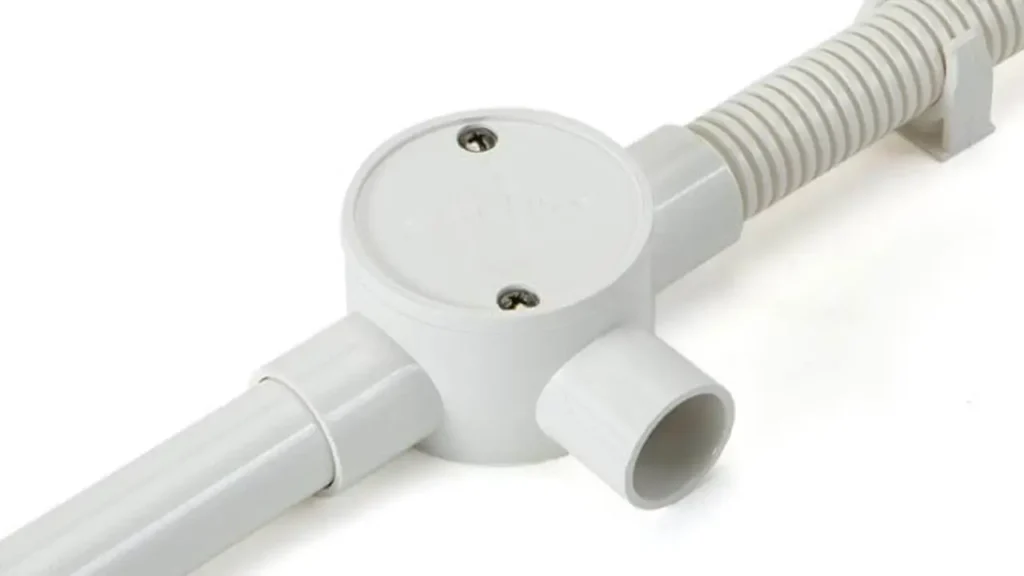
- Conduit Connector: A fitting used to physically attach the end of the conduit to the junction box. The type depends on the conduit (e.g., set-screw for EMT, compression, threaded) and the box knockout/hub.
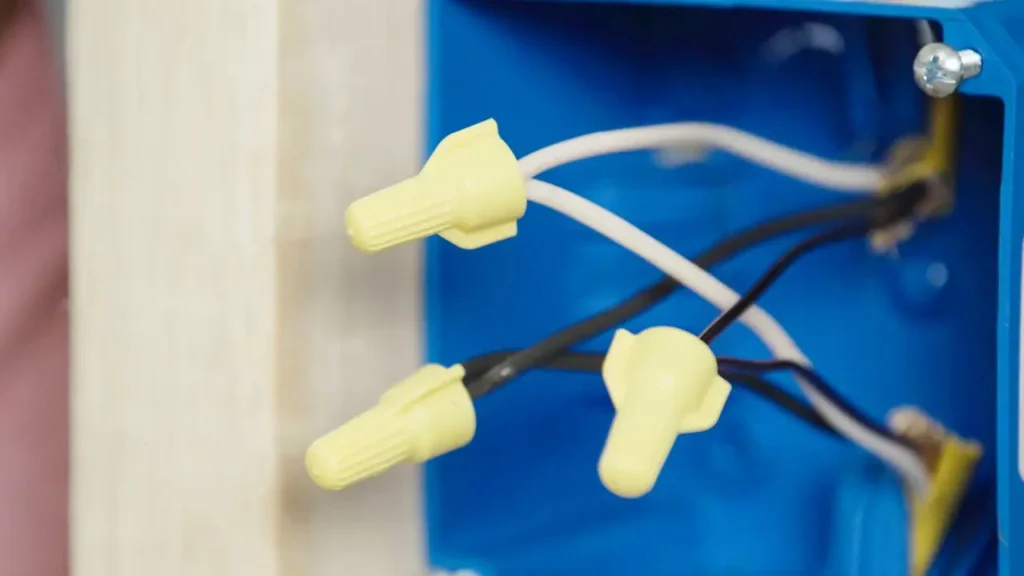
- Junction Box: An enclosure where electrical connections are made, devices are housed, and conduit runs terminate. It will have knockouts or threaded hubs for conduit attachment.
- Hacksaw or Conduit Cutter: Used to cut the conduit to the desired length. A conduit cutter is often specific to the type of conduit (e.g., a pipe cutter for PVC, a tube cutter for EMT).
- Reamer or File: Used to remove sharp edges and burrs from the cut end of metal conduit to protect wire insulation. (For PVC, a deburring tool or utility knife is used).
- Tape Measure: For accurately measuring the length of conduit needed.
- Marker: Used to mark the conduit where the cut needs to be made.
- Pliers or Channel Locks: Tools used for gripping and tightening conduit fittings, especially locknuts.
- Screwdriver: Needed if the conduit connector uses set-screws for attachment (common with EMT connectors).
- Knockout Punch or Drill with Hole Saw: Potentially needed if the junction box does not have pre-punched knockouts of the correct size, or if you need to create a new opening.
Step 2: Prepare the Conduit
Once you have your materials, the next step is to prepare the end of the conduit that will enter the junction box. Measure the required length of conduit and mark it accurately. Use a hacksaw or a specialized conduit cutter to make a clean, square cut. After cutting, the end of the conduit will have a sharp edge and burrs, which can damage the wire insulation as it’s pulled through.
It is essential to ream the inside and file the outside edge of the cut end of the conduit to remove any sharp edges and burrs. This creates a smooth surface that the wires can safely pass over without snagging or stripping their insulation. Failing to properly ream the conduit is a common mistake that can lead to frustrating wire pulls and potentially dangerous electrical shorts down the line.
Step 3: Install the Connector onto the Conduit
With the conduit cut and reamed, the next step is to install the appropriate conduit connector onto the prepared end. The method of attachment varies depending on the type of connector. For set-screw connectors on EMT, you slide the connector onto the conduit and then tighten the set-screws firmly and evenly using a screwdriver to secure the conduit within the fitting. For compression connectors, slide the compression nut and then the body onto the conduit, tighten the nut to compress a ring onto the conduit, creating a strong mechanical connection.
If you are using threaded rigid conduit, the conduit itself will thread directly into a threaded hub on the junction box or a threaded connector that then attaches to the box. Ensure the threads are clean and engage smoothly. For threadless connectors, common with some PVC applications or where threading isn’t feasible, follow the manufacturer’s specific instructions, which often involve gluing or a specific locking mechanism. Always ensure the conduit is fully inserted into the connector before tightening.
Step 4: Attach the Connector/Conduit to the Junction Box
Now, you will attach the connector, with the conduit secured to it, to the junction box. Junction boxes have pre-punched knockouts that can be removed to accept conduit connectors. Select a knockout of the correct size for your connector and remove it using a hammer and screwdriver, or a knockout punch for cleaner removal, especially in metal boxes. Insert the threaded end of the conduit connector through the removed knockout from the outside of the box.
On the inside of the junction box, secure the connector using the locknut provided with the fitting. Thread the locknut onto the connector and hand-tighten it initially. Ensure the connector is properly seated against the inside wall of the box. For connectors with integral threads that screw directly into a threaded box hub, simply thread the conduit or connector firmly into the hub.
Step 5: Tighten Connections and Ensure Security
The final step is to fully tighten all connections to ensure a secure and robust attachment between the conduit and the junction box. Use pliers or channel locks to firmly tighten the locknut on the inside of the box against the box wall. This creates a strong mechanical bond and ensures good electrical continuity between the conduit and a metal box, which is important for grounding. Avoid overtightening, which can damage the box or the connector.
For set-screw and compression connectors, double-check that the set-screws or compression nuts are fully tightened according to the manufacturer’s specifications. A properly tightened connection will prevent the conduit from pulling out of the box and will maintain the integrity of the electrical system. Give the conduit a gentle tug to verify it is securely fastened to the junction box before proceeding with pulling wires or closing the box.
How to Connect PVC Conduit to Junction Box
Connecting PVC conduit to a junction box is a common task in electrical installations, providing a durable and corrosion-resistant path for wiring. Proper connection is essential to maintain the system’s integrity, protecting wires from environmental factors and physical damage.
Unlike metal conduit, PVC requires specific preparation and adhesive techniques to ensure a secure, watertight, and compliant connection, guaranteeing long-term reliability and safety for your electrical system.
Step 1: Gather Necessary Tools and Materials
Connecting PVC conduit to a junction box requires specific tools and materials designed for plastic piping. You will need PVC conduit of the appropriate size, PVC conduit adapters or male terminal adapters (which have male threads on one end and a socket for gluing PVC on the other), a hacksaw or a specialized PVC cutter, a deburring tool or utility knife, PVC primer (usually required by code), PVC cement (matched to the conduit size and type), the junction box, and locknuts (typically plastic for non-metallic boxes or metal for metal boxes).
Here is a list of the necessary tools and materials required for connecting PVC conduit to a junction box, along with a brief explanation for each item:
- PVC Conduit: The main material for the wiring path. Choose the correct diameter and schedule (typically Schedule 40 for electrical applications) suitable for your project and local electrical codes.
- PVC Conduit Adapters (Male Terminal Adapters): These fittings have a socket on one end to accept the PVC conduit and male threads on the other end to screw into the junction box knockout or hub. Ensure the adapter size matches the conduit size.
- Junction Box: The enclosure where conduit runs terminate and wires are spliced or devices are installed. Select a box type appropriate for the installation location (e.g., indoor, outdoor, weather-resistant) and with knockouts or hubs that match your conduit size and adapter type.
- Hacksaw or PVC Cutter: Used to cut the PVC conduit to the required length. A dedicated PVC cutter provides a quicker, cleaner, and squarer cut, which is beneficial for gluing.
- Deburring Tool or Utility Knife: Essential for removing sharp edges and burrs from the inside and outside of the cut conduit end. This prevents damage to wire insulation during pulling.
- PVC Primer: A solvent-based cleaner and softener applied before the cement. It prepares the PVC surface for bonding, ensuring a strong, fused joint. Often purple or clear; check local code requirements.
- PVC Cement: A solvent-based adhesive that chemically fuses the PVC conduit and adapter together, creating a strong, airtight, and watertight seal. Use cement specifically designed for PVC conduit and appropriate for the application’s temperature range.
- Applicators (Daubers or Brushes): Small applicators, often included with primer and cement cans or sold separately, used to apply the liquids evenly and efficiently to the conduit and fitting surfaces.
- Locknuts: Used to secure the threaded end of the PVC adapter to the junction box knockout. These can be plastic (common for non-metallic boxes) or metal (used with metal boxes to ensure grounding continuity).
- Pliers or Channel Locks: Needed to tighten the locknut onto the adapter inside the junction box, creating a secure mechanical connection.
- Tape Measure and Marker: For accurately measuring and marking the conduit before cutting.
Step 2: Prepare the PVC Conduit
Just like with other conduit types, the end of the PVC conduit needs proper preparation before connecting it to the junction box. Measure and mark the desired length of the PVC conduit. Use a PVC cutter, which makes a clean, square cut with less effort than a hacksaw, or a fine-toothed hacksaw if a cutter isn’t available. Make the cut as straight as possible to ensure maximum contact surface for gluing.
After cutting, the inside and outside edges of the conduit end will have burrs. These burrs must be removed to prevent damage to the wire insulation during pulling. Use a deburring tool specifically designed for conduit or a utility knife to carefully chamfer the edges, smoothing both the inside and outside surfaces. A clean, smooth, and square-cut end is crucial for a strong, sealed connection when using PVC cement.
Step 3: Apply PVC Cement and Primer
Unlike metal conduit, PVC connections rely on a chemical bond created by primer and cement. First, apply PVC primer to both the outside end of the PVC conduit and the inside socket of the PVC adapter. The primer cleans the surfaces and softens the plastic, preparing it for the cement. Use a dauber or brush to apply a liberal, even coat, rotating the conduit and adapter to ensure full coverage. Work quickly as primer evaporates fast.
Immediately after applying primer, apply a uniform layer of PVC cement to both the primed outside end of the conduit and the inside of the adapter’s socket. Use the correct size dauber for the conduit diameter to ensure adequate coverage. The cement chemically fuses the two pieces of plastic together. Be generous with the cement, but avoid excessive runs that could drip into the conduit interior.
Step 4: Install the PVC Adapter onto the Conduit
Once the primer and cement have been applied, quickly insert the prepared end of the PVC conduit firmly into the socket of the PVC adapter. Push the conduit all the way into the socket until it bottoms out. Give the conduit a slight twist (about a quarter turn) as you push it in. This twisting motion helps distribute the cement evenly and ensures full contact between the two surfaces, maximizing the strength of the chemical bond.
Hold the conduit and adapter together firmly for about 10-30 seconds (check the cement manufacturer’s instructions for the exact time). This is crucial to prevent the conduit from pushing back out of the adapter as the cement begins to set. The cement creates a strong bond relatively quickly, but full cure strength takes longer. Avoid disturbing the joint for the time recommended by the cement manufacturer.
Step 5: Attach the PVC Adapter/Conduit to the Junction Box
Now that the PVC adapter is securely attached to the conduit, you can connect this assembly to the junction box. Junction boxes designed for PVC conduit often have integral hubs, or you will use a box with knockouts suitable for threaded connectors. If using a box with knockouts, select the correct size knockout and remove it. Insert the threaded end of the PVC adapter through the removed knockout from the outside of the box.
On the inside of the junction box, thread the appropriate locknut onto the adapter. For non-metallic boxes, use the plastic locknut provided with the box or adapter. For metal boxes, use a metal locknut. Thread the locknut onto the adapter until it is hand-tight against the inside wall of the box. If the box has threaded hubs, simply thread the male end of the adapter directly into the hub.
Step 6: Verify the Connection
The final step involves securely tightening the connection and allowing the PVC cement to cure properly. Use pliers or channel locks to firmly tighten the locknut against the inside surface of the junction box. This pulls the adapter snugly against the box wall, creating a secure mechanical connection. Be careful not to overtighten, especially with plastic locknuts, as this can strip the threads or crack the box.
After tightening the locknut, ensure that the PVC adapter is firmly attached to both the conduit and the junction box. Allow the PVC cement joint to cure for the time recommended by the manufacturer before pulling wires through the conduit. This curing time is essential for the joint to reach sufficient strength to withstand the stresses of wire pulling and environmental conditions. A properly glued and secured connection will be rigid and stable.
Junction Box Connection Methods
Selecting the appropriate method for connecting conduit to a junction box is crucial for ensuring a secure, safe, and code-compliant electrical installation. The choice of connection method depends primarily on the type of conduit being used and the design of the junction box, each offering distinct advantages and installation techniques for various applications.
Threaded Connection
This method is commonly used with rigid metal conduit (RMC) and intermediate metal conduit (IMC), which have threads on their ends. A threaded fitting or the conduit itself screws directly into a threaded hub on the junction box. For boxes with knockouts, a threaded connector with a locknut is used; the connector screws onto the conduit end, passes through the knockout, and is secured with a locknut inside the box. This method provides a very strong mechanical connection and excellent ground continuity for metal conduits.
Set-Screw Connection
Primarily used for EMT (Electrical Metallic Tubing), the set-screw method involves a connector body that slips over the smooth end of the EMT conduit. Small set-screws on the connector are then tightened down onto the conduit surface, biting into the metal to secure the tube within the fitting. The other end of the connector is typically threaded and attaches to the junction box knockout using a locknut. This method is relatively quick and easy for thinner-walled EMT.
Compression Connection
Another method frequently used for EMT, and sometimes flexible metal conduit, is the compression connection. A compression connector consists of a body, a compression ring (or gland), and a nut. The conduit is inserted into the connector body, the compression ring slides over the conduit, and the nut is tightened down onto the body, compressing the ring onto the conduit surface. This creates a secure, raintight (when specified) seal and a strong mechanical grip, and the connector’s threaded end then attaches to the box with a locknut.
PVC Glue/Solvent Weld Connection
For PVC conduit, the connection to a junction box is typically made using a PVC male terminal adapter and PVC solvent cement. The adapter has a socket end that is glued onto the smooth end of the PVC conduit using primer and cement, creating a fused joint. The other end of the adapter has male threads which pass through a knockout in the junction box and are secured with a plastic or metal locknut. This method creates a rigid, sealed, and corrosion-resistant connection suitable for damp or corrosive environments.
Conclusion
Connecting conduit properly to a junction box is a critical step in any electrical installation. It ensures the physical protection of the wiring inside the conduit and maintains the integrity of the entire electrical system. Correct connections prevent wire damage, protect against environmental factors, and are essential for meeting safety standards and electrical code requirements, minimizing risks like shorts or fires.
The process involves selecting the appropriate type of conduit fitting (e.g., set-screw, compression) that matches both the conduit material and size, as well as the knockout size on the junction box. Securing the fitting tightly to the box opening and ensuring the conduit is properly seated in the fitting are key steps to create a continuous, protected pathway for the conductors.
For professionals needing reliable supplies, obtaining high-quality components is paramount. Ensure your projects have the best start by sourcing your materials from a trusted provider. Contact Linkwell Electrics today to inquire about our range of wholesale junction boxes and conduit fittings for your electrical needs.


