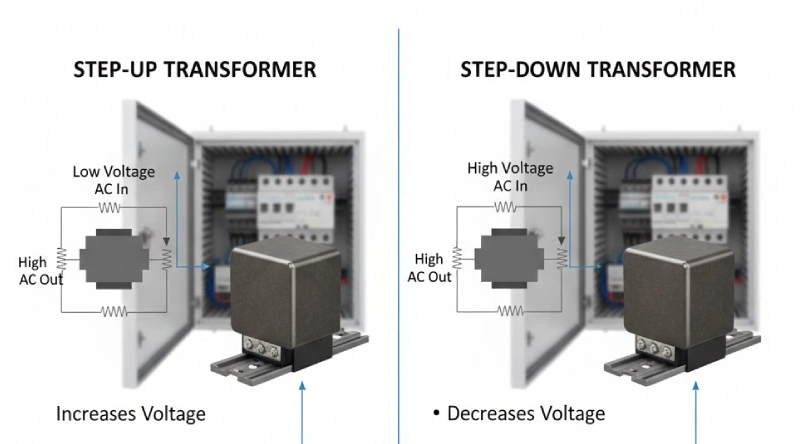
If you want to learn how to connect step down transformer or ac step down transformer Always review the wiring diagram before starting. Keep in mind that safety is the top priority in every transformer installation. Use the appropriate wiring tools and adhere to all safety guidelines for transformer wiring.
Checklist Before You Start Wiring:
- Turn off all power
- Gather your wiring tools
- Wear safety gear
- Confirm transformer wiring diagram
- Plan the installation and double-check wiring routes
By following these steps on how to connect step down transformer, you reduce risks during wiring and installation. This guide will assist you with wiring, including how to connect step down transformer, grounding, and testing. Whenever you wonder how to connect step down transformer, always prioritize safety and wiring accuracy.

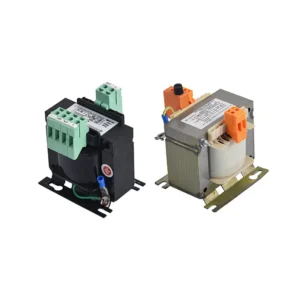
Recommended products

Step Down Transformer Key Takeaways
- Always turn off power and wear proper safety gear before wiring a step down transformer to avoid electrical hazards.
- Identify primary and secondary terminals carefully using the wiring diagram to ensure correct and safe connections.
- Choose the right wire gauge based on transformer size to prevent overheating and maintain efficiency.
- Ground the transformer properly following electrical codes to protect against shocks and equipment damage.
- Test and inspect all wiring before powering up to confirm correct installation and prevent future problems.
Safety Precautions
When you start wiring a step down transformer, you need to follow strict safety precautions. These guidelines help you avoid electrical hazards and keep your installation safe and reliable. Let’s break down the most important safety steps for wiring a low-voltage transformer in an electrical cabinet.
Electrical Hazards
You face several risks when wiring a transformer. Arc flash incidents can cause severe burns and injuries. Electric shock is a real danger if you touch live parts, so always treat every transformer as energized until you confirm otherwise. Fire and explosion risks can happen if you overload the transformer or ignore proper grounding. Chemical hazards may exist in older transformers, but most low-voltage transformer models in cabinets use safer materials. Regular maintenance, like checking insulation and connections, helps prevent failures. Always keep a safe distance from energized equipment and restrict access to authorized personnel.
- Arc flash and electric shock risks
- Overloading and improper grounding
- Fire and explosion hazards
- Importance of regular inspection and maintenance
Tip: Always de-energize the transformer before wiring. Use insulated tools and wear protective equipment to reduce risks.
Personal Protective Equipment
You need the right PPE for transformer wiring. OSHA requires head protection, hearing protection, foot protection, and arc-rated clothing for electrical work. For low-voltage transformer installations, gloves, safety glasses, and face shields are essential. If you work near energized parts, always follow the “two-person rule” for extra safety. PPE helps protect you from burns, shocks, and flying debris, but it’s not a substitute for proper wiring procedures.
- Wear gloves, safety glasses, and face shields
- Use arc-rated clothing for higher energy exposure
- Always work with a partner when wiring energized equipment
Compliance and Codes
You must follow electrical guidelines and codes for every transformer installation. In the United States, the National Electrical Code (NEC) sets standards for wiring, grounding, and transformer safety. UL Listing and IEEE/ANSI standards ensure your transformer meets safety requirements. For low-voltage transformer wiring, NEC covers voltage standards, wire sizes, and ground wire rules. Local codes may add extra requirements, so always check before starting. Insurance providers often require compliance with these codes for coverage.
- NEC and UL Listing for transformer safety
- IEEE/ANSI standards for design and testing
- Local codes and insurance requirements
Note: Following safety precautions and electrical guidelines reduces the risk of electrical injuries. Each year, thousands of workers suffer electrical injuries, many from improper wiring or failure to follow lockout/tagout procedures. You can prevent most accidents by sticking to these safety steps.
Step Down Transformer Wiring Guide
Connecting a step down transformer in an electrical cabinet might seem tricky, but you can do it safely by following a clear wiring guide. Let’s break down the wiring process step by step, so you know exactly how to connect step down transformer and avoid common mistakes.
Identify Terminals
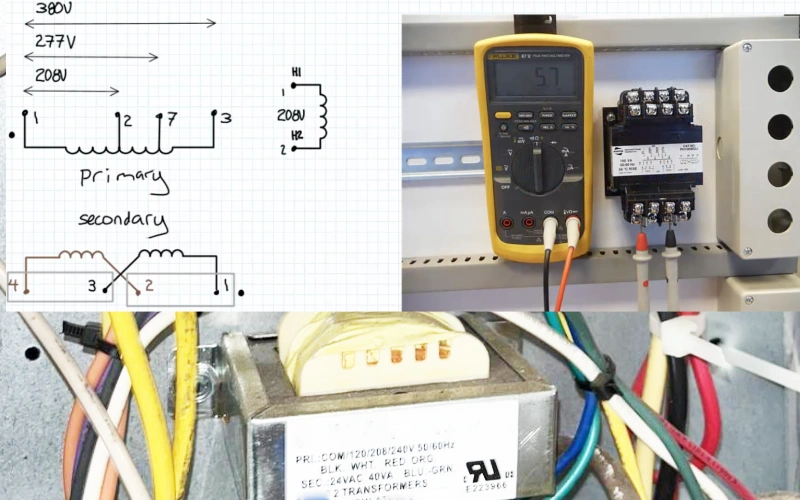
Before you start any wiring, you need to identify the primary and secondary terminals on your step-down transformer. This is a crucial part of the transformer wiring process. Here’s how you can do it using the wiring diagram and manufacturer’s schematic:
- Look at the transformer’s nameplate and wiring diagram. You’ll find terminal designations, voltage ratings, and polarity information there.
- Find the primary terminals. These are usually labeled H1, H2, H3, or similar. They mark the high voltage or input side.
- Locate the secondary terminals. You’ll see labels like X1, X2, X3, which show the low voltage or output side.
- Check for dot markings or notes in the wiring diagram. These show winding polarity, which helps you wire a transformer correctly.
- Always read the installation manual and wiring diagram from the manufacturer. This ensures you connect everything safely and accurately.
Tip: If you mix up the terminals, you risk inaccurate current readings, faulty protection, and unsafe grounding. Always double-check the wiring diagram before you wire a transformer.
Incorrect terminal identification can cause several problems:
- You might wire a transformer incorrectly, leading to inaccurate current readings.
- Protective relays may not work, so faults go undetected.
- Improper grounding can let fault currents flow in unsafe paths.
- Poor crimping or insulation mistakes can increase the risk of faults.
Wire Gauge Selection
Choosing the right wire gauge is a key part of the transformer wiring guide. The wire size affects both safety and transformer efficiency. The National Electrical Code (NEC) gives clear guidelines for wire gauge selection based on transformer power ratings and the wiring diagram.
| Wire Gauge | Approximate Ampacity (A) | Typical Application |
|---|---|---|
| 12 AWG | 20 | Small transformers (~9 kVA) with 20 A breakers |
| 14 AWG | 15 | Light loads, not usually for transformer secondaries |
| 600 kcmil | 420 | Large transformers (~300 kVA), used in parallel |
When you wire a transformer, always match the wire gauge to the current rating shown in the wiring diagram. For small low-voltage transformer installations, 12 AWG is common. For larger loads, you may need thicker wires or multiple conductors per phase.
Wire gauge selection also affects voltage drop. Thicker wires (lower AWG numbers) have less resistance, so they reduce voltage drop and heat. This is especially important in low-voltage transformer circuits, where even a small voltage drop can affect performance. If your wiring runs are long, use thicker wires to keep voltage drop low and maintain transformer efficiency.
Primary Side Connection
Now, let’s get into the wiring process for the primary side of your step-down transformer. Follow these steps for a safe and reliable installation:
- Turn off the power supply. Wear insulating gloves and goggles for safety.
- Make sure your step down transformer matches the voltage and load requirements in your wiring diagram.
- Mount the transformer securely in a dry, safe spot inside the electrical cabinet.
- Identify the primary terminals (H1, H2) using the wiring diagram.
- Strip insulation from the power supply wires. Crimp wire lugs for a solid connection.
- Connect the power supply wires to the primary terminals (H1 and H2).
- Attach the transformer’s grounding terminal to the cabinet’s grounding system.
- Double-check all wiring connections for tightness and correct placement.
- Test the wiring with a multimeter before turning the power back on.
- Once everything checks out, power up the transformer and verify the secondary voltage output.
- Cover all terminal boxes and label the wiring for future maintenance.
Note: Always follow the wiring diagram and torque specifications from the manufacturer. Secure connections help prevent overheating and reduce fire risk.
Secondary Side Connection
Wiring the secondary side of a step down transformer is just as important as the primary. Here’s how to wire a transformer’s secondary side safely:
- Identify the secondary terminals (X1, X2) using the wiring diagram. X1 is usually the hot side, and X2 is neutral or ground.
- Remove insulation from the wires and crimp lugs for a secure fit.
- Connect X1 to the load’s power input. Connect X2 to the load’s neutral and the grounding structure.
- Bond the X2 terminal to the grounding system. This prevents floating neutral issues and keeps the output voltage stable.
- Follow all manufacturer instructions and wiring diagram details for your specific low-voltage transformer.
If you wire a transformer’s secondary side incorrectly, you risk exposing the output to dangerous voltages, especially if insulation fails. Always check your wiring with a multimeter. Measure voltage between hot and neutral, and between hot and ground, to confirm everything matches the wiring diagram.
⚡ Alert: Never leave the secondary side open or disconnected when the transformer is energized. This can create dangerously high voltages and pose a serious shock hazard.
Grounding Methods
Proper grounding is essential for every transformer wiring guide. Good grounding protects you and your equipment from electrical shock and damage. Here’s how to ground your step-down transformer according to electrical standards:
- Use equipment grounding conductors in all circuits, not just the raceway.
- Size grounding conductors equal to phase conductors for better fault clearing.
- Bond all metal enclosures, raceways, and boxes into one continuous system.
- Use copper conductors rated for the system’s maximum fault current.
- Keep grounding resistance below 5 ohms for best protection.
- Size grounding conductors based on NEC guidelines, transformer KVA, and installation method.
- Securely connect grounding electrode conductors to electrodes with listed clamps.
- Keep conductor runs short and protect them from damage with conduit.
- Integrate the grounding system with the building’s main grounding electrode.
- Install dedicated neutral conductors and keep neutral and ground separate, except at the main service disconnect.
- Add surge protection devices at key points.
- Inspect and test the grounding system regularly.
| Aspect | Explanation |
|---|---|
| Low-impedance path | Grounding provides a safe path for fault currents, reducing shock risk. |
| Overcurrent device operation | Proper grounding ensures breakers and fuses trip during faults. |
| Voltage stabilization | Grounding keeps voltage levels steady, protecting sensitive equipment. |
| Equipment protection | Low ground impedance prevents voltage drops and electrical noise. |
Tip: Good grounding is your best defense against electrical shock, fires, and equipment damage. Always follow the wiring diagram and NEC rules for grounding in every transformer installation.
By following this transformer wiring guide, you can wire a transformer safely and keep your low-voltage transformer installation reliable. Always use the wiring diagram, double-check your wiring, and never skip grounding. If you ever feel unsure about how to connect step down transformer, consult a licensed electrician or refer to the manufacturer’s transformer wiring guide.
Testing and Inspection
Final Connection Check
Before you power up your transformer, you need to inspect every part of your wiring. Start by checking the wiring diagram again. Make sure each wire matches the diagram and that you have not missed any connections. Tighten all terminal screws and look for signs of overheating or loose wires. Examine both the primary and secondary sides of the transformer wiring. Confirm that the ground and neutral connections are secure and follow the wiring diagram exactly. If your transformer has a fuse block, check that the fuse is present and intact.
Here’s a quick checklist for your final connection check:
- Inspect all wiring for tightness and correct placement.
- Compare your setup to the wiring diagram.
- Check for any signs of damage or overheating.
- Make sure the ground wire is connected as shown in the wiring diagram.
- Look at the terminal board and confirm all bolts are torqued properly.
- Test insulation resistance between windings and ground.
- Record your inspection results for future reference.
Tip: Always de-energize the transformer before touching any wiring. Use lockout/tagout procedures for extra safety.
Output Voltage Test
Once you finish your wiring inspection, it’s time to test the output voltage. Use a multimeter to measure the voltage at the secondary terminals. Compare your reading to the expected value from the wiring diagram. Most step down transformers allow for small voltage adjustments. You can use the tap changer to fine-tune the output. Industry standards say the output voltage should stay within ±5% of the nominal value. Here’s a table to help you understand tap settings:
| Tap Position | Percentage Change | Description |
|---|---|---|
| +5% | +5% | Increases output voltage above nominal |
| +2.5% | +2.5% | Slight increase above nominal |
| Nominal | 0% | Standard nominal voltage |
| -2.5% | -2.5% | Slight decrease below nominal |
| -5% | -5% | Reduces output voltage below nominal |

If your voltage is outside this range, check your wiring diagram and inspect the transformer wiring for errors. Sometimes, a small wiring mistake can cause big voltage problems.
Troubleshooting
If your transformer wiring does not work as expected, don’t worry. Many common issues have simple fixes. Here are some troubleshooting steps you can follow:
- Double-check the wiring diagram and make sure every wire is in the right place.
- Look for confusion between neutral and ground wires. Mixing these up can cause protective devices to trip.
- Inspect for short circuits between the transformer windings and the metal case.
- Use a multimeter to test both input and output voltages. Disconnect the low voltage wiring to isolate the transformer if needed.
- Examine the wiring for breaks, loose connections, or signs of overheating.
- If you hear abnormal sounds or see tripped breakers, stop and review your wiring diagram and transformer wiring.
- For low or no output, verify the transformer’s rating and make sure you used the correct type for your equipment.
- Check for blown fuses in the secondary circuit and replace them if needed.
Alert: Never ignore strange noises or smells from your transformer. These can signal serious wiring problems or internal faults.
Regular maintenance keeps your transformer safe and reliable. Inspect your wiring and transformer wiring daily for leaks, loose wires, or overheating. Tighten connections monthly and test insulation yearly. Always use your wiring diagram as your guide for every inspection and repair.
You now know that every step in wiring a small transformer matters for safety and reliability. When you prepare your wiring, check each connection, and follow safety rules, you help prevent early transformer failures. Many transformer issues come from improper wiring or skipping tests, so always double-check your wiring. Use the right wiring tools and never rush the wiring process. If you face a complex or high-voltage transformer job, reach out to a licensed technician with transformer training and hands-on wiring experience. Remember, even the secondary wiring can be dangerous. Always wear safety gear, isolate the transformer, and follow lockout/tagout steps. Your wiring choices protect you and your equipment. Safety and compliance should always guide your wiring work.
FAQ
What tools do you need for wiring a step down transformer?
You need wire strippers, screwdrivers, a multimeter, and crimping tools. Always use insulated tools for safety. These help you make secure wiring connections and check voltage.
How do you know if your wiring is correct?
Check your wiring against the diagram from the manufacturer. Use a multimeter to test voltage at the terminals. If you see the expected output, your wiring is likely correct.
Can you connect the ground and neutral together in transformer wiring?
No, you should keep ground and neutral separate except at the main service disconnect. Mixing them in transformer wiring can cause safety problems and trip breakers.
What should you do if the transformer wiring gets hot?
Turn off power right away. Hot wiring means there could be a loose connection or overload. Inspect all wiring, tighten connections, and check the wire gauge. Replace damaged wires before restarting.
Why does your transformer wiring need regular inspection?
Regular inspection helps you find loose wires, overheating, or insulation problems. This keeps your wiring safe and prevents transformer failure. You protect your equipment and avoid electrical hazards.
Conclusion
Learning How to Connect Step Down Transformer safely ensures reliable performance, equipment protection, and user safety. From identifying terminals to grounding and final inspection, every step matters. Always follow wiring diagrams, use proper tools, and comply with electrical codes. By focusing on safety and accuracy, you minimize risks, extend transformer life, and guarantee stable output for your applications. For complex projects, consult a licensed professional.