
Crimping ring terminals correctly is a fundamental skill for anyone working with electrical wiring. A proper crimp ensures a robust, electrically sound connection, crucial for safety and optimal performance. Conversely, a poorly crimped terminal can lead to dangerous overheating, intermittent power, or complete system failure.
This step-by-step guide will walk you through the precise process of crimping ring terminals. We’ll cover everything from preparing your wire to verifying the final connection, empowering you with the knowledge and confidence to achieve professional-grade results on all your electrical projects.
What are Ring Terminals?


Ring terminals are electrical connectors featuring a closed circular end and a barrel for wire insertion. They provide highly secure, vibration-resistant connections by being fastened under a screw or stud. Ideal for demanding applications, they ensure reliable electrical conductivity and prevent accidental disconnections.
How to Crimp Ring Terminals?
Crimping ring terminals accurately is a critical skill for creating robust and reliable electrical connections. A precise crimp ensures optimal conductivity, minimizes resistance, and prevents potential hazards. Mastering this process is essential for anyone involved in electrical work, guaranteeing long-lasting and safe installations.
Following the correct step-by-step procedure is paramount. Each stage contributes to the overall integrity of the connection, from meticulous wire preparation to the final verification. This comprehensive guide will walk you through the entire process, ensuring every crimp meets professional standards.
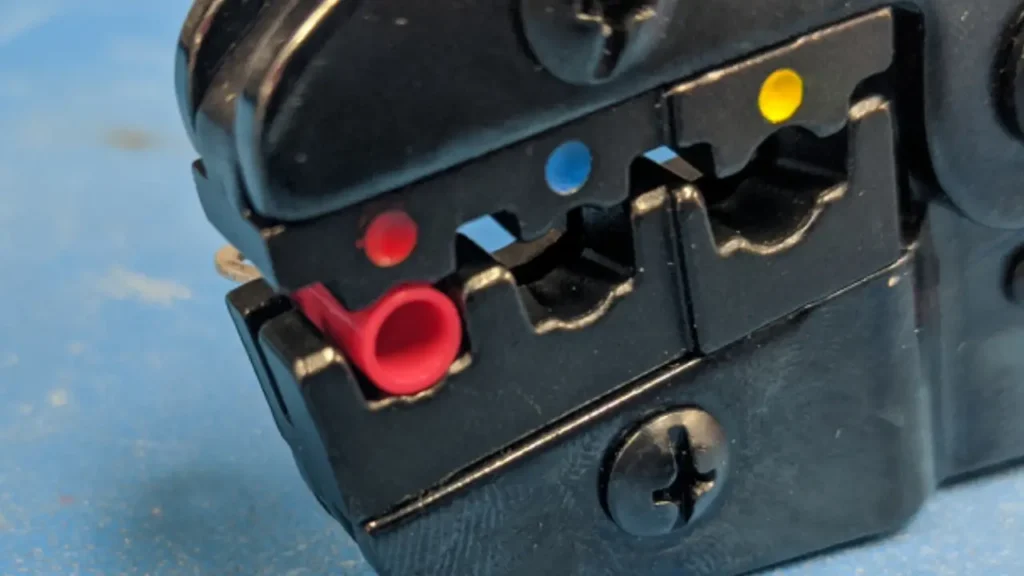
Crimping Tool for Ring Terminal
A specialized crimping tool is absolutely essential for properly installing ring terminals, transforming a simple wire and terminal into a secure, conductive, and reliable connection. Unlike ordinary pliers, a dedicated crimper is designed to uniformly deform the terminal barrel around the wire, creating a “cold weld” that ensures maximum electrical contact and mechanical strength.
Using the correct crimping tool prevents under-crimping (leading to loose connections and resistance) and over-crimping (which can damage the wire strands or the terminal itself), both of which can lead to dangerous overheating or system failure. Investing in the right crimping tool is crucial for safe, efficient, and professional electrical work.
- Proper Die Matching: Crimping tools have specific dies (jaws) designed to match the various sizes and types of ring terminals, ensuring the correct amount of pressure and deformation.
- Ratcheting Mechanism: Many professional crimpers feature a ratcheting mechanism that prevents the jaws from opening until a full, complete crimp cycle has been achieved, ensuring consistent pressure.
- Ergonomic Design: Good crimping tools are designed for comfortable use, reducing hand fatigue, especially during repetitive tasks.
- Durability: High-quality tools are built from robust materials to withstand repeated use and deliver consistent performance over time.
- Versatility: Some tools offer interchangeable dies, allowing a single tool to be used for multiple terminal types and sizes, increasing their utility.
Step 1: Gather Your Tools and Materials
Before beginning, ensure you have all necessary items: the correct gauge wire, appropriate ring terminals (matching wire gauge and stud size), a high-quality wire stripper, and a specialized crimping tool. Using the right tools is non-negotiable for achieving a reliable and safe crimp, preventing damage to both the wire and terminal.
Having the correct crimping tool is especially vital. Avoid using pliers or non-specialized tools, as these will deform the terminal incorrectly, leading to a weak electrical connection and potential safety risks. Match the crimping tool’s die size to the terminal’s wire gauge for a perfect compression.
Step 2: Select the Correct Ring Terminal
Choose a ring terminal that precisely matches both your wire’s gauge (AWG or mm²) and the diameter of the stud or screw it will connect to. An ill-fitting terminal will either result in a loose connection or be impossible to crimp properly, compromising both electrical integrity and mechanical security.
Verify the terminal’s material is suitable for your application, considering conductivity and corrosion resistance. For example, high-purity copper terminals are excellent for general use, while tin-plated versions offer enhanced protection in corrosive environments. Ensure the insulation type (if applicable) meets your temperature and electrical isolation requirements.
Step 3: Strip the Wire Insulation
Carefully strip the insulation from the end of the wire. The stripped length should exactly match the metal barrel length of the ring terminal. Use a wire stripper adjusted to the correct gauge to ensure a clean cut, avoiding any nicks or cuts to the copper strands themselves, which could weaken the wire.
Inspect the stripped wire for any damaged or stray strands. All individual strands must remain intact and tightly bundled. A precise strip without damaging the conductor is fundamental for maximizing the surface contact inside the terminal’s barrel, which directly impacts the connection’s conductivity and strength.
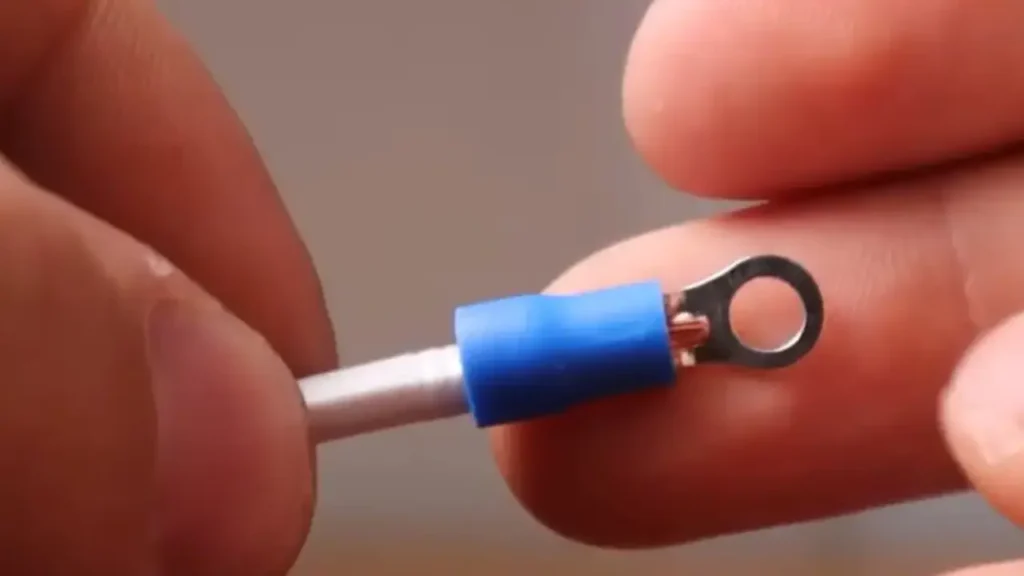
Step 4: Insert Wire into Terminal Barrel
Gently twist the stripped wire strands together to prevent fraying and then fully insert them into the metal barrel of the ring terminal. Ensure that no stray strands are protruding outside the barrel. The insulation should butt up snugly against the base of the terminal’s barrel, providing proper strain relief and insulation integrity.
Confirm that all wire strands are fully seated within the barrel. Any strands left outside will not be properly crimped and can lead to reduced conductivity or even short circuits. Proper insertion is crucial for achieving the full benefits of the crimp, ensuring all conductive material is engaged.
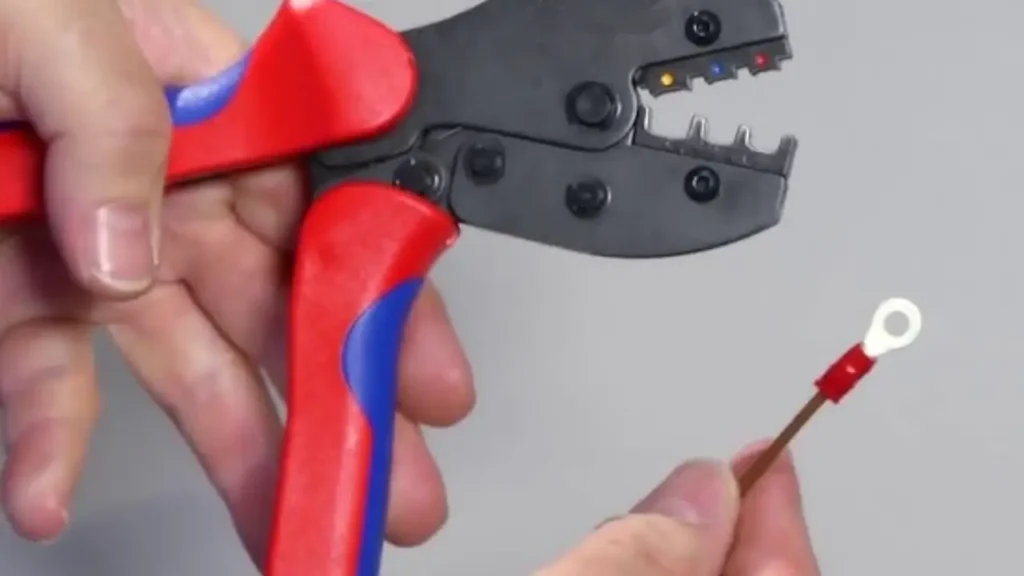
Step 5: Crimp the Terminal
Position the terminal and wire into the correct crimping die on your crimping tool, matching the terminal’s gauge. Squeeze the crimping tool’s handles firmly and completely until the tool’s ratcheting mechanism (if present) releases. This action will uniformly compress the barrel around the wire, creating a cold weld.
A successful crimp will deform the terminal barrel tightly around the wire strands, establishing both a strong mechanical bond and an excellent electrical connection. Avoid over-crimping, which can cut the wire strands, or under-crimping, which results in a loose and unreliable connection prone to overheating.
Step 6: Perform a Pull Test
Once crimped, perform a gentle but firm pull test on the wire. The wire should be securely held within the terminal barrel and should not budge or pull out. This simple mechanical test confirms the integrity of your crimp, verifying that a strong bond has been formed between the conductor and the terminal.
A failed pull test indicates an improper crimp, likely due to incorrect tool selection, insufficient pressure, or a mis-matched wire/terminal size. Re-crimp only if using a non-insulation displacement type; otherwise, cut and start with a new terminal to ensure reliability.
Step 7: Inspect the Crimp and Insulate (if necessary)
Visually inspect the crimped area. It should appear uniform and compressed, without sharp edges, exposed wire strands outside the crimp, or signs of over-stressing the terminal material. For non-insulated terminals, apply appropriate insulation such as heat-shrink tubing to protect against shorts and environmental factors.
Ensure the final connection is clean and robust. If using insulated terminals, check that the insulation is intact and fully covers the crimped area up to the wire jacket. This final inspection step confirms both the electrical safety and the long-term durability of your crimped ring terminal.
Proper Way to Crimp a Ring Terminal
Ensuring a reliable electrical connection hinges on the proper crimping of a ring terminal. A correctly executed crimp is critical for optimal conductivity, mechanical strength, and overall system safety, preventing future issues like resistance buildup or disconnections.
While there are various tools, the fundamental principle remains consistent: applying the right pressure to deform the terminal around the wire. Mastering this technique guarantees a professional and long-lasting termination for all your wiring projects.
Using a Manual Ratcheting Crimper
Manual ratcheting crimpers are a popular choice for their precision and consistency. These tools feature a mechanism that prevents the jaws from releasing until a full crimp cycle is completed, ensuring uniform pressure and preventing under-crimping. This design guarantees that the terminal is correctly deformed around the wire, creating a secure, high-conductivity bond.
When using a ratcheting crimper, it’s crucial to select the correct die opening that matches both your terminal and wire gauge. Place the stripped wire and terminal securely into the appropriate die, then squeeze the handles firmly until the ratchet mechanism clicks and releases. This method significantly reduces the chance of human error, leading to reliable, repeatable crimps every time.
Using a Hydraulic Crimper
For larger gauge wires and heavy-duty ring terminals, a hydraulic crimper is often the preferred and necessary tool. These tools use hydraulic pressure to deliver immense, controlled force, which is essential for properly deforming the thicker metal barrels of larger terminals. Manual crimpers simply cannot apply sufficient force for these applications.
Hydraulic crimpers provide a powerful, consistent crimp that ensures maximum surface contact between the wire and the terminal, crucial for high-current applications. They typically come with interchangeable dies to accommodate a wide range of wire and terminal sizes, making them indispensable for industrial, automotive, and power distribution work where robust connections are paramount.
Using a Bench-Mount Crimper
Bench-mount crimpers offer stability and leverage, making them ideal for high-volume crimping or for situations where maximum control is desired. These tools are often larger and more robust, designed to be fixed to a workbench, which allows the operator to use both hands for guiding the wire and terminal while applying consistent pressure.
These crimpers can range from heavy-duty manual models to pneumatic or electric-powered versions for even greater efficiency. Their stationary nature reduces fatigue during repetitive tasks and ensures highly precise and consistent crimps, particularly beneficial in production environments or when working with less common terminal types that require specialized dies.
Conclusion
Mastering the art of crimping ring terminals is an invaluable skill for anyone engaged in electrical work. By following these precise steps, you can consistently achieve connections that are not only mechanically secure but also electrically superior, preventing common issues and ensuring lasting reliability.
A properly crimped ring terminal is the cornerstone of a safe and efficient electrical system. This guide empowers you to perform installations with confidence, knowing that each connection will withstand the test of time, vibration, and environmental stresses, contributing to overall system integrity.
For all your electrical component needs, including premium wholesale ring terminals that guarantee exceptional performance, choose Linkwell Electrics. Trust our quality to power your projects safely and efficiently.


