
Replacing an old, damaged, or improperly located junction box in your home requires careful attention to safety and adherence to the National Electrical Code (NEC). This task involves disconnecting and reconnecting electrical wiring, making it crucial to follow a systematic approach to prevent hazards. This guide will walk you through the essential steps for safely replacing a junction box, ensuring a compliant and reliable electrical connection in your United States residence.
Whether you’re upgrading fixtures, dealing with corrosion, or relocating a junction box for renovations, understanding the proper procedures for junction box replacement is vital. Prioritizing safety through complete power disconnection and accurate wire identification is paramount before any physical work begins. This blog will provide you with the knowledge to undertake this task confidently and in accordance with established electrical practices in the United States.
When to Replace Junction Boxes

Replacing a junction box in your home becomes necessary under several circumstances, primarily related to safety, functionality, or code compliance with the National Electrical Code (NEC). Recognizing these situations is crucial for maintaining a safe and reliable electrical system. Addressing these issues promptly can prevent more significant problems down the line and ensure your electrical wiring meets current safety standards in the United States.
One key reason to replace a junction box is physical damage or deterioration. Over time, boxes can crack, warp, or corrode, especially in damp environments. Another critical reason is if the existing box is undersized for the number of wires it contains, violating NEC fill capacity requirements and potentially leading to overheating.
Additionally, if you are upgrading wiring or adding new circuits that the current box cannot accommodate safely, a replacement with a larger or more appropriate box is necessary. Finally, if a junction box is not readily accessible for inspection and maintenance, as required by the NEC, it might need to be relocated or replaced with a box in an accessible location.
Here are some specific instances when you should consider replacing a junction box:
- Physical Damage: Cracks, breaks, holes, or corrosion on the box.
- Overcrowding: The box is too small for the number of wires, making it difficult to close the cover or causing stress on the connections.
- Non-Compliance: The existing box does not meet current NEC standards for its location or application.
- Inaccessibility: The box is hidden behind walls or ceilings without a proper access panel.
- Upgrading Wiring: The existing box cannot safely accommodate new or larger gauge wires.
- Adding Devices: The box is not large enough to house both the wiring and new devices like switches or receptacles.
- Loose or Damaged Fittings: If the knockouts or cable clamps are damaged and no longer secure the wires properly.
- Signs of Overheating: Discoloration or melting on the box or wires, indicating a potential overload or loose connection within the box.
How to Replace Junction Boxes

Replacing a junction box in your home is a task that demands careful attention to safety and adherence to the National Electrical Code (NEC). This process involves disconnecting and reconnecting electrical wiring, so precision and caution are paramount to prevent hazards. This guide will walk you through the essential steps to safely replace a junction box, ensuring you maintain a compliant and secure electrical system in your United States residence.
Tools Needed
- Screwdriver (flat-head and Phillips)
- Wire strippers
- Voltage tester
- Drill (optional)
- New junction box
- Electrical tape
- Wire connectors (wire nuts)
Step 1: Ensuring Absolute Power Disconnection
Before you begin any work on replacing a junction box, your utmost priority is to ensure complete electrical safety. You must locate the specific circuit breaker in your main electrical panel that controls the power to this particular junction box and switch it to the “off” position.
Do not rely solely on a wall switch that might control a device connected to the box. After switching off the breaker, it is absolutely essential to use a reliable voltage tester on every wire within the junction box to confirm that no electrical current is present. Test each wire individually to ensure complete power disconnection, as junction boxes can sometimes contain wires from multiple circuits.
Confirming the absence of power is not a step to be taken lightly. Even if you are certain you’ve turned off the correct breaker, testing is crucial. A mistake in identifying the breaker or an unexpected wiring configuration could lead to a dangerous electrical shock.
Take your time and be meticulous in this verification process. Wearing appropriate personal protective equipment (PPE), such as insulated gloves and safety glasses, provides an additional layer of safety during this and all subsequent steps. Remember, safety is paramount when dealing with electrical wiring in the United States.
Step 2: Removing the Old Junction Box
Once you have definitively confirmed that the power to the junction box is off, the next step is to carefully remove the old, damaged, or undersized junction box. Before you start detaching the box, take clear photos of the wiring inside. These photos can serve as a valuable reference when you are reconnecting the wires to the new junction box. Next, carefully loosen and remove any screws or nails that are securing the old junction box to its mounting surface, which could be a wall stud, ceiling joist, or mounting bracket.
As you remove the fasteners, be prepared to support the box to prevent it from falling and potentially damaging surrounding surfaces or pulling on the wires still connected inside. Once the box is free from its mounting, gently pull it away, being mindful of any conduit or cables attached to it. If the wires are entering the box through clamps or connectors, you might need to loosen these to fully detach the box. Handle the old box with care, especially if it is damaged, and dispose of it properly according to local regulations.
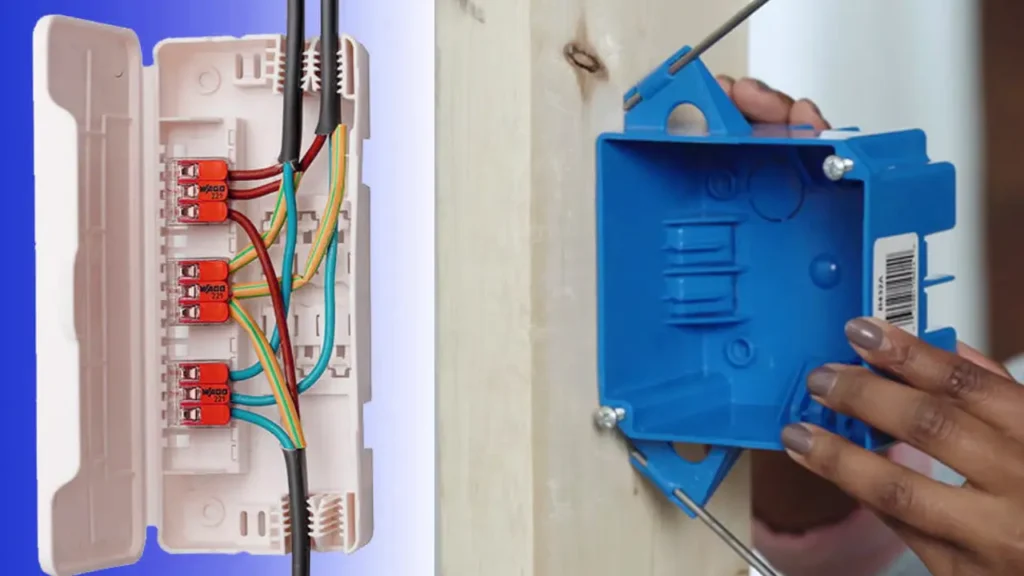
Step 3: Preparing the New Junction Box
With the old box removed, the next step is to prepare the new junction box for installation. Select a new junction box of the appropriate size and type for your needs, ensuring it meets the requirements of the National Electrical Code (NEC) for its intended location and use in the United States. If the new box doesn’t have pre-drilled knockouts in the locations you need for the incoming wires or conduit, carefully remove the appropriate knockouts using a screwdriver and hammer or knockout pliers. Ensure the knockout edges are smooth to prevent damage to the wire insulation.
If you are using non-metallic (NM) cables, install appropriate cable clamps into the knockouts to secure the cables to the box and protect the wires from abrasion. For metallic conduit, install the correct type and size of conduit connectors. If the new junction box is metal, ensure it has a grounding screw or provision for attaching a grounding wire. Preparing the new box properly before installation will make the wiring process smoother and help ensure a safe and code-compliant installation in your home.
Step 4: Wiring the New Junction Box
Now that the new junction box is prepared and mounted (as per Step 5), you can begin the process of connecting the wires. Carefully transfer the wires from the old wiring setup to the new junction box, referring to the photos you took earlier and the labels you applied.
For each wire, strip the insulation to expose the appropriate length of bare conductor, typically around 1/2 to 3/4 of an inch. Connect the wires of the same color together securely using appropriately sized wire connectors (wire nuts), twisting them clockwise until snug. Ensure that no bare wire is exposed outside the wire connector.
Pay close attention to the grounding wires (green or bare copper). These should all be connected together and, if the junction box is metal, also connected to the grounding screw or grounding provision in the box. The neutral wires (usually white) should be connected together, and the hot wires (usually black or red) should also be connected together. If you are wiring a device like a light fixture or receptacle to the junction box, connect the corresponding colored wires from the fixture or receptacle to the wires in the box, again ensuring secure connections and no exposed bare wire.
Step 5: Mounting the New Junction Box
With the new junction box prepared, you need to securely mount it in the same location as the old one. Ensure the new box is oriented correctly and will provide adequate support for any devices or fixtures that will be attached to it.
Align the mounting holes of the new box with the existing screw holes or mounting bracket. Use screws of the appropriate type and size to firmly attach the junction box to the wall stud, ceiling joist, or mounting bracket. Ensure the box is flush with the surrounding surface and is securely fastened to prevent movement.
If the old box was recessed and you are installing a new recessed box, make sure it is properly seated within the wall or ceiling cutout and that the mounting ears or flanges are correctly positioned and tightened. For surface-mounted boxes, ensure they are securely screwed to a solid surface. A properly mounted junction box provides a stable and safe enclosure for the electrical connections and any attached devices or fixtures in your US electrical system.
Step 6: Installing the Cover and Testing
The final step in replacing a junction box is to install the appropriate cover securely onto the new box. The cover serves as a physical barrier, protecting the wire connections from damage and preventing accidental contact with live wires, as mandated by the National Electrical Code (NEC) in the United States. Ensure that the cover fits properly and is fastened tightly with the screws provided. For outdoor or damp locations, use a weatherproof cover designed for such environments.
Once the cover is securely in place, and only after you have double-checked all your wiring connections and the mounting of the new box, you can carefully restore power at the circuit breaker in your electrical panel. Test any devices or fixtures connected to the junction box to ensure they are functioning correctly. If anything seems amiss, immediately turn off the power and re-check your wiring. A properly replaced and covered junction box ensures a safe and compliant electrical connection in your home.
Bonus Tips for Junction Box Replacement
Beyond the essential steps for replacing a junction box, several bonus tips can enhance the safety, efficiency, and longevity of your work in the United States. Before starting, take the time to thoroughly understand the existing wiring configuration, and if you’re unsure about anything, don’t hesitate to consult a qualified electrician. Proper planning and meticulous execution are key to a successful replacement that adheres to the National Electrical Code (NEC).
During the replacement process, consider the future needs of your electrical system. If there’s a possibility of adding more circuits or devices in the same area, opting for a slightly larger junction box can save you time and effort later. Ensure all wire connections are not only secure but also neat and organized within the box, making future troubleshooting easier. Finally, always double-check your work against the NEC guidelines and local electrical codes before restoring power.
Here are some bonus tips for junction box replacement:
- Document Everything: Take photos and make notes of the existing wiring before disconnection.
- Upgrade if Necessary: If the old box was undersized, replace it with a larger one that meets current and potential future needs.
- Use Quality Connectors: Opt for UL-listed wire connectors (wire nuts) of the appropriate size and type for the wires you are joining.
- Ensure Proper Grounding: Pay extra attention to creating a solid and continuous grounding path within the new box, connecting all ground wires and the metal box if applicable.
- Protect Wire Insulation: Be careful not to nick or damage the insulation of the wires during stripping and connection.
- Test Thoroughly: After restoring power, test all connected devices and circuits to ensure they are functioning correctly.
- Label Circuits Clearly: Update the labels on your electrical panel to accurately reflect any changes made during the replacement.
- Consider Weatherproof Boxes: If the replacement is in an outdoor or damp location, use a junction box and cover rated for that environment.
- Secure Cables Properly: Ensure that cables entering the box are securely held in place by cable clamps to prevent strain on the wire connections.
- Keep it Accessible: Ensure the replaced junction box remains accessible for future inspection and maintenance, as required by the NEC.
Junction Box Maintenance Tips
Maintaining your electrical junction boxes in the United States is crucial for ensuring the long-term safety and reliability of your home’s electrical system, as mandated by the National Electrical Code (NEC). Regular checks can help identify potential issues before they escalate into serious hazards. While junction boxes are designed to be relatively maintenance-free, environmental factors, age, and improper initial installation can sometimes lead to problems. Addressing these issues promptly can prevent electrical faults, overheating, and even fires, safeguarding your property and well-being.
Routine visual inspections are a cornerstone of junction box maintenance. Look for any signs of physical damage, such as cracks, dents, or loose covers. Pay attention to the surrounding area for any indications of moisture ingress, especially in outdoor or damp locations.
Be aware of any unusual smells emanating from or around the junction box, such as a burning odor, which could indicate an overheating issue. If you notice any of these warning signs, it’s essential to turn off the power to the affected circuit at the breaker and investigate further, potentially with the assistance of a qualified electrician.
Here are some key maintenance tips for your electrical junction boxes:
- Regular Visual Inspections: Periodically check for physical damage, loose covers, and signs of moisture or corrosion.
- Ensure Covers are Secure: Make sure all junction box covers are tightly fastened to protect the wiring from damage and prevent accidental contact.
- Check for Overheating Signs: Look for discoloration, melting, or burning smells around the box, which could indicate loose connections or overloads.
- Keep Area Clear: Ensure the area around junction boxes is free from obstructions, allowing for proper ventilation and access for inspection or maintenance.
- Address Moisture Issues: If a junction box is in a damp location, ensure it’s rated for such use and that any seals or gaskets are intact.
- Listen for Unusual Noises: Hissing, buzzing, or crackling sounds from a junction box can indicate loose connections or electrical faults.
- Avoid Overloading Circuits: Ensure the total load on the circuit connected to the junction box does not exceed its rated capacity.
- Don’t Tamper with Wiring: If you are not a qualified electrician, do not attempt to repair or modify the wiring inside a junction box.
- Label Circuits Clearly: Ensure your electrical panel is clearly labeled, making it easier to identify and de-energize circuits for maintenance.
- Schedule Professional Inspections: Consider having a qualified electrician inspect your home’s electrical system, including junction boxes, periodically, especially in older homes.
Conclusion
Replacing a junction box, as this guide outlines, is a task that demands careful attention to safety protocols and adherence to the National Electrical Code (NEC) prevalent in the United States. By meticulously following each step, from power disconnection to secure re-wiring and proper mounting, you can ensure a safe and code-compliant electrical connection. Remember, prioritizing safety and verifying power is off are paramount throughout the replacement process.
For electrical professionals and contractors in the USA seeking a reliable source of wholesale junction boxes for replacement or new installations, we offer a comprehensive range of high-quality enclosures. Our selection caters to diverse needs, ensuring you have access to durable and code-compliant boxes in various sizes and materials to meet your project specifications.
Ready to source dependable wholesale junction boxes for your electrical projects? Contact us today to explore our extensive inventory and benefit from competitive pricing and reliable supply. Partner with us to ensure the safety and success of your electrical installations.


