
If you want to know how to use a cable clamp safely and effectively, you need to start with the basics. Always check your cable clamp for damage before use. Make sure you follow each step closely because safety depends on proper installation. When you learn how to use a cable clamp the right way, you keep your equipment running smoothly. You can trust Linkwell for reliable cable management solutions in any industrial or data center setting.
Electrical Enclosure Use Cable Clamp Key Takeaways
- Always inspect cable clamps and cables for damage before installation to ensure safety and durability.
- Use the correct clamp size and material for your cables and environment to prevent damage and ensure long-lasting performance.
- Follow proper installation steps, including correct clamp orientation, spacing, and torque tightening, to keep cables secure and reliable.
- Regularly check and retighten clamps after loading to maintain a strong grip and prevent failures.
- Choose high-quality cable clamps from trusted brands like Linkwell to support safe, efficient, and organized cable management.
Cable Clamps Definition
What Is a Cable Clamp?
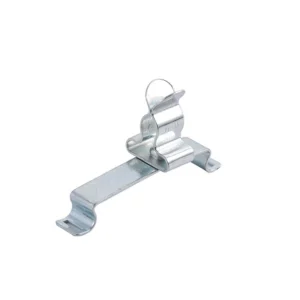


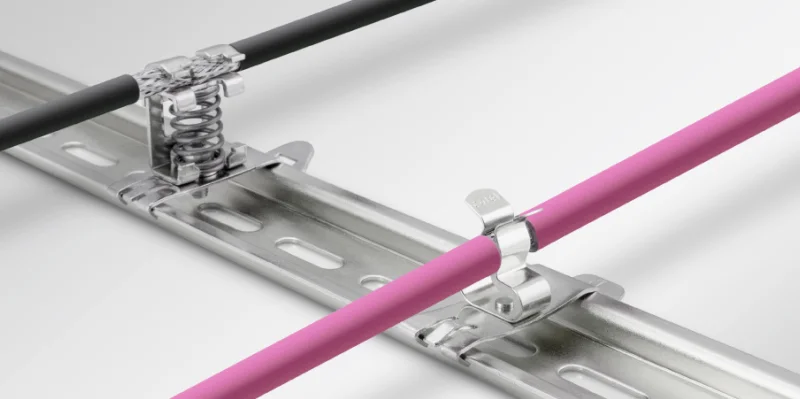
You might wonder what a cable clamp actually does. In electrical cabinets and data centers, a cable clamp keeps cables secure, organized, and protected. You use it to hold cables in place, prevent tangling, and reduce wear from vibration or movement. Cable clamps come in many shapes and materials, like nylon, stainless steel, or cushioned types for extra protection. You’ll see them in industrial settings, server racks, and even in marine or automotive jobs. When you use a wire rope clamp or wire rope clip, you add extra support for heavy-duty cables or bundles. These clamps help you avoid cable damage and make maintenance easier.
Tip: Always check the clamp’s material and rating before installation. This ensures safety and durability, especially in harsh environments.
Here’s a quick look at how industry standards classify cable clamps:
| Standard / Classification | Description | Key Criteria / Features |
|---|---|---|
| UL 94 Flammability Ratings | Flammability classes for plastics | V-0, V-1, V-2 ratings, burning time, dripping behavior |
| ASTM D4066 & MIL-M-20693 | Material standards for clamp components | Durability, performance, weather resistance |
| MS25281 | Hardware requirements for heavy-duty clamps | Mechanical, environmental requirements |
| MIL-S-23190E | Standards for plastic and metal cable support | Design, material standards |
| UL Recognized Component Mark | Certification for UL-standard products | Safety, performance compliance |
Main Uses in Rack Cable Management
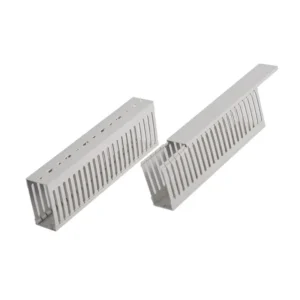
When you set up a server rack, you want everything neat and easy to manage. Cable clamps, wire rope clamps, and wire rope clips help you group cables, layer them, and keep airflow optimal. You prevent cables from crossing or interfering with each other. You also make it simple to remove or reinstall cables without disturbing the rest. These clamps distribute cable weight, reduce fire hazards, and protect against vibration. You can use adjustable clamps for quick changes or hinged locking clamps for easy maintenance.
- Securing cable bundles
- Fast installation with adhesive or screw mounts
- Vibration protection for sensitive cables
- Easy cable insertion and removal
- Maintenance convenience with releasable latches
Linkwell’s rack cable management solutions give you customizable options for any rack setup. You get robust construction, user-friendly features, and reliable performance. Whether you need horizontal or vertical cable managers, cable ties, or labeling systems, Linkwell helps you keep your data center organized and efficient. If you want to know how to use a cable clamp safely and effectively, start with quality products and proven installation methods.
How to Use a Cable Clamp

Preparation and Inspection
Before you start, you want to make sure your workspace and tools are ready. Here’s a simple checklist to follow for safe and effective cable clamp installation:
- Clean the area where you’ll install the cable clamp. Remove any dust, oil, or debris so you get a solid grip.
- Bundle and route your cables neatly. This step helps prevent damage during installation and keeps everything organized.
- Gather your tools. You’ll need wire strippers, torque wrenches, cable ties, cutters, and pliers.
- Put on your safety gear. Gloves, safety glasses, and a hard hat protect you from unexpected hazards.
- Inspect each cable clamp for cracks, corrosion, or other damage. Never use a damaged clamp.
- Make sure your cables are supported and not under tension. This prevents stress and possible failure.
- After you finish, double-check that all clamps are tight and undamaged.
Tip: Always use high-quality cable clamps like those from Linkwell to ensure long-lasting performance and safety.
Correct Orientation and Placement
Getting the orientation right is key to safety and reliability. If you’re working with a wire rope clamp or wire rope clip, remember the golden rule: never saddle a dead horse. This means you should always place the saddle of a U-bolt clip on the live end of the wire rope, not the dead end. This keeps your connection strong and secure.
Here’s how to install wire rope clips the right way:
- Turn back the rope around a thimble, leaving one saddle width from the dead end for your first clip.
- Place the first wire rope clip one base width from the dead end.
- Put the second clip as close to the loop or thimble as possible.
- If you need more clips, space them evenly between the first two.
- Use a torque wrench to tighten the nuts evenly to the manufacturer’s recommended torque.
- Test the load with a weight equal to or greater than what you expect in use, then re-tighten the nuts.
Note: Always follow safety best practices and manufacturer guidelines for proper installation. Regularly inspect your wire rope clamp and wire rope clip connections, especially in overhead or overhead lifting applications.
Spacing and Number of Clamps
Proper spacing and the right number of clamps keep your cables safe and organized. If you space your clamps too far apart or use too few, cables can sag, kink, or even fail. This can lead to safety hazards, system downtime, and expensive repairs.
For most electrical cabinet and rack applications, follow these guidelines:
- Light cables: space clamps 12–18 inches apart.
- Medium cables: use 8–12 inch spacing.
- Heavy cables: go with 4–8 inch spacing.
- For wire rope clips, space them about six times the diameter of the wire rope.
- Always allow a little slack for future changes or maintenance.
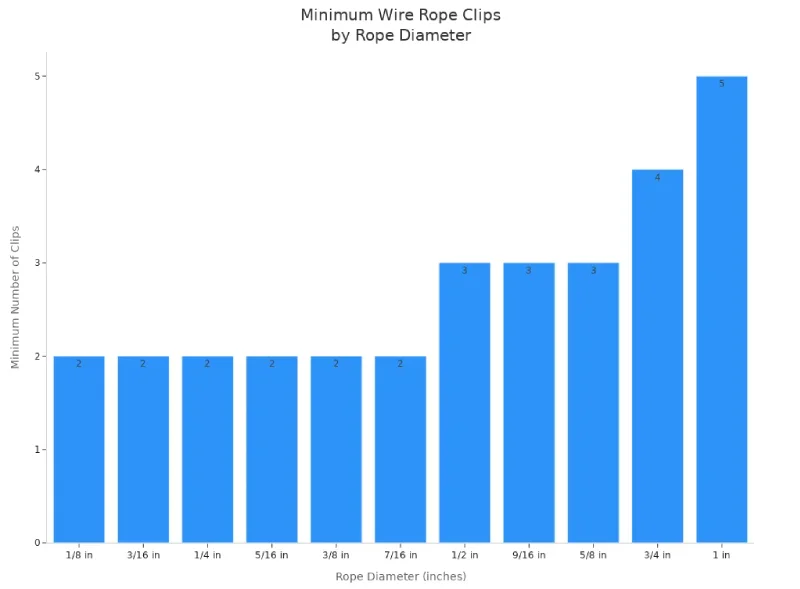
Here’s a quick reference table for the minimum number of wire rope clips based on rope diameter:
| Rope Diameter (inches) | Minimum Number of Wire Rope Clips |
|---|---|
| 1/8 | 2 |
| 3/16 | 2 |
| 1/4 | 2 |
| 5/16 | 2 |
| 3/8 | 2 |
| 7/16 | 2 |
| 1/2 | 3 |
| 9/16 | 3 |
| 5/8 | 3 |
| 3/4 | 4 |
| 1 | 5 |
If you don’t follow these spacing rules, you risk sagging cables, increased vibration, and even fire hazards. Poor spacing also makes maintenance harder and can lead to code violations. Always check your work and use the right number of clamps for each job.
Remember: Proper spacing and the correct number of wire rope clamps are essential for safety and system reliability.
How to Install Wire Rope Clips
Step-by-Step Installation
If you want to know how to install a wire rope clip the right way, you need to follow a few simple steps. This process keeps your cables secure and your system safe. Here’s how to install wire rope clips like a pro:
- Turn back the wire rope from the thimble or loop by the amount listed in the table below.
- Install the first clip one base width from the dead end of the rope. Make sure the saddle sits on the live end and the U-bolt on the dead end. Remember the saying: never saddle a dead horse.
- If you need more than one clip, apply the second clip as close to the loop or thimble as possible.
- For three or more clips, space them evenly between the first two. Tighten all nuts evenly using a torque wrench.
Here’s a quick reference table for how to install wire rope clips based on rope size:
| Rope Diameter | Minimum Number of Clips | Minimum Turnback Length | Required Torque (ft-lbs) |
|---|---|---|---|
| 1/8″ to 3/8″ | 2 | 3-1/4″ to 6-1/2″ | 4.5 to 45 |
| 1/2″ to 5/8″ | 3 | 11-1/2″ to 12″ | 65 to 95 |
| 3/4″ to 1″ | 4 to 5 | 18″ to 26″ | 130 to 225 |
| 1-1/8″ to 1-1/2″ | 6 to 8 | 34″ to 54″ | 225 to 360 |
| 1-5/8″ to 3-1/2″ | 8 to 12 | 58″ to 149″ | 430 to 1200 |
Tip: Always match the clip size to your wire rope diameter. Use a torque wrench to avoid under- or over-tightening.
Tightening and Retorquing
You want your wire rope clamp to hold strong, especially in overhead or high-stress applications. After you install wire rope clips, tighten them before you put the rope under tension. Once you apply the load, retighten each wire rope clip to the recommended torque. This step helps the clips grip the rope as it settles and stretches.
- First, torque all clips to the correct value.
- Next, apply the load to seat the clips and remove slack.
- Finally, retorque each clip to keep your connection safe.
Regular checks and retorquing keep your system reliable. Linkwell’s cable management solutions make it easy to install wire rope clips with confidence, knowing you’re using products trusted by industry leaders.
Choose the Right Cable Clamp
Size and Type Selection
Picking the right cable clamp for your electrical cabinet makes a big difference in safety and performance. You want a clamp that fits your cable bundle snugly, but not so tight that it damages the wires. If you choose a clamp that’s too loose, your cables might slip or sag. If it’s too tight, you risk crushing the insulation. Always match the clamp size to your cable diameter.
Here’s a quick table to help you decide:
| Factor | Description |
|---|---|
| Size | Match clamp size to cable diameter for secure support. |
| Type | Pick U-bolts for versatility, saddle clamps for grip, cushion clamps for vibration protection. |
| Installation Needs | Follow instructions and consult experts for best results. |
| Environmental Factors | Think about temperature, humidity, and vibration when choosing clamp type. |
You should plan your cable routing before installing clamps. Group cables with ties for better organization. Position clamps so they don’t block connectors or access points. Test clamp adhesion before putting cables under full load.
Tip: Always choose clamps from trusted brands like Linkwell to ensure quality and compliance with industry standards.
Material and Application Fit
The material of your cable clamp affects how well it performs in different environments. Stainless steel clamps work best in harsh places like marine or oil and gas sites. They resist corrosion, handle extreme temperatures, and last longer than plastic. Aluminum clamps are lightweight and good for places where you need to reduce weight, like automotive or aerospace racks. Nylon clamps suit general indoor use and can handle some outdoor conditions.
Here’s a table showing common materials and where they work best:
| Material | Key Properties and Performance Characteristics | Typical Applications and Environmental Suitability |
|---|---|---|
| Nylon | General-purpose, works in -40 °C to 85 °C, flexible, cost-effective | Indoor, some outdoor, general wiring |
| Stainless Steel | High corrosion resistance, strong, durable, handles extreme temperatures | Marine, oil & gas, aerospace, military, outdoor |
| Aluminum | Lightweight, rust-resistant, good thermal and electrical conductivity | Automotive, aerospace, weight-sensitive setups |
| Titanium | Superior strength-to-weight, excellent corrosion resistance, extreme temperature tolerance | Aerospace, military, marine, critical load-bearing |
| UV-resistant Plastics | Sunlight, moisture, and temperature resistant | Outdoor, UV-exposed environments |
If you use the wrong clamp material, you risk corrosion, cable damage, or even system failure. Always consider temperature, humidity, chemical exposure, and vibration. For outdoor or corrosive environments, stainless steel or UV-resistant plastics are your best bet.
- Stainless steel clamps offer high strength and long life.
- Plastic clamps are flexible and affordable but wear out faster in tough conditions.
- Aluminum clamps balance weight and durability.
Linkwell offers customizable cable management solutions. You can choose the right size, type, and material for your specific project. If you’re unsure, ask for expert advice to get the best fit for your application.
Safety Tips and Common Mistakes
Safety Checklist
You want to keep your cables secure and your system running smoothly. Start every job with a safety checklist. This helps you spot problems before they become hazards. Here’s what you should check:
- Inspect wire ropes and cables for broken wires, kinks, corrosion, or diameter changes. Use a wire rope gauge for accurate measurement.
- Verify all hardware, including shackles and hooks, is rated for the load and free from damage. Make sure pins are fully seated.
- Check the environment. Look for wet floors, poor lighting, or overhead obstructions that could affect your work.
- Confirm that each safety rope clamp is installed correctly and tightened to the manufacturer’s specifications.
- Make sure Working Load Limit markings are visible and easy to read.
Tip: Regular inspections and using high-quality clamps from Linkwell help you avoid unexpected failures and keep your workspace safe.
Mistakes to Avoid
Even experienced technicians make mistakes. You can prevent most problems by knowing what to watch for:
- Placing the saddle on the dead end instead of the live end. This reduces grip and increases slippage risk.
- Choosing the wrong clamp size for your wire rope. If the clamp doesn’t fit, your connection won’t be secure.
- Tightening clamps unevenly or skipping the torque wrench. Uneven pressure can cause clamp failure.
- Using too few clamps or spacing them incorrectly. This compromises load distribution and safety.
- Forgetting to retighten clamps after loading. Clamps can loosen over time and lose their grip.
If you follow these tips, you’ll reduce wear, prevent cable slippage, and comply with safety regulations. Good cable management starts with the right products and careful installation.
You can boost safety and efficiency by following best practices for cable clamp installation. Choose high-quality clamps, inspect regularly, and organize cables for optimal airflow and troubleshooting.
- Select clamps that meet ANSI, IEC, and TIA-942 standards
- Schedule routine safety checks
- Use Linkwell Rack Cable Management for reliable results
Prioritize safety and quality. Smart cable management saves time, reduces costs, and supports future growth.
References
FAQ
What is the main purpose of a cable clamp in an electrical cabinet?
A cable clamp keeps your cables secure and organized. It prevents cables from moving, sagging, or getting damaged. You make your cabinet safer and easier to maintain by using the right clamp.
How do you know which size cable clamp to use?
Measure your cable bundle’s diameter. Pick a clamp that fits snugly but does not crush the insulation. If you are unsure, check the manufacturer’s sizing chart or ask for expert advice.
Can you reuse cable clamps after removing them?
You can reuse some cable clamps if they show no cracks, wear, or deformation. Always inspect each clamp before reinstalling. If you see any damage, replace it with a new one for safety.
Why should you choose Linkwell cable management solutions?
Linkwell offers customizable, high-quality cable management products. You get reliable performance, easy installation, and expert support. Many industry leaders trust Linkwell for safe and efficient cable organization in electrical cabinets
Conclusion
A cable clamp is essential for keeping cables secure, organized, and protected in electrical cabinets and data centers. By choosing the right size, material, and type, and following proper installation steps, you prevent damage, reduce hazards, and extend system life. Regular inspections and retightening ensure reliability.
Linkwell provides high-quality, standards-compliant cable management solutions trusted by industry professionals for safety, efficiency, and long-term performance in any environment.


