
The attic, often an overlooked space, can house numerous electrical junction boxes that serve as crucial connection points for wiring throughout your home. Understanding their location, ensuring their safety, and adhering to electrical codes within this often-cramped environment is paramount for every homeowner. Neglecting these aspects can lead to potential hazards and complicate future electrical work.
This comprehensive guide aims to demystify junction boxes in the attic. We’ll walk you through how to effectively locate them, provide essential safety precautions to follow when working around them, and highlight key code requirements you need to be aware of. By the end, you’ll have a clearer understanding of these vital components within your attic space.
Can You Put a Junction Box in the Attic

Yes, you can put a junction box in the attic, and it’s a common practice for extending or modifying electrical circuits.
However, there are important considerations and electrical code requirements you must adhere to for safety and compliance. The primary rule is that all junction boxes, including those in the attic, must be accessible. This means they cannot be permanently covered by insulation, drywall, or any other building finish.
The National Electrical Code (NEC) and local building codes mandate accessibility to allow for inspection, maintenance, and future modifications to the wiring. While the attic is generally considered an accessible space, the junction box itself must remain uncovered.
Many electricians prefer to mount junction boxes on rafters or other visible structural members above the level of insulation to ensure they are easily located and accessed. Covering a junction box can create a fire hazard and make troubleshooting electrical issues significantly more difficult.
Cost to Install Junction Box in Attic
The cost to install a junction box in the attic can vary quite a bit depending on several factors.
If you are simply adding a new junction box to an existing circuit, the cost will likely be lower than if new wiring needs to be run from the main electrical panel. The accessibility of your attic space also plays a significant role; a cramped or difficult-to-reach attic will increase labor time and thus the overall cost. Additionally, the type of junction box required (standard vs. fan-rated) and its material (plastic vs. metal) will influence the price of the materials.
Generally, you can expect the cost to install a single junction box in the attic to range from around $100 to $300 for both parts and labor. This is a broad estimate, and the final price can fluctuate based on your location and the specific electrician’s rates. More complex installations, such as those requiring extensive new wiring or dealing with older wiring systems, could push the cost higher. It’s always recommended to get quotes from a few local, licensed electricians to get a more accurate estimate for your specific situation.
Here are some factors that can affect the cost:
- Complexity of the job: Running new wiring from the main panel will cost more than tapping into an existing circuit.
- Accessibility of the attic: A difficult-to-access attic increases labor time.
- Type of junction box: Fan-rated and weatherproof boxes cost more than standard indoor boxes.
- Material of the junction box: Metal boxes are generally more expensive than plastic ones.
- Local labor rates: Electrician hourly rates vary by location and experience.
- Permits: Depending on your local regulations, you may need to factor in the cost of electrical permits.
What Type of Junction Box to Use in Attic

When choosing a junction box for your attic, several factors come into play to ensure safety and code compliance. Since attics can experience temperature extremes and may have varying levels of dust and humidity, selecting the right type is important. Standard indoor-rated junction boxes made of plastic or metal are generally acceptable for dry attic environments. However, if your attic is prone to moisture or dust, considering a damp-rated or even a weatherproof junction box might be a prudent choice for added protection of the electrical connections.
Furthermore, the size and type of the junction box should be appropriate for the number and size of wires you need to connect. For simple splices, a standard 4-inch square or octagonal box might suffice. If you anticipate a larger number of connections or if the attic is part of a ventilation system where airflow could cause vibrations, a more robust metal box might be preferable over a plastic one for its durability.
Remember that all junction boxes in the attic must remain accessible and cannot be covered by insulation or other materials, so choose a box that allows for easy access and secure cover installation.
Here are some common types of junction boxes suitable for attic use:
- Standard Square or Octagonal Boxes: Suitable for general wiring and light fixture connections in dry attics. Available in both metal and plastic.
- Metal Junction Boxes: Offer increased durability and are required when using metal conduits or shielded cables. They also need to be properly grounded.
- Plastic (PVC) Junction Boxes: Lightweight, corrosion-resistant, and suitable for use with non-metallic (NM) cables in dry environments.
- Damp-Rated Junction Boxes: Designed to withstand moisture and humidity, suitable for attics that are not climate-controlled or may experience condensation.
- Weatherproof Junction Boxes (NEMA 3R or higher): Provide the highest level of protection against moisture and dust, ideal for particularly harsh attic environments.
- Fan-Rated Junction Boxes: Specifically designed and reinforced to safely support the weight and movement of ceiling fans, if you plan to install one in your attic space (though this is less common).
How to Install a Junction Box in Attic
Installing a junction box in the attic is a common task when extending or modifying electrical circuits in your home. Ensuring the junction box is properly installed and remains accessible is crucial for safety and adherence to electrical codes.
This guide will walk you through the necessary steps to install a junction box in your attic safely and effectively. Remember to always turn off the power to the circuit you’ll be working on at the main electrical panel before starting any electrical work.
Step 1: Preparation and Safety First
Before commencing any work, it is paramount to switch off the power supply to the intended circuit at the breaker box. Gather all the required tools and materials, including the junction box, appropriate wire connectors, cable clamps, a drill with suitable bits, a stud finder (if needed for mounting), a drywall saw (if cutting a new opening), screwdrivers, and safety glasses. Carefully plan the location for your junction box, ensuring it is in an accessible area of the attic and away from any obstructions like ductwork or insulation that might cover it later.
Step 2: Choosing the Mounting Location
Select a suitable location for the junction box. Ideally, mount it directly onto a sturdy structural member like a rafter or a joist. Use a stud finder if necessary to locate these structural elements.
If direct mounting to a structural member isn’t feasible in your chosen location, you can use appropriate mounting hardware designed for attic installations, ensuring the box will be securely supported. The chosen location should also provide enough space to work comfortably and allow for future access to the box for inspection or modifications.
Step 3: Cutting the Opening (If Necessary)
If you are installing a new junction box and need to create an opening in a surface like a plywood subfloor in the attic, carefully measure and mark the desired location. Use a drywall saw or a similar tool to cut an opening that is appropriately sized for your junction box.
Ensure you are cutting only through the intended material and not hitting any existing wires or other hidden components. If you are replacing an existing box, this step is already completed.
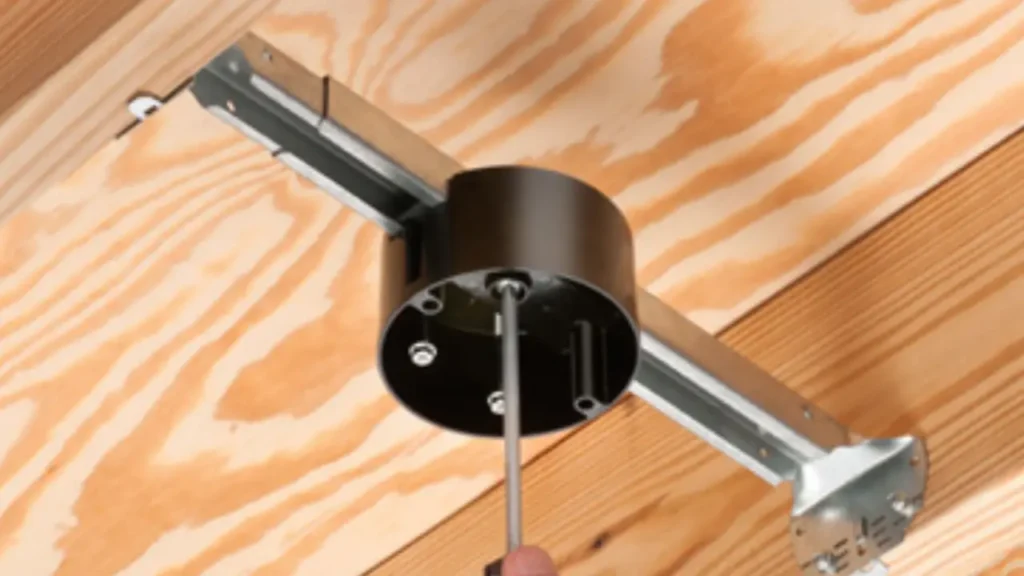
Step 4: Securing the Junction Box
Once the mounting location is prepared, securely attach the junction box. If mounting to a rafter or joist, use screws of the appropriate length and type to firmly fasten the box. Ensure the box sits flush against the mounting surface and does not wobble.
If using mounting hardware, follow the manufacturer’s instructions carefully to ensure the box is properly supported and can withstand any potential strain on the wiring. The box should be rigidly fixed to prevent movement.
Step 5: Running and Securing the Wires
Carefully run the necessary electrical cables to the location of the junction box. Ensure you have enough slack in the wires to make connections comfortably within the box. Use cable clamps at the point where the wires enter the junction box to secure them and prevent them from being pulled out accidentally. These clamps also protect the wires from abrasion against the edges of the box’s knockout holes. Tighten the clamps adequately to hold the cables firmly in place.
Step 6: Making the Wire Connections
Inside the junction box, make the necessary electrical connections according to the wiring diagram for your specific application. Typically, you will connect like-colored wires together (black to black, white to white) using appropriate wire connectors.
Ensure all connections are tight and secure. If a ground wire is present, connect all ground wires together and to the grounding screw inside the metal junction box or to the designated grounding terminal in a plastic box. Properly made connections are crucial for safety and reliable electrical flow.
Step 7: Installing the Junction Box Cover
Once all wire connections are made and safely tucked inside the junction box, install the appropriate cover plate. The cover should fit snugly and be secured with screws to protect the wiring inside from physical damage and to prevent accidental contact with the live wires.
Ensure the cover is firmly in place and that no wires are pinched between the cover and the box. The junction box must remain accessible, meaning it cannot be permanently covered by insulation or other materials.
Step 8: Final Inspection and Restoring Power
Before restoring power, double-check all wire connections to ensure they are secure and that the junction box is properly mounted and covered. Ensure no bare wires are exposed and that the cable clamps are tightened.
Once you are confident in the installation, you can carefully restore power to the circuit at the breaker box and test the newly connected devices or circuits to ensure they are functioning correctly. If you encounter any issues, immediately turn off the power and re-examine your wiring.
Junction Box in Attic Code

The National Electrical Code (NEC) has specific requirements for the installation and use of junction boxes, including those located in attics, primarily focusing on safety and accessibility. A key requirement, outlined in NEC 314.29, is that all junction boxes must be accessible without removing any part of the building structure or finish.
This ensures that electricians can inspect, maintain, and modify the wiring within the box in the future without causing damage to the building. Covering a junction box with insulation or drywall, thus making it inaccessible, is a direct violation of this code and can create a fire hazard.
Furthermore, the NEC also addresses the proper support and securing of junction boxes. NEC 314.23 details how boxes must be rigidly and securely fastened to the building structure. For attic installations, this often means mounting the box directly to a joist or rafter. If a ceiling fan-rated box is installed, it must be listed and marked as such and appropriately secured to handle the fan’s weight and movement. Remember that any wiring splices must occur within an approved junction box, and open splices are prohibited for safety reasons.
Here are key NEC considerations for junction boxes in attics:
- Accessibility (NEC 314.29): Junction boxes must remain accessible and cannot be covered by insulation, drywall, or other building materials.
- Secure Mounting (NEC 314.23): Boxes must be rigidly fastened to the building structure, such as joists or rafters.
- Fan-Rated Boxes: If installing a ceiling fan, a specifically listed and marked fan-rated box is required.
- Wiring within Boxes: All wire splices and connections must be contained within an approved and covered junction box.
- Protection: Junction boxes provide protection to the wiring connections from physical damage and environmental factors.
Conclusion
Navigating the world of attic junction boxes is crucial for maintaining a safe and functional electrical system. Understanding their location, adhering to safety protocols, and ensuring code compliance are paramount for any homeowner or DIY enthusiast venturing into this often-overlooked space. Properly managed junction boxes in the attic minimize hazards and streamline electrical work.
This guide has provided essential insights into identifying, inspecting, and addressing common concerns related to attic junction boxes. By prioritizing safety and understanding the fundamentals, you can confidently manage the electrical connections within your attic. Remember, when dealing with electricity, caution and knowledge are your best allies.
For large-scale projects or if you require a reliable supply of junction boxes specifically suited for attic environments, consider us your trusted partner. Call to action: Get wholesale junction boxes for your attic projects from us and ensure quality and compliance.


