
You check switchgear resistance with a megger by isolating the equipment, applying the tester, and reading the insulation resistance value. Safety comes first—de-energize the switchgear and follow lockout/tagout (LOTO) procedures. Neglecting insulation problems can lead to costly failures.
- Corrosion in production and manufacturing can reach $17.6 billion in direct costs.
- Moisture under insulation is hard to spot and can cause unplanned downtime.
- Regular maintenance helps prevent expensive repairs.
The Resistance of Switchgear Should Be Checked Using A megger to avoid these risks.
What is Switchgear?

Switchgear is an electrical equipment system used to control, protect, and isolate circuits, ensuring the safe operation of power distribution in industrial, commercial, and infrastructure applications. You can think of it as the “guardian” of an electrical network.
Under normal conditions, switchgear distributes and transmits electricity smoothly. But when a fault occurs, such as a short circuit, overload, or abnormal voltage, it immediately cuts off the faulty circuit, preventing accidents from spreading and protecting equipment and personnel.
The main functions of switchgear include:
- Protection: Prevents damage to electrical devices and safeguards operators.
- Control: Allows flexible switching of power on and off.
- Isolation: Ensures safe maintenance and inspection of circuits.
From factory production lines and data centers to power plants and large commercial buildings, switchgear is indispensable for achieving a stable, reliable, and efficient power system
| Component | Function Description | Application Value |
|---|---|---|
| Push Button Switch | Manually controls circuit start and stop, common on panels. | Lets operators quickly start or stop equipment on-site. |
| Resistor | Limits current, divides voltage, or absorbs energy. | Essential for circuit protection and load regulation. |
| Switchgear Fan | Ensures internal airflow and reduces temperature rise. | Extends component lifespan and keeps systems stable. |
| Switchgear Air Conditioner | Controls cabinet temperature and humidity. | Ensures reliability in hot or humid environments. |
| Control Transformer | Provides low-voltage power for control circuits. | Keeps control systems isolated from the main circuit for safety. |
| Terminal Block | Connects cables and equipment for stable electrical paths. | Simplifies installation, inspection, and expansion. |
Key Takeaways
- Always prioritize safety by de-energizing switchgear and following lockout/tagout (LOTO) procedures before testing.
- Use the right tools, including a megger, to ensure accurate resistance readings and prevent costly equipment failures.
- Regular maintenance and testing every 24 to 36 months help identify insulation issues early, reducing the risk of unplanned downtime.
- Document all test results and compare them with industry standards to ensure your switchgear remains in good condition.
- Inspect your safety gear for damage before use to protect yourself from electrical hazards during testing.
Tools and Safety Gear

Tools
You need the right tools to test switchgear resistance with a megger. Each tool has a specific job that helps you get accurate results and keep equipment safe. The table below shows the main tools and their functions:
| Tool/Component | Function |
|---|---|
| Megger PD Scan | Finds early signs of partial discharge in medium voltage switchgear. |
| Internal Sensors (TEV, Airborne) | Detect signals from inside the equipment. |
| External TEV Sensor | Pinpoints the location of partial discharges. |
| Temperature and Humidity Sensor | Tracks environmental conditions that can affect switchgear performance. |
| Phase Pattern Representation (PRPD) | Shows measurement data in a visual way for easy analysis. |
| Measurement Result Presentation | Evaluates data and gives feedback about asset condition. |
Modern megger devices offer new features that make testing easier and more reliable. For example, the MFT-X1 device has a full color screen, an RCD configurator, and can test EV charge points. It also connects to mobile devices for quick data sharing. The Portable Partial Discharge Testing System, launched in September 2023, gives you advanced diagnostic tools and a user-friendly interface.
- The portable system uses advanced signal processing for better accuracy.
- You can carry it easily and use it in different locations.
- The industry now prefers portable and simple testing solutions.
Safety Gear
You must wear proper safety gear before you start testing. This gear protects you from electric shock and other hazards. Always use:
- Insulated gloves 🧤
- Safety glasses 🥽
- Flame-resistant clothing
- Insulated boots
- Hard hat
Tip: Always check your safety gear for damage before you use it. Damaged gear cannot protect you.
You should also keep a first aid kit nearby. Make sure you know where emergency exits are located. Safety gear helps you stay safe while working with high voltage equipment. Never skip these steps, even if you feel confident. Your safety matters most.
The Resistance of Switchgear Should Be Checked Using A Megger: Steps
Preparation
You must prepare carefully before you test switchgear resistance. Good preparation helps you get accurate results and keeps you safe. Follow these steps:
- Disconnect the motor or switchgear from the electrical circuit and power supply. This prevents interference with your readings.
- Use a voltage tester to check for any leftover energy. Make sure the equipment is fully de-energized.
- Clean all terminals and insulators. Dirt, oil, or moisture can change resistance measurements.
- Inspect the switchgear for cracks, burns, or signs of wear. Damaged insulation can give false readings.
- Check the environment. High humidity or extreme temperatures can affect your test results.
- Make sure your megger device matches the voltage rating of the switchgear.
- Review all documentation and data logs. Missing records can cause confusion later.
- Walk down the area and look for any hazards or problems. Skipping this step can lead to unsafe conditions.
- Confirm that all operators understand the process and their roles.
Tip: Always retest after you make repairs or changes. This helps you validate your work and ensures safety.
Isolation and LOTO
Isolation and lockout/tagout (LOTO) procedures protect you from electrical hazards. You must follow industry standards to keep everyone safe. The Resistance of Switchgear Should Be Checked Using A strict LOTO process. Here is a table that shows the main steps:
| Step | Description |
|---|---|
| 1 | Clear the machine or equipment of tools and materials. |
| 2 | Remove employees from the machine or equipment area. |
| 3 | Remove the lockout or tagout devices. |
| 4 | Energize and proceed with testing or positioning. |
| 5 | Deenergize all systems and reapply energy control measures. |
You should always de-energize the switchgear before you start. Remove all devices that could carry current. The Resistance of Switchgear Should Be Checked Using A process that includes removing any connected loads. Never skip these steps. LOTO procedures prevent accidents and protect you and your team.
Testing
Now you can begin the actual megger test. The Resistance of Switchgear Should Be Checked Using A megger with the correct voltage setting. Most tests use 500V or 1,000V. Higher voltages can give more accurate results for stress testing. Here is a table that shows common voltage settings:
| Voltage (V) | Purpose |
|---|---|
| 500 | Common testing voltage |
| 1,000 | Used for stress testing insulation |
| Higher | Obtains more accurate results |
Follow these steps to test the resistance:
- Connect the megger leads to the switchgear terminals.
- Set the voltage on the megger. Use 500V for basic tests or 1,000V for stress tests.
- Apply the test voltage for at least 60 seconds. International standards like ANSI, IEEE, and IEC recommend a minimum of 1 minute for accurate results.
- Watch the reading on the megger display. Record the insulation resistance value.
- Remove the test leads and return the switchgear to its normal state.
Note: The Resistance of Switchgear Should Be Checked Using A process that follows standards like IEC 62271-200 and IEEE C37.20.2. These standards help you get reliable results and keep your equipment safe.
If you see unexpected readings, check your connections and repeat the test. Always document your results for future reference.
Safety Precautions
Switchgear Safety
You must treat switchgear with respect during resistance testing. High voltage equipment can cause serious injuries if you ignore safety rules. Always de-energize the switchgear before you begin. Lockout/tagout (LOTO) procedures keep you safe by making sure no one accidentally energizes the equipment while you work.
Common hazards include insulation failure, moisture ingress, and contamination from dust or chemicals. You can see these hazards and their solutions in the table below:
| Hazard | Mitigation Strategy |
|---|---|
| Insulation Failure | Regular maintenance, insulation resistance testing, and partial discharge testing. |
| Environmental Contamination | Implementing environmental controls and monitoring humidity and temperature. |
You should also watch for signs of aging and wear. Moisture can sneak into the switchgear and lower insulation resistance. Dust and chemicals can build up and cause problems. You can reduce these risks by cleaning the area, checking for leaks, and using environmental controls.
Tip: Always inspect the switchgear for cracks, burns, or other damage before you test. If you find any issues, fix them before you continue.
Megger Safety
You need to handle the megger with care. This device sends high voltage through the equipment to measure resistance. You must follow strict safety protocols to avoid electric shock.
Here are key safety protocols for using a megger:
| Safety Protocols for Megger Use |
|---|
| Use meggers on high-resistance measurements only (such as insulation measurements or to check two separate conductors on a cable). |
| Never touch the test leads while the handle is being cranked. |
| Deenergize and discharge the circuit completely before connecting a megger. |
| Disconnect the item being checked from other circuitry, if possible, before using a megger. |
You should always disconnect the switchgear from other circuits before you test. Never touch the test leads when the megger is active. Make sure the circuit is fully discharged before you connect the device.
- Wear insulated gloves and safety glasses.
- Stand on an insulated mat.
- Keep your hands dry and clean.
Note: If you feel unsure about any step, ask a qualified technician for help. Safety always comes first when working with high voltage equipment.
Interpreting Results
Reading Values
When you finish testing, you need to read the insulation resistance values from your megger. These numbers tell you how healthy your switchgear is. High resistance means good insulation. Low resistance can mean trouble, like moisture or damage inside the equipment.
You should compare your readings with industry standards. The table below shows the recommended minimum insulation resistance for different switchgear voltages. These values come from IEEE and IEC guidelines.
| Nominal Equipment Rating (Volts) | Minimum DC Test Voltage | Recommended Minimum Insulation Resistance (Megohms) |
|---|---|---|
| 250 | 500 | 25 |
| 600 | 1,000 | 100 |
| 1,000 | 1,000 | 100 |
| 2,500 | 1,000 | 500 |
| 5,000 | 2,500 | 1,500 |
| 8,000 | 2,500 | 2,500 |
| 15,000 | 2,500 | 5,000 |
| 25,000 | 5,000 | 10,000 |
| 34,500 | 5,000 | 100,000 |
| 46,000 and up | 5,000 | 100,000 |
You can also look at the chart below to see how resistance values change with voltage:
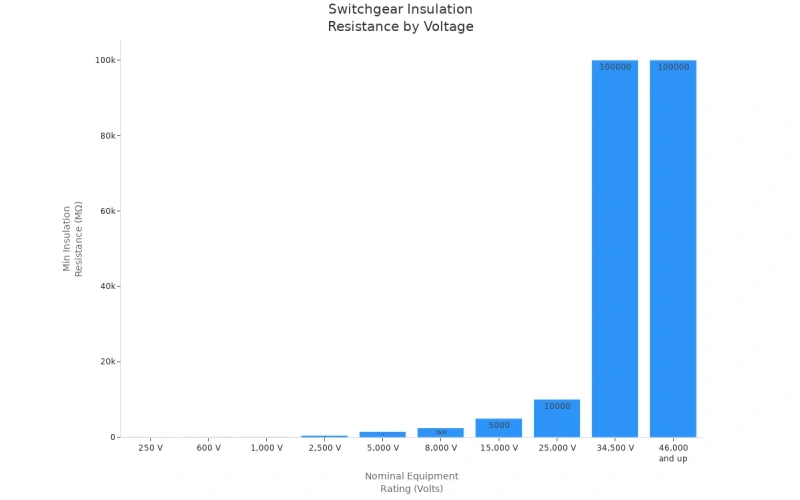
Tip: Always check your readings against these standards. If your value is much lower, you should investigate the cause.
Acceptable Resistance
You need to know what counts as an acceptable resistance value. If your reading is above the minimum, your switchgear is in good shape. If it falls below, you may need repairs or more tests.
Here is a simple table to help you understand what your results mean:
| Insulation Resistance Value | Condition |
|---|---|
| > 5 Giga-ohms | Acceptable |
| 50 Mega-ohms | Minimum Requirement |
| < 1.25 | Investigate |
For different types of equipment, the minimum resistance values can change. The table below shows some examples:
| Equipment Type | Minimum Resistance Value | Tolerance Between Phases |
|---|---|---|
| Circuit Breakers | 20 microhms | 50% |
| Fuses | 1000 microhms | 15% |
| Batteries | Installation value + 20% | 50% |
You should also check the polarization index (PI) value. If your PI value is above 2.0, your insulation is excellent. If it is between 1.5 and 2.0, it is acceptable. If it drops below 1.25, you need to investigate.
- Compare your measured values with the standards.
- Investigate any big differences.
- Adjust for humidity or temperature if needed.
The Resistance of Switchgear Should Be Checked Using A clear process. This helps you spot problems early and keep your equipment safe.
Troubleshooting
Unexpected Readings
You may sometimes see resistance values that do not match your expectations. These unexpected readings can signal problems with your switchgear or the testing process. Start by checking your connections. Loose or dirty test leads can cause low or fluctuating readings. Make sure you connect the megger leads firmly to clean terminals.
Environmental factors can also affect your results. Watch for these conditions:
- Humidity
- Degree of pollution
- Temperature
- Normal deterioration
- Minor contamination
- Field emission
High humidity or temperature can lower insulation resistance. Pollution and contamination on the switchgear surface can also change your readings. If you test in a dirty or damp area, clean the equipment and try again. Sometimes, normal aging or field emission from the equipment can cause lower values. Compare your results with previous records to spot trends.
Tip: Always retest after cleaning or adjusting connections. If the reading stays low, you may need to inspect the insulation for damage or moisture.
Testing Issues
Testing problems can happen even if you follow every step. If your megger does not work as expected, check the battery and settings first. A weak battery can cause false readings. Make sure you select the correct voltage for your switchgear.
Here is a quick checklist to solve common testing issues:
| Problem | Solution |
|---|---|
| No reading on display | Check battery and connections |
| Fluctuating readings | Clean terminals and leads |
| Consistently low values | Inspect insulation and retest |
| High readings suddenly | Verify test voltage and setup |
You should also disconnect all other devices from the switchgear before testing. Other connected equipment can affect your results. If you still see problems, try using another megger to confirm the readings.
Remember: Careful troubleshooting helps you find the real cause of unexpected results. Always document your steps and results for future reference.
You can keep your facility safe and reliable by following a clear process. The Resistance of Switchgear Should Be Checked Using A megger with these steps:
- Prepare your tools and safety gear.
- Isolate the switchgear and use lockout/tagout.
- Test resistance for at least 60 seconds.
- Record and compare your results.
Regular testing helps you spot problems early and meet standards from groups like NFPA and IEEE. You avoid costly repairs and keep your equipment working longer.
| Key Point | Explanation |
|---|---|
| Temperature Consistency | Keep the temperature steady for accurate readings. |
| Impact of Changes | A 10 °C rise cuts resistance in half; a drop doubles it. |
You should test every 24 to 36 months. If you skip testing, you risk insulation breakdown, arc flashes, and unplanned downtime. Stay safe by following each step and checking your results against the recommended values.
FAQ
How often should you test switchgear resistance with a megger?
You should test switchgear resistance every 24 to 36 months. Regular testing helps you find problems early and keeps your equipment safe. Always follow your facility’s maintenance schedule.
What does a low insulation resistance reading mean?
A low reading means your switchgear may have moisture, dirt, or damaged insulation. You should clean the equipment and retest. If the value stays low, inspect for damage or call a technician.
Can you use a megger on live equipment?
Never use a megger on live equipment. You must always de-energize and isolate the switchgear before testing. This keeps you safe from electric shock and prevents equipment damage.
What safety gear do you need for megger testing?
You need insulated gloves, safety glasses, flame-resistant clothing, insulated boots, and a hard hat. Always check your gear for damage before you start. Safety gear protects you from electrical hazards.
Why do you need to test for at least 60 seconds?
Testing for 60 seconds gives you a stable and accurate resistance reading. Short tests may not show true insulation conditions. International standards recommend a minimum of one minute for reliable results.


