If you want to wire a transformer for your control cabinet or telecom signal cabinet, you need to put safety first. Many people get hurt every year during transformer installation, mostly from arc flashes, electrical shocks, and burns. You also face risks like exposed wires, wet conditions, or damaged cords, which can lead to fires or even fatal accidents. Always use a Wiring Diagram for Transformer connections and follow safety rules. Linkewell offers trusted solutions that help make your transformer installation safe and reliable.
Wiring Diagram for Transformer Key Takeaways
- Always wear safety gear like insulated gloves and safety glasses to protect yourself during transformer wiring.
- Use the correct tools and certified materials, and double-check your wiring diagram before starting any work.
- Follow step-by-step wiring instructions carefully, including proper mounting, connecting primary and secondary wires, and grounding.
- Ground your transformer properly to prevent electrical shocks and equipment damage; never skip this crucial step.
- Test your wiring and inspect regularly to catch problems early and keep your control cabinet or telecom signal cabinet safe.
Transformer Safety
Personal Protective Equipment
When you work with a low-voltage transformer in a control cabinet or telecom signal cabinet, you need the right safety gear. Always wear safety glasses to protect your eyes from sparks or flying debris. Insulated gloves are a must because they keep your hands safe from electric shocks. You should also wear non-slip shoes and avoid loose clothing. These simple steps help you avoid many hazards that can happen during transformer installation. Never skip these safety precautions, even if you feel confident.
Tip: Keep your safety glasses and insulated gloves in good condition. Replace them if you see any damage.
Electrical Hazard Awareness
You face several hazards when wiring a low-voltage transformer. Electric shock, arc flashes, and burns are real risks in low-voltage environments. Always turn off the power before you start any work. Use a voltage tester to double-check that the circuit is dead. Grounding is another key step. Proper grounding protects you and your equipment from dangerous faults. You should also keep your workspace dry and free from clutter. This reduces the chance of accidents and keeps your focus sharp.
Here’s a quick look at key safety standards for transformer installation:
| Standard/Regulation | Focus Area | Application |
|---|---|---|
| IEC 61936 | Electrical safety, grounding | Industrial and residential |
| IEEE Standards | Arc flash, hazard zones | Industrial, control cabinets |
| OSHA, NFPA Codes | Personnel safety, fire risk | All electrical installations |
Linkewell Product Safety Features
Linkewell’s low-voltage transformer products for control panels and telecom cabinets meet strict international safety standards. You get peace of mind because these transformers carry UL and CE certifications. These marks show that the transformer passed tough tests for electrical safety and reliability. Linkewell transformers use high-quality insulation and overload protection to keep your system safe. The design supports proper grounding, which is vital for any low-voltage setup. When you choose a Linkewell transformer, you know it meets IEC and ANSI requirements. This helps you avoid hazards and ensures your installation follows all safety rules.
Tools and Materials
Required Tools
Before you start wiring a transformer in your control panel or telecom signal cabinet, you need the right tools. Having the correct tools makes your job safer and much easier. Here’s a list of what you should have on hand:
- Screwdrivers – Use these to tighten or loosen terminal screws.
- Wire strippers – These help you remove insulation from wires without damaging the copper.
- Multimeter – You’ll need this to check voltage, current, and make sure your wiring is correct.
- Electrical tape – Use this to insulate connections and prevent short circuits.
Tip: Always keep your tools clean and in good condition. Damaged tools can cause accidents or poor connections.
Materials Checklist
You also need the right materials to wire your transformer safely and correctly. Here’s a quick checklist to help you get organized:
- Control power transformer (choose a UL or CE certified model, like those from Linkewell)
- Electrical wires (make sure they match the voltage and current requirements)
- Terminal blocks or connectors
- Grounding wire
- Cable ties or wire ducts for neat routing
- Mounting hardware (screws, brackets, or DIN rail clips)
- Labels for marking wires and terminals
✅ Double-check that you have all these materials before you begin. Missing items can slow you down or lead to mistakes.
Inspection Before Wiring
Take a few minutes to inspect everything before you start wiring. This step helps you avoid problems later.
- Make sure the power is off. Use your multimeter to confirm there’s no voltage present.
- Check the transformer for any visible damage, like cracks or burnt marks.
- Inspect wires for cuts, nicks, or exposed copper.
- Confirm that all terminals are clean and free of corrosion.
- Ensure your workspace is dry and tidy. Water or clutter can create hazards.
- Review your wiring diagram and identify the primary and secondary terminals.
Note: Careful inspection keeps you safe and helps your transformer work reliably in your control cabinet or telecom signal cabinet.
Wiring Diagram for Transformer
Reading the Diagram
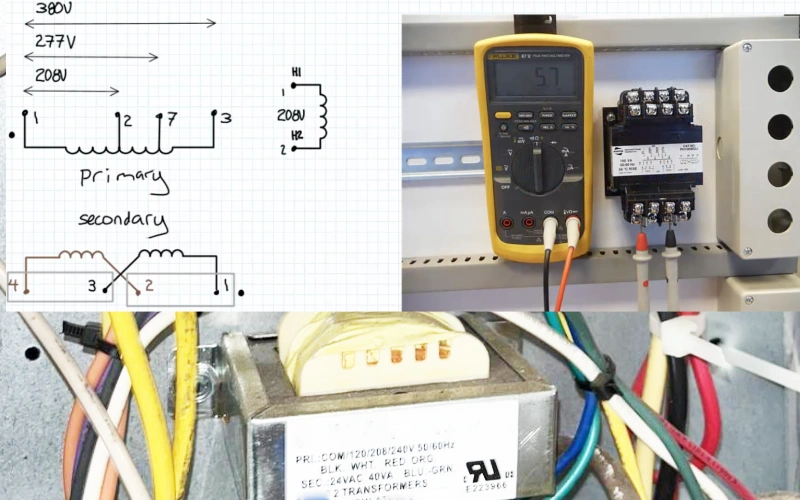
When you look at a wiring diagram for transformer installation, you see a map that shows how to connect each wire safely. You will notice different symbols and lines. These symbols help you understand what each part does. For example:
- Two coils side-by-side or rectangles with lines show the transformer itself.
- Ground symbols look like three short lines stacked on top of each other.
- Switches appear as breaks in lines or “T” shapes.
- Dots at line intersections show where wires connect.
You might also see special symbols for multi-tap transformer setups, which let you select the correct voltage for your control panel or telecom signal cabinet. Always check the legend or notes on the diagram. This helps you match each symbol to its real-world part.
Tip: Take a moment to study the wiring diagram for transformer before you start. This step can save you from wiring mistakes and help you deliver the correct voltage to your equipment.
Identifying Terminals
You need to find the right terminals on your transformer to make sure everything works as planned. Start by looking at the labels on the diagram. Most transformers for control cabinets and telecom signal cabinets use these labels:
- Primary (high voltage) terminals: Usually marked as H1, H2, or H3.
- Secondary (low voltage) terminals: Marked as L1, L2, or L3.
- Grounding points: Shown with the ground symbol.
If you use a multi-tap transformer, you will see extra taps or terminals. These let you pick the correct voltage for your system. Follow the lines from each terminal in the wiring diagram for transformer to see where each wire should go. This step is key for safe and reliable operation.
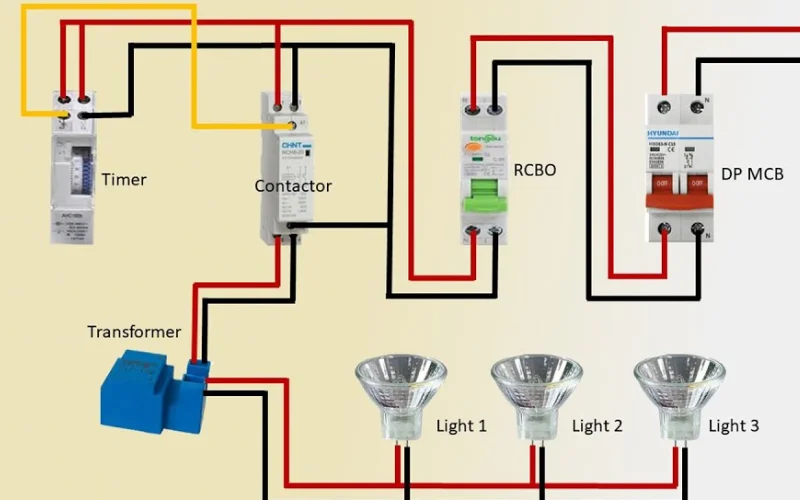
Linkewell Control Panel Integration
Linkewell control panels and power distribution boxes work smoothly with transformers, including multi-tap transformer models. The wiring diagram for transformer will show you how to connect the transformer’s primary and secondary sides to your panel. You will see clear terminal labels and grounding points. Linkewell designs its panels with labeled terminals and organized layouts, making it easy to follow the diagram and deliver the correct voltage to your control circuits.
If you use a Linkewell power distribution box, you get pre-cut cable entries and labeled terminals. This makes wiring your transformer simple and reduces the chance of mistakes. Always double-check your wiring diagram for transformer to confirm every connection before you power up.
Step-by-Step Wiring Guide
Wiring a low-voltage transformer for your control cabinet or telecom signal cabinet might seem tricky, but you can do it safely by following this step-by-step wiring guide. Let’s break down each part of the process so you can make secure connections and keep your system running smoothly.
Mounting the Transformer
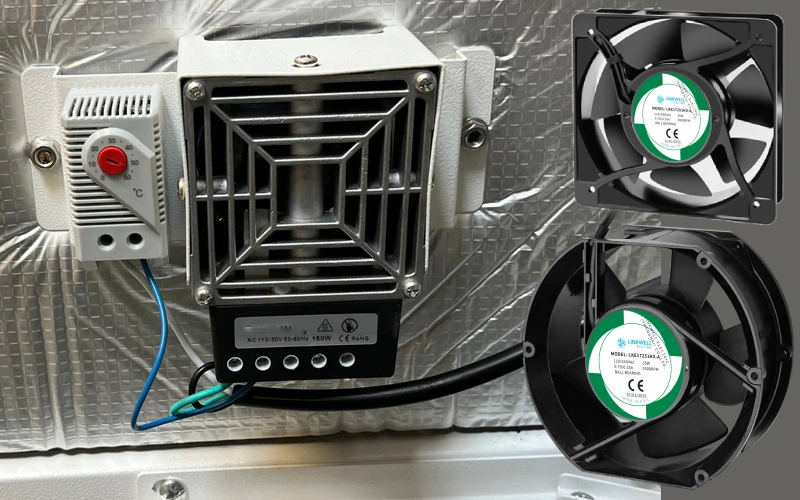
Start by choosing the right spot inside your control panel or telecom signal cabinet. You want a place with enough space for air to flow around the transformer. Good ventilation keeps your low-voltage transformer cool and prevents overheating. Always follow clearance guidelines from standards like NEC, IEC, and UL.
Here’s what you should do:
- Make sure a certified electrician handles the installation.
- Check the transformer’s power rating. It should match your load and allow for voltage swings.
- Use the mounting hardware that comes with your Linkewell transformer. You can pick from panel-mount, DIN rail, or enclosed styles.
- Secure the transformer tightly. Avoid placing it above heat-sensitive parts.
- Leave enough space for wires and future maintenance.
Tip: Linkewell transformers have clear labels and mounting options, making installation in control cabinets and telecom signal cabinets much easier.
Connecting Primary Wires
Now, let’s connect the primary (high-voltage) side. This is where you bring in the main power.
- Double-check that the power is off before you start.
- Strip the insulation from the wires, but don’t nick the copper.
- Attach the wires to the primary terminals, usually marked H1, H2, or H3.
- For larger transformers (80 VA and above), use fuses on the primary side. This protects both the transformer and your wiring.
- Tighten all screws to make secure connections. Loose connections can cause heat and faults.
- If you’re wiring a three-phase transformer, connect all three phases as shown in your wiring diagram.
Note: Always follow the wiring diagram for your specific low-voltage transformer. Linkewell transformers have easy-to-read terminal labels to help you avoid mistakes.
Connecting Secondary Wires
The secondary side delivers the low-voltage power to your control circuits. Here’s how to do it right:
- Identify the secondary terminals, usually labeled L1, L2, or L3.
- Use wires rated for the voltage and current your control panel needs.
- Make sure there’s electrical isolation between the primary and secondary windings. This prevents faults and keeps your equipment safe.
- Add overvoltage protection devices, like MOVs or TVS diodes, if your system is sensitive to spikes.
- Use terminal blocks or connectors for neat, organized connections.
- Check that all wires and components meet temperature and flammability standards.
Tip: Linkewell control panels and power distribution boxes have labeled terminals and cable entries, making secondary connections fast and reliable.
Grounding Steps
Grounding is one of the most important steps in transformer installation. Proper grounding protects you and your equipment from electrical faults.
- Connect the grounding electrode conductor to the transformer’s grounding terminal, often near H1.
- Use copper grounding conductors sized according to NEC guidelines. For example, #2 AWG for 30-75 KVA transformers.
- Keep the grounding resistance below 5 ohms for the best protection.
- Use rigid conduit for neutral connections and avoid sharp bends in the cables.
- Label all grounding wires clearly.
- Seal unused cable openings and keep phase conductors spaced apart.
- Use heat-shrink tubing to protect against moisture.
- Inspect your grounding connections regularly—monthly visual checks and quarterly tests help keep your system safe.
Alert: Never skip grounding the transformer. It’s required by code and is your best defense against electrical hazards.
Delta and Wye Configurations
You might need to choose between delta and wye wiring for your low-voltage transformer, especially in three-phase control cabinets.
| Configuration | Neutral Availability | Typical Use |
|---|---|---|
| Delta (Δ) | No neutral | Industrial settings with balanced loads |
| Wye (Y) | Neutral available | Commercial, utility, and mixed load systems |
- Delta: The windings connect end-to-end, forming a triangle. There’s no neutral, so grounding options are limited. Delta handles balanced loads well and can keep running if one phase fails, but it has higher short-circuit currents.
- Wye: The windings connect to a common neutral point. This setup gives you a neutral wire for grounding and single-phase loads. Wye handles unbalanced loads better and has lower short-circuit currents, which helps protect your equipment.
Tip: For most control panels and telecom signal cabinets, wye configurations are preferred because they support grounding and single-phase loads.
If you’re working with a single-phase transformer, the wiring is simpler. You only need to connect one phase and one neutral wire. Three-phase transformers need more complex connections, but Linkewell’s clear labeling and modular layouts make the job easier.
By following this step-by-step wiring guide, you can wire your low-voltage transformer safely and correctly. Always double-check your connections and grounding before powering up your control cabinet or telecom signal cabinet.
Testing and Troubleshooting
Safety Checks
Before you power up your control cabinet or telecom signal cabinet, you need to run through some safety checks. Start by making sure all covers are in place and the workspace is clear. Look for loose wires, missing screws, or signs of damage. Check that every connection is tight and that you have labeled all wires. If you see any exposed copper or insulation damage, fix it right away. You should also confirm that the grounding wire is secure. For transformers in these cabinets, regular inspections matter. Under normal conditions, check your wiring every 2 to 3 years. If your cabinet runs in a tough environment, inspect it every 6 to 12 months. These steps help you catch problems before they turn into hazards.
Tip: Always include grounding and insulation checks in your final checks and testing routine.
Voltage Testing
Once you finish wiring, it’s time for voltage testing. This step makes sure your transformer delivers the right voltage to your control circuits. Here’s a simple process you can follow:
- Gradually apply a voltage higher than the rated value, but adjust the frequency to avoid over-exciting the transformer core.
- Simulate high-voltage surges using impulse testing, especially if your cabinet is in a critical telecom or industrial setting.
- Test the insulation power factor to check for hidden problems inside the transformer.
- Never test when the transformer is under vacuum, since this can lower its dielectric strength.
- Always base your test voltages on the lowest insulation level in grounded wye setups.
Use a multimeter to confirm that the output matches your wiring diagram. If you spot any voltage outside the expected range, turn off the power and check for wiring mistakes.
Common Issues
You might run into a few common issues after installation. Here’s what to watch for:
- Overheating: This often happens if you overload the transformer or block ventilation in your control cabinet. Make sure you match the transformer’s VA rating to your load and keep vents clear.
- Loose or corroded connections: These can cause voltage drops or even fires. Tighten all terminals and check for rust.
- Moisture or oil leaks: These problems can lead to insulation breakdown. Inspect for leaks and keep your cabinet dry.
- Partial discharge or insulation failure: Regular testing and visual checks help you spot these early.
- Tap changer or bushing issues: If your transformer has taps, inspect and clean them during maintenance.
If you notice any of these problems, shut down the system and fix them before restarting. Regular testing and inspections keep your control panels and telecom signal cabinets running safely.
You want your control cabinet or telecom signal cabinet to run safely and last for years. Always follow each step when wiring a transformer. Double-check every connection and use certified products like Linkewell transformers and control panels. If you ever feel unsure, reach out to a professional or Linkewell’s support team. Here’s what you gain by wiring your transformer the right way:
- You keep airflow clear and avoid overheating.
- You reduce fire risks and prevent early equipment failure.
- You help your transformer last 20 to 30 years or more.
Proper wiring means better safety, fewer problems, and real peace of mind.
FAQ
How do you choose the right transformer for a control panel?
You need to match the transformer’s voltage and VA rating to your control panel’s needs. Always check the wiring diagram and pick a UL or CE certified model, like those from Linkewell, for safety and reliability.
Can you wire a transformer without a wiring diagram?
No, you should never wire a transformer without a diagram. The diagram shows you where each wire goes. It helps you avoid mistakes and keeps your control cabinet or telecom signal cabinet safe.
Why is grounding so important for transformer installations?
Grounding protects you and your equipment from electrical faults. It gives stray current a safe path to the ground. Without proper grounding, you risk shocks, fires, or damage to your control panel.
What should you do if your transformer gets hot after wiring?
First, turn off the power. Check for loose connections, blocked airflow, or an overloaded transformer. Make sure you matched the transformer’s rating to your control cabinet’s load. If you still have trouble, contact a professional or Linkewell support.
Conclusion
A Wiring Diagram for Transformer is more than a technical tool—it’s a safety blueprint. By following proper wiring steps, using certified products like those from Linkewell, and grounding your system correctly, you can avoid hazards, protect your control panel or telecom signal cabinet, and extend the life of your equipment. Always inspect, test, and refer to your wiring diagram to ensure a safe, long-lasting installation.