You want to keep your workplace safe, and installing an emergency stop push button is a big step in the right direction. This device acts as a last-resort control during an emergency when other safety measures just don’t cut it. Check out the table below to see what makes this button so important:
| Aspect | Details |
|---|---|
| Definition | An emergency stop push button is a last-resort control used in emergencies when other safety measures are insufficient. It is not intended for normal machine stopping or maintenance shutdowns. |
| Compliance Standards | According to ISO 13850, it must be red, mounted on a yellow background, easily accessible, and require a manual reset. |
| Functionality | It must stop hazardous movement quickly without creating additional risks. |
| Safety Level | Must achieve at least Performance Level c as per ISO 13850, with two independent channels for fault tolerance. |
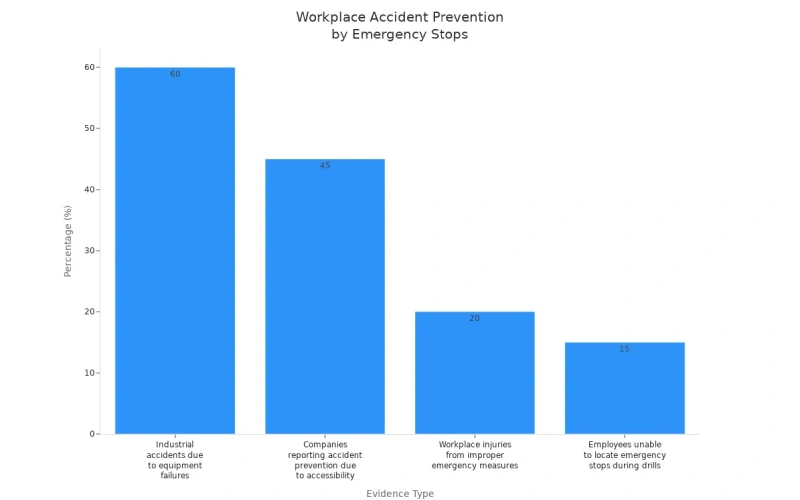
If you install your emergency stop button in a spot that’s easy to reach, you can help prevent up to 45% of workplace accidents.
Always double-check your wiring and test the system to make sure your emergency stop push button will work when you need it most.
Key Takeaways
- Choose a visible and accessible location for the emergency stop button to ensure quick response during emergencies.
- Gather essential tools and materials before starting the installation to avoid mistakes and ensure a smooth process.
- Follow safety precautions, including wearing protective gear and ensuring electrical safety, to protect yourself and others.
- Test the emergency stop button after installation to confirm it works properly and schedule regular maintenance checks.
- Select a button that meets safety standards and is suitable for your specific work environment to enhance workplace safety.
Tools and Materials for Emergency Stop Push Button
Before you start installing your emergency stop push button, you need to gather the right tools and materials. Having everything ready makes the job smoother and helps you avoid mistakes. Let’s break down what you’ll need.
Essential Tools List
You don’t need fancy equipment for this project. Most of these tools might already sit in your toolbox:
- Phillips and flathead screwdrivers 🪛
- Wire strippers and cutters
- Needle-nose pliers
- Drill with hole saw or step bit (for mounting holes)
- Multimeter (for testing)
- Marker or pencil (for marking positions)
- Small wrench or adjustable spanner
Tip: Always check your tools before you begin. A dull drill bit or worn-out screwdriver can slow you down or cause slips.
Required Materials and Components
Choosing the right emergency stop button and accessories matters for both safety and durability. Here’s a quick look at what you should look for:
| Feature | Details |
|---|---|
| Mounting Hole Size | 22mm (also available: 16mm, 19mm) |
| Functionality Options | 1NO1NC (3 pins), 2NO2NC (dual-way control) |
| Head Material | Zinc alloy, available in different colors |
| Rated Current | 5A 250V AC |
| Service Life | 100,000 operations |
| Waterproof Rating | IP65 |
| Housing Material | Engineering plastics or metal |
| Labeling | Wear-resistant printing or engraving |
| Durability Features | Dust-proof, waterproof, shock-resistant |
You want a button that stands up to tough environments. Look for one with a zinc alloy head and a waterproof rating of at least IP65. Labels should resist wear, so you can always read them. If you plan to install the button outdoors or in a dusty area, pick a model with dust-proof and shock-resistant features.
Note: Double-check the mounting hole size before you drill. Most industrial buttons use a 22mm hole, but some panels need a different size.
With these tools and materials, you’re ready to move on to the installation steps!
Safety Precautions for Emergency Stop Button Installation
Before you grab your tools, you need to think about safety first. Installing an emergency stop push button isn’t just about following instructions. You want to protect yourself and everyone around you.
Electrical Safety Tips
You can’t ignore electrical safety when working with emergency stop push buttons. Here’s what you should keep in mind:
- Use dual-channel wiring. This adds redundancy and helps identify faults quickly.
- Pick a button with a direct opening mechanism. It ensures the contacts separate mechanically when you press it.
- Test the button regularly. Manual inspections and automated diagnostics help catch problems early.
- Add tamper-proof covers or keyed reset mechanisms if needed. These prevent accidental or unauthorized use.
- Label every button clearly. Staff should know exactly what to do in an emergency.
- Choose enclosures with the right rating. If you work in a dusty or wet area, look for IP65 protection.
You want to make sure your installation meets all safety standards. Don’t rush through these steps.
Personal Protective Equipment
You need to wear the right gear for safety. Gloves protect your hands from sharp edges and electrical shocks. Safety glasses keep dust and debris out of your eyes. If you work in a noisy area, ear protection helps you stay focused. Closed-toe shoes prevent injuries from dropped tools or parts. Always check your gear before you start.
Tip: If you feel unsure about electrical work, ask a qualified electrician for help. Your safety matters more than speed.
Preparing the Workspace
A clean workspace makes installation safer and easier. Remove clutter and keep tools organized. Make sure the area is dry and well-lit. If you work near moving machinery, shut it down before you begin. Mark the installation spot with a pencil or marker so you don’t drill in the wrong place. You want to create a safe environment for yourself and others.
You can never take too many steps for safety. Every precaution helps prevent accidents and keeps your emergency stop push button reliable.
Emergency Stop Push Button Types and uses
You might think all emergency stop push buttons look the same, but they actually come in different types. Each type fits a specific job or industry. Picking the right one helps you keep your workplace safe and your equipment running smoothly.
Let’s look at some common types you’ll find:
- Mushroom Head Push Button: This is the classic big red button. You can hit it fast with your palm or even your elbow. It works well in places where you need to stop machines quickly.
- Keyed Reset Push Button: After you press this button, you need a key to reset it. This type stops people from turning machines back on before it’s safe.
- Twist Release Push Button: You twist the button to reset it. This design helps prevent accidental resets.
- Pull Release Push Button: You pull the button out to reset it. It’s simple and easy to use.
You’ll see these buttons in many industries. Here’s a quick table to show how different fields use emergency stop push buttons:
| Industry | Specific Use |
|---|---|
| Food and Beverage Processing | Lets you stop machinery fast to keep food safe and prevent accidents. |
| Chemical Processing | Shuts down pumps and mixers during dangerous situations to protect workers and stop spills. |
| Material Handling | Stops conveyors and cranes if someone is at risk or if something goes wrong. |
| Machine Tools | Halts cutting machines like lathes and mills right away. |
You’ll also find emergency stop push buttons in medical equipment. For example, hospital beds and dental chairs use normally open momentary switches. These switches let you adjust positions safely and quickly.
Tip: Always choose a button that matches your environment. If you work in a wet or dusty area, pick a model with a high waterproof rating.
Here are some pros and cons to keep in mind:
- Pros:
- You get quick control over dangerous equipment.
- These buttons help prevent damage and keep people safe.
- They follow safety rules set by OSHA and other groups.
- Cons:
- Someone might press the button by mistake.
- You have to reset the button by hand, which can slow things down.
- Sometimes, false alarms can stop work for no reason.
Choosing the right emergency stop push button makes a big difference in safety and efficiency. Take a moment to think about your needs before you buy.
Emergency Stop Push Button Installation Steps
Choosing Installation Location
You want your emergency stop push button to be easy to spot and quick to reach. Picking the right location is the first step. If you put the switch in a hidden spot, it might not help in an emergency. Here’s what you should look for:
| Criteria | Description |
|---|---|
| Conspicuous Location | Place the emergency stop switch where everyone can see and reach it fast. |
| High-Visibility Color | Use a red button on a yellow background so it stands out. |
- Emergency stop push buttons must be red and easy to access. OSHA standards require this for safety.
- Never put the switch behind equipment or in a spot where you need to reach over moving parts.
- Always mark the location clearly.
| Requirement | Specification |
|---|---|
| Location | At operator stations, accessible from all hazard zones |
| Reach | No reaching over moving parts |
| Marking | Red button on yellow background, clearly marked |
| Height | 0.6 m to 1.7 m from the ground, based on operator height |
Tip: Walk around your workspace and imagine where someone would stand during an emergency. That’s where you want to install the switch.
Preparing Mounting Holes
Once you pick the location, you need to get the panel or surface ready for the emergency stop switch. Here’s how you do it:
- Mark the exact spot for the switch using a marker or pencil.
- Check the mounting hole size for your emergency stop push button. Most use a 22mm hole, but always double-check.
- Use a drill with a hole saw or step bit to make the hole. Drill slowly to avoid cracking the panel.
- Clean away any dust or sharp edges around the hole.
Make sure the hole lines up with the operator’s reach. If you drill in the wrong spot, the switch might not be easy to use.
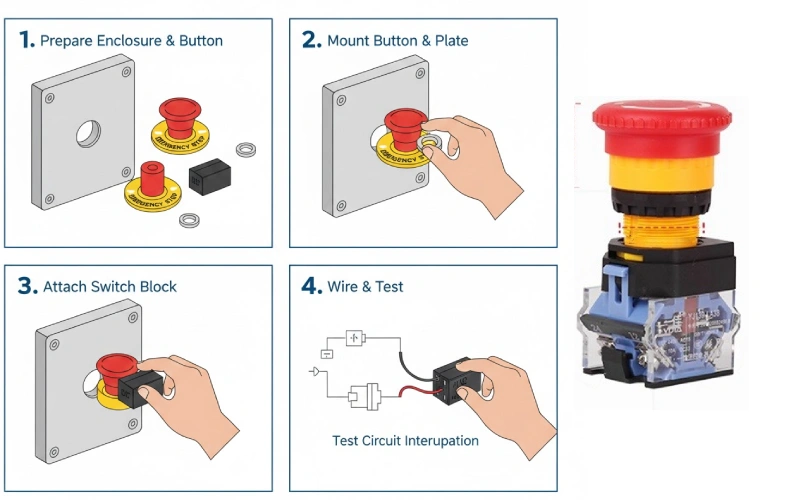
Mounting the Emergency Stop Switch
Now you’re ready to install the switch. You want it to stay put, even if someone hits it hard during an emergency. Follow these steps:
- Insert the emergency stop switch into the mounting hole.
- Use the mounting hardware that comes with the switch. Tighten the nut or screws by hand first, then use a wrench or spanner for a snug fit.
- Don’t overtighten. You want the switch secure, but not cracked.
- Check that the switch does not wiggle or move. It should feel solid.
Here’s a quick checklist for a secure installation:
- Choose the right location for the emergency stop switch.
- Use strong fasteners to keep the switch from loosening due to vibration.
- Test the switch after mounting to make sure it works.
- Add clear signage near the switch.
- Train everyone on where the switch is and how to use it.
If you work in a place with lots of vibration, check the switch every month to make sure it stays tight.
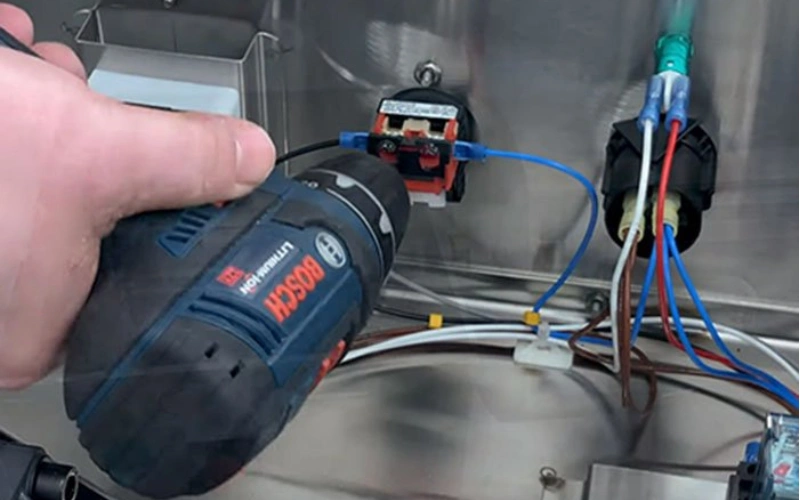
How to Wire the Emergency Stop Button
Wiring the emergency stop push button is the most important part. If you wire it wrong, the switch won’t work when you need it. Here’s how to wire the switch step by step:
- First, turn off all power to the panel before you start.
- Understand the difference between normally open (NO) and normally closed (NC) contacts. Normally closed contacts break the circuit when you press the switch, which stops the machine.
- Most emergency stop switches use NC contacts for safety. If the wire gets cut or the power fails, the switch will stop the machine by default.
- Connect the wires to the correct terminals. Use a screwdriver to tighten the screws, but don’t overtighten.
- If you need to wire imo emergency stop button, follow the same steps. Always check the wiring diagram that comes with your switch.
- Double-check your connections. Loose wires can cause the switch to fail.
- A typical wiring setup for a start-stop circuit looks like this:
- Power supply connects to the NC contact of the emergency stop switch.
- The other side of the switch goes to the relay coil.
- The NO push button connects in parallel for starting.
- Ground all metal parts for safety.
The stop push button should be programmed in the PLC as a normally open contact, but the physical relay wiring should use a normally closed contact. This way, if the wire breaks or power is lost, the switch will stop the machine.
If you’re not sure how to wire the emergency stop button, ask a professional. Safety comes first.
Testing the Emergency Stop Push Button
After you install the switch and finish wiring, you need to test it. Testing makes sure the emergency stop switch will work when you need it most. Here’s a simple plan:
| Testing Procedure | Description |
|---|---|
| Regular Inspection | Plan monthly or quarterly checks, depending on how often you use the switch and your environment. |
| Functional Testing | Tell everyone nearby, start the machine, press the emergency stop push button, and watch for a quick stop. |
| Recovery Operation | Release the switch, reset the machine, and make sure it starts up again. |
| Record Test Results | Write down the test date, who did it, what happened, and any problems you found. |
| Maintenance & Repair | Fix any problems right away to keep the switch reliable. |
- You should test the emergency stop switch at least twice a year if you don’t use it often.
- If you find any issues during testing, fix them before you use the machine again.
Always keep a record of your tests. This helps with audits and shows you care about safety.
You’ve now learned how to install the switch, how to wire the emergency stop button, and how to test it. If you follow these steps, your emergency stop push button will help keep your workplace safe.
Troubleshooting Emergency Stop Switch Issues
Even after a careful installation, you might run into problems with your emergency stop push button. Let’s walk through some common issues and how you can fix them.
Button Not Working
If you press the emergency stop and nothing happens, don’t panic. Start by checking the basics:
- Look at the emergency stop circuit, beginning at terminal S11 on the relay.
- Make sure you see 24–27 VDC between terminals A1 and A2, and check if the relay’s indicator light is on.
- Follow the signal path to the air pressure safety sensor. You want at least 75 PSI of air pressure.
- Trace the signal through each emergency stop device, like cable pulls or touchscreen stops.
- Confirm the signal returns to the relay at terminals S31 and S32, and check voltage at terminals 70 through 76.
If you find a problem at any step, fix it before you move on. Always test and verify after each adjustment.
Wiring Problems
Wiring issues can cause all sorts of headaches. Here are some typical problems you might see:
- Loose wires that mess with the signal.
- Misconnected terminals that make the push button act strangely.
- Cables routed the wrong way, which can affect pressure sensors.
You should always double-check your wiring. If you spot a loose or misplaced wire, fix it right away. After any repair, test and verify that the button works as it should.
Loose Connections
Loose connections are sneaky. They might work one day and fail the next. Use a screwdriver to gently tighten all terminal screws. Don’t overtighten, or you could damage the switch. If you notice any corrosion or frayed wires, replace them. A solid connection keeps your emergency stop reliable.
Other Common Issues
Sometimes, the emergency stop switch stays triggered or the board enters alarm mode. You might see a message telling you to reset the board before you can keep working. These problems often come from using the button the wrong way. Check out this table for common mistakes and how to prevent them:
| Common Mistakes | Preventive Measures |
|---|---|
| Wrong application | Use a normally closed emergency stop button to cut power right away. |
| Wrong occasion for use | Only use the emergency stop in real emergencies, not for regular maintenance. |
| Wrong usage habits | Teach everyone how and when to use the emergency stop to avoid unnecessary stops. |
Tip: Regular training and reminders help everyone use the emergency stop button correctly.
Conclusion
You’ve just learned how to install an emergency stop push button from start to finish. Now, you know how to pick the right spot, mount the switch, wire it safely, and test it for reliability. These steps help you create a safer workspace for everyone.
Let’s recap the key points you should always remember:
- Choose a location that’s easy to see and reach.
- Use the right tools and materials for a secure installation.
- Follow safety rules and wear protective gear.
- Double-check your wiring before turning the power back on.
- Test the emergency stop push button after installation.
Regular checks and maintenance keep your emergency stop switch ready for action. Skipping these steps can lead to serious accidents. For example, a faulty emergency stop switch in Meizhou City caused a tragic accident. This shows why you should never ignore routine inspections. Always test the button’s response, look for damage, and make sure nothing blocks access during an emergency.
Here’s a quick checklist to help you stay on track:
| Step | Done? |
|---|---|
| Location is visible | ☐ |
| Switch is mounted securely | ☐ |
| Wiring is correct | ☐ |
| Button tested and working | ☐ |
| Maintenance scheduled | ☐ |
If you ever feel unsure about wiring or installation, don’t hesitate to call a professional. Your safety and the safety of your team come first. When you follow these steps, you can trust your emergency stop push button to work when you need it most. Stay safe and keep your equipment in top shape!
You now know how to install an emergency stop push button the right way. Always pick a spot that everyone can reach fast. Use a button that meets safety standards like ISO 13850 and IEC 60204-1. Test your button after installation and keep checking it often. Here are some best practices to remember:
- Place the button where it’s easy to see and reach.
- Check the electrical rating and safety features.
- Test and maintain the button regularly.
- Train everyone on how to use it.
If you ever feel unsure about wiring or setup, call a professional. Your safety comes first!
FAQ
How often should you test your emergency stop push button?
You should test your emergency stop button at least twice a year. If you work in a harsh or busy environment, check it more often. Regular testing keeps everyone safe.
Can you install an emergency stop button yourself?
You can install it if you feel comfortable with basic electrical work. If you have any doubts, call a licensed electrician. Safety always comes first.
What should you do if the button gets stuck?
Try resetting the button by twisting or pulling, depending on the type. If it stays stuck, turn off the power and inspect for dirt or damage. Replace the button if needed.
Do emergency stop buttons work during a power outage?
No, emergency stop buttons need power to function. If the power goes out, the machine should stop anyway. Always check your system’s fail-safe features.