Does a 2-pin vs. 3-pin fan, or a 3-pin vs. 4-pin fan, offer any difference in cooling performance? Real-world testing provides a more intuitive comparison.
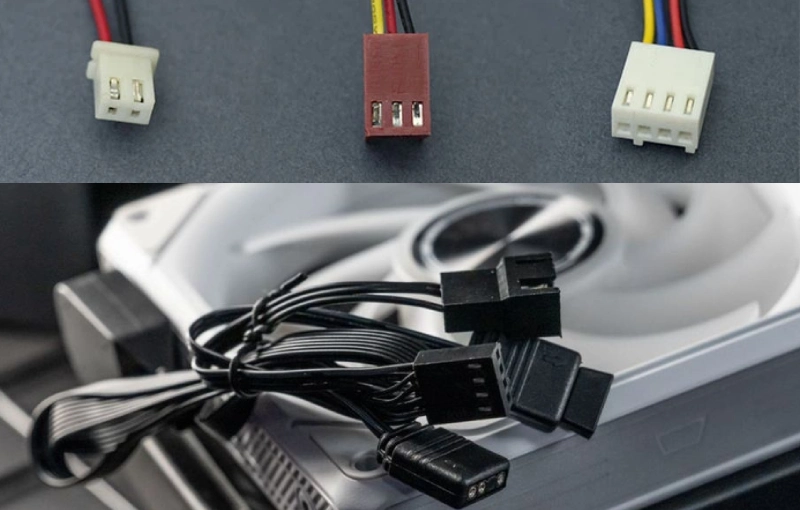
I think about cooling fans like tools in a toolbox. Each fan serves a different purpose. A 2-pin fan works like a basic screwdriver—simple and straightforward. A 3 Pin Fan feels more like a ratchet wrench because it adds speed monitoring. A 4-pin fan acts like a power drill, offering flexible control with PWM. The structure of fans changes how they fit into your system. I check this table to see how each fan impacts compatibility:
| Fan Type | Structure Description | Compatibility Impact |
|---|---|---|
| 2-Pin | Simple structure with power and ground wires only. Cannot measure speed or adjust speed. | Limited compatibility due to lack of speed control. |
| 3-Pin | Adds a wire for speed measurement, allows voltage-based speed regulation. | Compatibility depends on motherboard support for speed adjustment. |
| 4-Pin | Includes PWM for flexible speed control, independent of motherboard BIOS. | High compatibility with modern systems due to advanced control features. |
Linkwell fans give me confidence in every project. I always find the right fan for any cabinet or computer case.
Main Points
- 2-pin cooling fans are simple and cost-effective. They provide steady airflow but lack speed control.
- 3-pin fans offer speed monitoring and voltage-based control. They balance cooling and noise effectively.
- 4-pin fans use PWM for precise speed regulation. They adjust automatically based on temperature, ensuring quiet operation.
- Always check compatibility before installing a fan. Match the fan type to your system’s requirements for optimal performance.
- Linkwell fans are reliable and customizable. They meet various needs, from basic cooling to advanced applications.
2-Pin Cooling Fans: Basic Power and Operation
Structure and Wiring of 2-Pin Cooling Fans
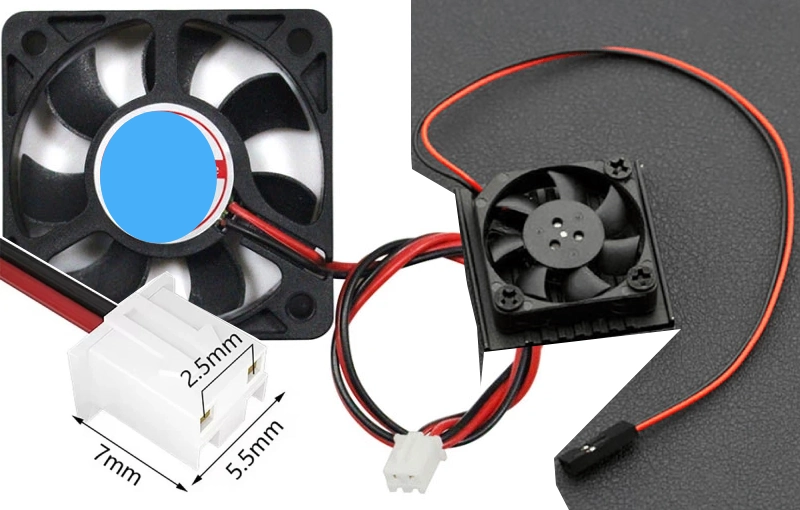
When I work with 2-pin cooling fans, I always notice how simple the connectors look. These fans use just two wires—one for power and one for ground. That’s it. The connectors usually snap right into place, making installation quick and easy. I don’t have to worry about extra wires or complicated setups. Most 2-pin fans use standard connectors that fit into many types of devices, from small electronics to industrial panels.
Here’s a quick table showing the typical voltage and current ratings for 2-pin cooling fans in consumer electronics:
| Voltage (V) | Current (A) |
|---|---|
| 12 | 0.1 – 0.3 |
This basic wiring means I can focus on getting airflow where I need it, without fussing over advanced controls. The connectors keep things straightforward, especially when I need to swap out a fan fast.
Features and Limitations of 2-Pin Cooling Fans
I like using 2-pin fans when I want a cost-effective solution that just works. These fans run at a fixed speed, so I get consistent airflow every time. If I need high airflow in a control panel or a small cabinet, a 2-pin fan does the job. The Linkwell DC Fan is a great example. It comes in different sizes and supports a range of voltages, so I can match it to almost any project. The connectors are sturdy, and the fan fits right into place.
Here’s what I see for lifespan in industrial use:
| Application Area | Typical Use Case | Power Source | Expected Lifespan |
|---|---|---|---|
| Industrial Equipment | Control panel cooling | 12V DC power supply | 30,000–50,000 hours |
But there are some things to keep in mind. Since 2-pin cooling fans always run at full speed, they can get a bit noisy. I can’t adjust the speed or monitor it. Here’s a table that sums up the main limitations:
| Limitation | Description |
|---|---|
| Fixed speed operation | No ability to adjust fan speed |
| Increased noise levels at full speed | Higher noise output when operating at maximum speed |
Even with these points, I find 2-pin cooling fans perfect for simple jobs where I just need steady airflow and easy connectors. The Linkwell DC Fan gives me peace of mind, knowing I have a reliable and straightforward cooling solution.
3-Pin Cooling Fans: Speed Monitoring and Voltage Control
Structure and Wiring of 3-Pin Cooling Fans
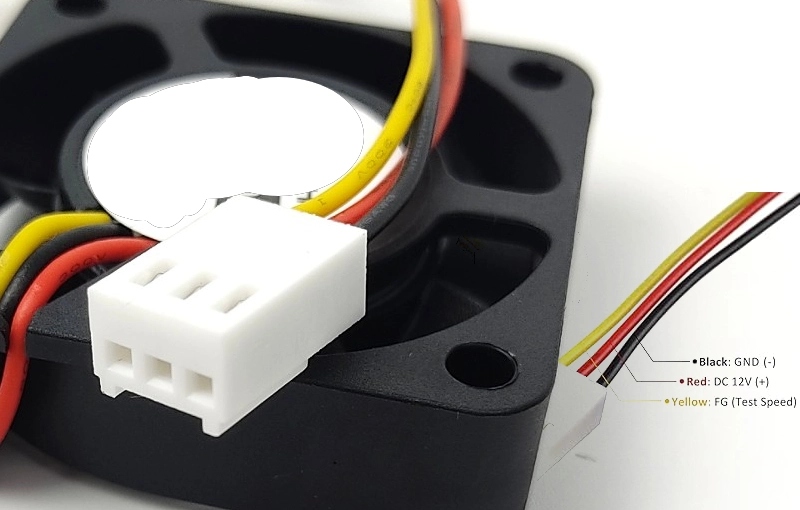
When I work with a 3 pin fan, I notice the extra wire right away. The connector has three pins: one for power, one for ground, and one for the tachometer signal. That tachometer wire lets me track the fan’s speed in real time. I find this feature handy when I want to keep an eye on airflow or troubleshoot cooling issues. The wiring feels a bit more advanced than a 2-pin setup, but it’s still easy to install. I just plug the connector into the motherboard or controller, and the fan starts spinning.
Control Methods for 3 Pin Fan
I like how the 3 pin fan gives me more control than a basic model. Instead of running at full speed all the time, I can adjust the speed by changing the voltage. Most motherboards let me tweak the voltage from 12 volts down to about 5 volts. This method is called Voltage Control Mode or DC Mode.
3-pin fans are controlled by varying the voltage on Pin #2, which can range from +12 VDC (maximum speed) to about +5 VDC (minimum speed). This method is known as ‘Voltage Control Mode’ or ‘DC Mode’.
I use this feature to balance cooling and noise. If my system doesn’t get too hot, I lower the voltage and the fan slows down. When things heat up, I crank the voltage and the fan speeds up. The Linkwell Computer Chassis Fan makes this process simple. It supports voltage control and gives me steady airflow, even when I adjust the speed.
Compatibility and Use Cases for 3-Pin Cooling Fans
I always check the documentation before installing a 3 pin fan. I read the motherboard’s User Guide, the fan’s installation guide, and the case manual. I make sure the pin configuration matches. Sometimes, I use splitters or adapters to connect everything properly.
I use 3-pin cooling fans in a lot of projects. Here are some common scenarios:
- Electrical Enclosures: I install 3 pin fan models in control panels to cool PLCs and relays.
- Cost Efficiency: I pick these fans when I need a simple, affordable solution for stable conditions.
- Constant Airflow: I rely on them in environments with steady temperatures, where consistent cooling matters.
The Linkwell Computer Chassis Fan fits these needs perfectly. It offers reliable speed monitoring, easy voltage control, and flexible installation. I trust it for both industrial and consumer applications.
4-Pin Cooling Fans: PWM Precision and Quiet Operation
Structure and Wiring of 4-Pin Cooling Fans
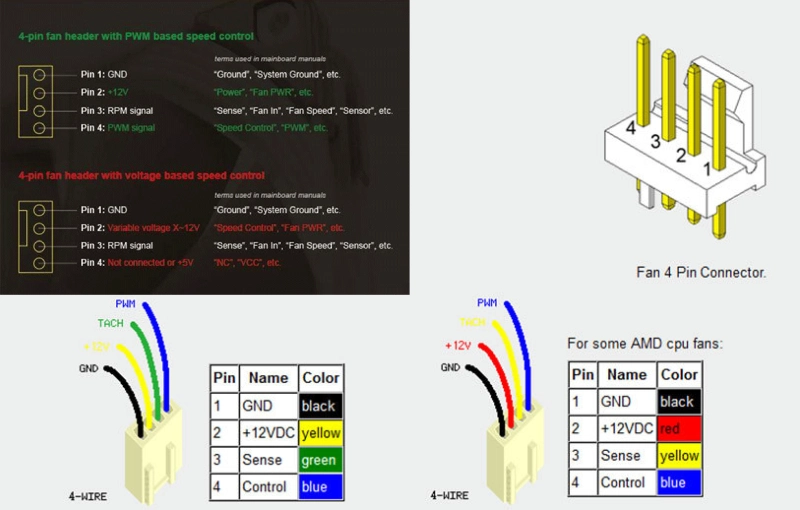
I always notice the difference when I install 4-pin cooling fans. The connector has four wires: power, ground, tachometer, and PWM. That extra PWM wire gives me flexible speed control. I can set the fan speed based on system needs. The wiring structure feels more advanced compared to 2-pin and 3-pin fans. Here’s a table that shows the wiring differences:
| Fan Type | Wiring Structure | Functionality |
|---|---|---|
| 2-Pin | Basic power and ground | Simple on/off control |
| 3-Pin | Power, ground, and tachometer | Speed monitoring and basic control |
| 4-Pin | Power, ground, tachometer, and PWM | Advanced speed control with PWM mechanism |
I like how the PWM wire lets me use pulse width modulation for precise speed regulation. This setup makes installation easy and gives me more options for temperature control.
PWM Control and Advanced Features of 4-Pin Cooling Fans
PWM control changes everything for me. With 4-pin cooling fans, I can adjust fan speed automatically. The system sends a PWM signal to the fan, and the fan responds by speeding up or slowing down. This means I get quieter operation when the system is cool and more airflow when things heat up. I can customize fan curves in the BIOS, which helps me balance cooling performance and noise. PWM functionality lets me fine-tune speed regulation for every situation.
Linkwell’s PWM Fan stands out in my projects. It supports PWM speed regulation, so I can set the fan to run quietly or ramp up when needed. The fan comes with certifications like CE, RoHS, UL, FCC, and CCC. Here’s a quick table:
| Certification | Description |
|---|---|
| CE | Compliance with health, safety, and environmental protection standards in Europe. |
| RoHS | Restriction of hazardous substances in electrical and electronic equipment. |
| UL | Safety certification for products in the United States. |
| FCC | Compliance with electromagnetic interference standards in the U.S. |
| CCC | China Compulsory Certification for safety and quality assurance in China. |
I can also customize Linkwell’s PWM Fan for size, airflow, and branding. This flexibility helps me match the fan to any industrial or computer cooling project.
Ideal Scenarios for 4-Pin Cooling Fans
I use 4-pin cooling fans in high-performance systems where temperature control matters most. These fans work well in modern motherboards that support PWM. I rely on them for:
- Precise speed regulation in data centers and server racks
- Dynamic speed adjustment based on system temperature
- Quiet operation in office computers and industrial control cabinets
4-pin fans give me superior energy efficiency compared to 2-pin and 3-pin models. Here’s a table that shows the difference:
| Fan Type | Energy Efficiency | Speed Control Method | Noise Level |
|---|---|---|---|
| 4-Pin | Superior | PWM | Quieter |
| 3-Pin | Less Efficient | Voltage Regulation | Higher |
| 2-Pin | Least Efficient | Fixed Voltage | Variable |
I trust Linkwell’s PWM Fan for projects that demand advanced cooling performance and flexible speed regulation. The fan’s PWM control and customization options make it my go-to choice for bulk orders and industrial applications.
Cooling Fan Comparison: Choosing the Right Solution
Recommended products

Practical Differences Between Fan Types
When I choose a cooling fan, I always start by comparing the main types side by side. Each one brings something different to the table. I like to use a simple chart to keep things clear:
| Fan Type | Key Features | Speed Regulation | Flexibility |
|---|---|---|---|
| 2-pin | Simple structure, cannot measure speed | No speed regulation | Low |
| 3-pin | Measures speed, voltage-based regulation | Voltage adjustment | Moderate |
| 4-pin | PWM speed regulation, constant voltage | PWM mechanism | High |
A 2-pin cooling fan works best for basic jobs. It just spins at one speed. I use it when I want something simple and reliable. A 3-pin fan gives me a little more control. I can check the speed and adjust it by changing the voltage. This works well in systems where I want to keep noise down but don’t need advanced features. The 4-pin type is my favorite for high-performance setups. With PWM, I can fine-tune the speed and keep things quiet or powerful as needed.
I always think about what matters most for my project. If I want something budget-friendly, I stick with 2-pin. If I need more control, I go for 3-pin or 4-pin. Here’s another chart that helps me decide:
| Fan Type | Key Features | Advantages | Limitations |
|---|---|---|---|
| 2-Pin | Simple design with power and ground wires, no speed control | Straightforward and reliable | Operates at constant speed, can be noisy |
| 3-Pin | Includes RPM feedback, requires manual voltage regulation for speed control | Improved control and quieter than 2-pin | Cannot automatically adjust speed based on temperature |
| 4-Pin | PWM capability for automatic speed modulation | Effective temperature management, quieter | Typically more expensive than 2-pin or 3-pin |
System Compatibility and Installation
I always check compatibility before I install a new cooling fan. Each type has its own requirements. If I pick the wrong one, I might run into problems with connectors or speed control. Here’s a quick guide I use:
| Fan Type | Installation Requirements | Speed Control | Notes |
|---|---|---|---|
| 2-Pin | Simple connection with ground and power wires | No speed monitoring | Cost-effective but noisy |
| 3-Pin | Requires motherboard support for speed monitoring | Voltage-based | Limited flexibility, may not reflect CPU temperatures |
| 4-Pin | Requires compatible motherboard for PWM control | PWM control | Offers precise speed adjustments without voltage reliance |
If I’m working on an older system or a basic control panel, I usually pick a 2-pin fan. It plugs right in and starts spinning. For computers and smart devices, I often use 3-pin or 4-pin fans. I always check the motherboard manual to see if it supports voltage or PWM control. That way, I know the fan will work as expected.
Tip: I always match the connector type and double-check the voltage before installing any cooling fan. This helps me avoid damage and keeps my system running smoothly.
Linkwell Cooling Fan Recommendations
When I need a cooling fan for any project, I trust Linkwell. The product range covers all the main types, so I always find what I need. For simple jobs, I use the Linkwell DC Fan. It comes in different sizes and voltages, and I can even get waterproof models for outdoor use. If I want speed monitoring and voltage control, I go with the Linkwell Computer Chassis Fan. It’s perfect for computer cases and industrial cabinets.
For advanced projects, I always recommend the Linkwell PWM Fan. It supports PWM control, which means I can set custom fan curves and keep noise low. Linkwell offers a lot of customization options for bulk buyers and integrators:
- Voltage options from 5V to 48V
- Connector types: 2-pin, 3-pin, and 4-pin
- Waterproof designs (IP67 and IP68) for outdoor use
- Custom sizes from 40mm to 200mm
- Tailored airflow, voltage, and noise levels
- OEM and ODM solutions for special industry needs
I’ve used Linkwell fans in manufacturing, healthcare, and even food processing. The fans keep air clean, meet strict safety standards, and help reduce energy costs. If you need a cooling fan for a unique project, Linkwell can customize the design to fit your exact requirements.
If you want a cooling fan that matches your system perfectly, reach out to Linkwell. Their team helps with everything from design to delivery, making sure you get the right solution every time.
Conclusion
If I only need steady airflow without speed control, I choose a 2-pin fan. It’s simple, reliable, and cost-effective for basic cooling applications.
When I want speed monitoring or quieter performance, I go with a 3-pin fan. It allows RPM monitoring and basic voltage control, making it ideal for computers and electrical enclosures.
For high-performance systems, I select a 4-pin PWM fan. It provides precise speed control, lower noise, and better energy efficiency. This is the best choice for data centers, industrial cabinets, and modern PCs.
If you’re unsure which fan fits your project, choose based on control needs:
- 2-pin for simple cooling
- 3-pin for monitoring and flexibility
- 4-pin PWM for precision and efficiency
Matching the right fan to your application ensures stable performance, lower noise, and longer equipment life.
Choosing the right cooling fan feels a lot like picking the right shoes for a job. I always ask myself,
| Feature | Description |
|---|---|
| Efficiency | High performance and energy-saving |
| Low noise | Quiet operation in any environment |
| Durability | Built for harsh conditions |
I trust Linkwell for every cooling project. Their fans always fit my needs.
FAQ
How do I pick the right cooling fan for my project?
I start by checking my system’s connector type and voltage. If I want simple airflow, I grab a 2-pin fan. For speed monitoring, I choose a 3-pin. When I need quiet, adjustable cooling, I go with Linkwell’s 4-pin PWM fan.
Can I customize Linkwell fans for special requirements?
Yes, I can! Linkwell offers custom sizes, voltages, waterproofing, and branding. I just contact their team, and they help me design a fan that fits my exact needs. Bulk buyers get extra support and fast delivery.
What’s the main difference between voltage control and PWM control?
Voltage control changes fan speed by adjusting voltage. PWM uses a signal to set speed without changing voltage. I prefer PWM because it keeps noise low and gives me precise control, especially with Linkwell’s 4-pin fans.
How often should I replace a cooling fan in industrial use?
I check my fans every few months for dust and noise. Linkwell fans last up to 70,000 hours, so I rarely need replacements. If airflow drops or noise increases, I swap the fan to keep my system cool.