Wondering how to remove push button switch components from your control cabinet? Start by making sure you cut the power and grab the right tools for the job. Safety comes first! Linkewell stands out as a trusted name when it comes to push button switch solutions for industrial and automation needs. If you follow the right steps, you can remove a push button switch easily—even if you’re new to this kind of task.
Remove Push Button Switch Key Takeaways
- Always turn off the main power and use a voltage tester before working on any push button switch to stay safe.
- Gather the right tools like screwdrivers, pliers, wire cutters, and insulated gloves to make removal easier and safer.
- Label all wires before disconnecting to avoid confusion when reinstalling the switch.
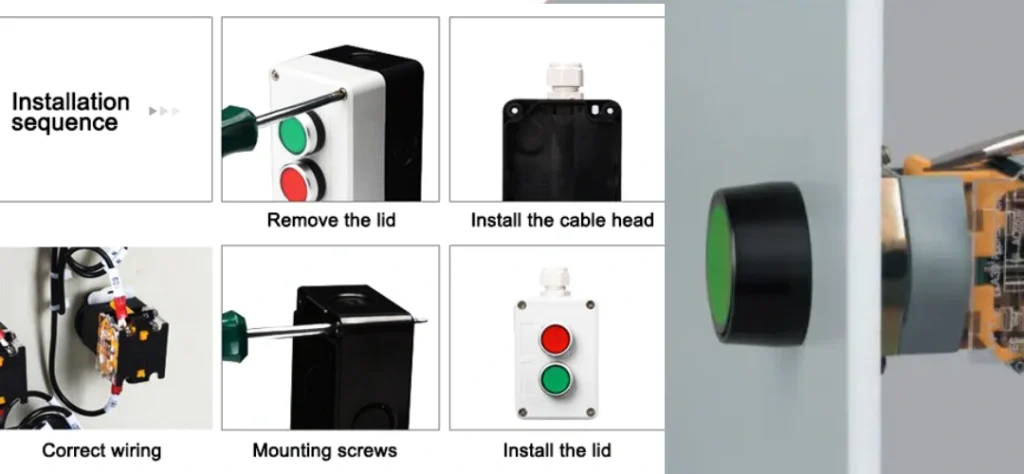
- Remove switches carefully by following the right steps for standard, waterproof, or soldered types to prevent damage.
- Check switches for damage or wear and replace them if they are loose, stuck, or not working properly to keep your device running smoothly.
Tools and Safety
What You Need
Before you start working on your electrical control cabinet, you need to gather the right tools. Having the proper equipment makes the job easier and safer. Here’s a handy checklist for you:
- Screwdrivers (flathead and Phillips) for removing panel covers and switch mounting screws
- Needle-nose pliers for gripping small parts and wires
- Wire cutters and strippers for handling and preparing wires
- Small adjustable wrench for loosening mounting nuts
- Labeling tape or markers to keep track of wires
- Insulated gloves to protect your hands
- Flashlight or headlamp for better visibility inside the cabinet
- Voltage tester, continuity tester, or multimeter for checking electrical status
If you’re looking for tools needed for mini push button switch repair, you might want to add precision screwdrivers and tweezers to your kit. These help you handle smaller components without damaging them.
Tip: Keep your tools organized in a small box or pouch. This way, you won’t lose anything while working inside the cabinet.
Safety Tips
Safety should always come first when you remove a push button switch. Here are some important steps you should follow:
- Turn off the power at the main circuit breaker. Never trust a switch alone—always cut the power at the source.
- Use a non-contact voltage tester to make sure no wires are live before you touch anything. This tool lets you check for electricity without direct contact.
- Double-check your tester on a known live circuit to confirm it works.
- Wear insulated gloves to protect yourself from accidental shocks.
- If you need to test the switch after removal, use a continuity tester or a multimeter. These tools help you check if the switch works and if the wires are safe to handle.
- Work in a dry area and keep your hands dry at all times.
Note: Always label wires before disconnecting them. This step saves you time and confusion when you install a new push button switch, especially if you use a Linkewell model.
By following these steps and using the right tools, you can safely remove and replace switches in your control cabinet.
How to Remove Push Button Switch
Accessing the Switch
First, you need to get to the push button switch inside your control cabinet. Start by making sure the power is off and you have your tools ready. Open the cabinet door or remove the panel cover using a screwdriver. If your cabinet has a transparent cover, you might only need to unscrew a few fasteners. Shine a flashlight inside to spot the switch and check how it’s mounted.
Tip: Take a quick photo of the wiring and switch placement before you begin. This helps you remember where everything goes when you put it back together.
Look for any labels or markings on the switch. Linkewell push button switches often have clear labels and color-coded wires, making identification easier. If you see a mounting collar or locking mechanism, note its position. You’ll need to handle these carefully in the next steps.
Removing Standard Switches
Standard push button switches usually sit in a round hole on the control panel. Here’s how to remove them:
- Disconnect the Wires: Use needle-nose pliers to gently pull off the wire connectors from the back of the switch. If the wires are screwed in, loosen the screws with a small screwdriver.
- Label the Wires: Stick a piece of labeling tape on each wire or use a marker. Write down the terminal number or color. This step saves you time during reinstallation.
- Release the Locking Mechanism: Many Linkewell switches use Z2 or Z3 holders, fixing screws, or mounting nuts. For Z2 holders, gently lift the buckle with a screwdriver to release the switch. For Z3 holders, remove the switching element first, then unscrew the mounting nut by turning it counterclockwise.
- Remove the Switch: Once the locking mechanism is loose, push the switch out from the back of the panel. Pull it out slowly to avoid damaging the wires or the panel opening.
Note: Don’t use too much force when loosening mounting collars or buckles. Linkewell switches are designed for easy removal, so a gentle touch works best.
Removing Waterproof Switches
Waterproof push button switches have extra protection, like rubber gaskets or covers, to keep out dust and moisture. Here’s how to remove these:
- Remove the Waterproof Cover: Unscrew or unclip the waterproof cap or gasket. Set it aside for reuse.
- Disconnect the Wires: Just like with standard switches, pull off or unscrew the wire connectors. Label each wire as you go.
- Loosen the Mounting Collar: Waterproof switches often use a threaded collar or nut. Use an adjustable wrench to turn the collar counterclockwise. Hold the switch steady from the front to keep it from spinning.
- Push Out the Switch: Once the collar is off, gently push the switch out from the back of the panel.
Tip: Check the gasket for cracks or wear. If it looks damaged, replace it when you install the new switch.
Removing Soldered Switches
Some push button switches are soldered directly onto a circuit board inside the control cabinet. Removing these takes a bit more care and the right tools. Here’s how to remove push button switch components that are soldered:
- Remove the Circuit Board: Unscrew the board from the cabinet and place it on a non-flammable surface.
- Identify the Solder Points: Flip the board over and find the solder joints holding the switch in place.
- Heat the Solder Joints: Use a temperature-controlled soldering iron. Touch the tip to each solder joint until the solder melts.
- Use a Solder Sucker or Desoldering Braid: Quickly place a solder sucker over the molten solder and press the button to suck it up. Or, lay desoldering braid on the joint and heat it; the braid will absorb the solder.
- Remove the Switch: Once all the solder is gone, gently pull the switch out with tweezers or pliers.
- Clean Up: If any solder remains in the holes, use the soldering iron and braid again. Make sure the board is clean before installing a new switch.
Note: Always wear safety glasses and work in a well-ventilated area when desoldering. Don’t rush—take your time to avoid damaging the board.
If you run into stubborn solder, try adding a bit of fresh solder to help melt the old joint. For tough jobs, a hot air rework station or a desoldering iron with built-in suction can make the process easier and safer.
By following these steps, you’ll know exactly how to remove push button switch components from your control cabinet, whether you’re dealing with standard, waterproof, or soldered types. Linkewell push button switches are designed for easy installation and removal, so you can keep your equipment running smoothly.
Handling Wires
Disconnecting Safely
When you work inside a control cabinet, safety comes first. You want to avoid shocks, shorts, or any damage to your equipment. Here are some best practices to keep you safe:
- Always turn off the power at the main breaker before you touch any wires. Double-check with a voltage tester to make sure nothing is live.
- Wear insulated gloves and use insulated tools. This protects you from accidental contact with live wires.
- Work in a dry, well-lit area. Wet hands or a dark workspace can lead to mistakes.
- Inspect wires and terminals for any damage or exposed strands. If you see cracked insulation or loose wires, fix them before moving on.
- Use the right wire gauge and insulation for your switch. For Linkewell Push Button Switches, thin, flexible wires like 22- or 24-gauge work well.
- Strip about a quarter inch of insulation from each wire. Twist the strands to prevent fraying.
- If you ever feel unsure, ask a qualified electrician for help.
Tip: Never skip the power check. Even a quick touch on a live wire can cause serious injury.
Labeling and Organizing
Keeping your wires organized makes reassembly much easier. You do not want to guess where each wire goes when you install a new switch. Here’s how you can stay organized:
- Use labeling tape or a marker to tag each wire as you disconnect it. Write down the terminal number or color code.
- Take a photo of the wiring before you start. This gives you a visual reference for later.
- Place wires in order or group them by function. For example, keep all start wires together and all stop wires together.
- If you are working with a waterproof switch, note how to wire waterproof pushbutton switch connections. These often have extra seals or covers, so pay attention to how everything fits.
- Use a table to track common wire issues and how to prevent them:
| Wire-Related Issue | What Happens | How to Prevent |
|---|---|---|
| Loose wires | Flickering or shutdowns | Tighten with pliers |
| Irritated contacts | Erratic switch behavior | Tighten with screwdriver |
| Disrupted circuits | Malfunction or no operation | Test with a multimeter |
Note: Always double-check your labels and connections before you close the cabinet. This step helps you avoid mix-ups and keeps your control system running smoothly.
Push Button Switch Failure
Troubleshooting Removal Issues
Sometimes, you run into trouble when trying to remove a push button switch from your control cabinet. Maybe the switch feels stuck, or the wires seem tangled. Don’t worry—these problems happen more often than you think. Here are some common reasons for push button switch failure:
- Dust or debris inside the button can cause it to jam.
- Springs inside the switch may lose their bounce or break.
- The sliding parts might get stiff if they dry out or get dirty.
- Water or moisture can sneak in, especially if the cabinet isn’t sealed well.
- Excessive force during operation can damage the switch or make it hard to remove.
If you have a switch with an LED, removal can get tricky. Sometimes, the LED blocks the plastic part of the button, so you need to desolder the LED first. Always use plastic-safe cleaners if you try to loosen a stuck button. Some cleaners can damage the plastic and make things worse.
Try these mini push button switch troubleshooting steps:
- Clean the inside of the button to remove dust.
- Check the spring for damage or loss of elasticity.
- Lubricate the sliding mechanism if it feels stiff.
- Inspect the wires for any signs of damage or corrosion.
- If the button still won’t budge, take your time and avoid using too much force.
Tip: Regularly check and clean your switches, especially if you use them often. This simple habit can prevent most removal headaches.
Inspecting and Replacing
When you finally get the switch out, take a close look at it. Some signs tell you it’s time to replace the switch instead of trying to fix it:
- Cracks, warping, or visible damage on the button or plate
- Loose or wobbly buttons that don’t feel secure
- Flickering or dim lights on illuminated switches
- Intermittent operation or the switch only works sometimes
- Overheating or discoloration around the switch
- Strange noises when you press the button
Sealed switches, like many used in control cabinets, can’t be cleaned inside. If cleaning doesn’t help, replacement is the safest option. Linkewell push button switches are affordable and easy to install, so you don’t have to struggle with unreliable parts.
Note: Always match the new switch’s stem length and mounting style to your panel. This ensures smooth operation and a perfect fit.
If you notice any of these issues, don’t hesitate to swap out the old switch for a new one. You’ll keep your equipment running safely and avoid bigger problems down the line.
You now know how to remove push button switch components safely from your control cabinet. After you finish, always double-check your connections and test the device:
- Reconnect the power and press the switch to see if everything works.
- Inspect all wiring for tightness and proper placement.
- Test the switch several times to confirm smooth operation.
If you want reliable performance and easy integration, choose Linkewell push button switches. Not sure about a step? Reach out to a professional for help.
FAQ
How do you know if a push button switch in your control cabinet needs replacing?
If the button feels loose, sticks, or stops working, it’s time to swap it out. Flickering lights or strange noises also mean you should check the switch. Sometimes, cleaning internal components helps, but often a new switch works best.
What’s the safest way to disconnect wires from a push button switch?
Always turn off the main power first. Use insulated tools and label each wire as you remove it. This makes reconnecting easier when you follow the steps for installing a new mini push button switch later.
Can you fix a stuck or unresponsive mini push button switch?
You can try repairing a mini push button switch by gently cleaning internal components. Remove dust or debris with a soft brush. If the button still sticks or feels rough, replacing it is usually the safest choice.
Do you need special tools for cleaning internal components of a push button switch?
You don’t need fancy tools. A small brush, compressed air, and a soft cloth work well for cleaning internal components. Just make sure the power is off before you start. If the switch is sealed, replacement is a better option.
Conclusion
Knowing how to remove a push button switch safely saves time and avoids equipment damage. With the right tools, careful labeling, and proper techniques, even non-experts can handle standard, waterproof, or soldered switches confidently. Linkewell provides reliable push button solutions that simplify both installation and maintenance for industrial control systems.