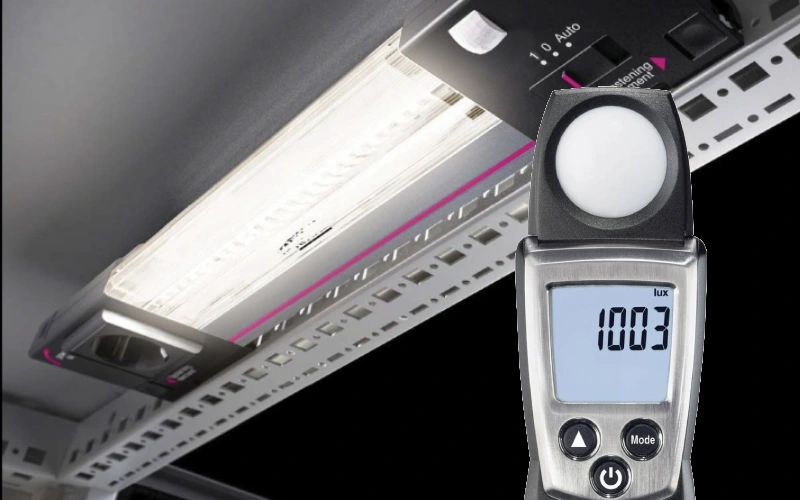
If you want to know how to measure light intensity, you need to use tools like a luxmeter, goniophotometer, or even a CCD-based testing method. These devices help you measure light intensity accurately in places like factories or inside electrical cabinets. Accurate measurement of light intensity keeps your workplace safe, boosts efficiency, and helps you avoid costly fines. Did you know poor lighting causes about 15% of workplace injuries? That’s why you should always check your lighting measurements. Linkewell offers smart solutions, and their Enclosure Light makes it easy to see every detail in your cabinet or control panel.
Measure Light Intensity Key Takeaways
- Use the right units—lux, lumens, and candela—to measure light depending on your goal: lux for surface brightness, lumens for total light output, and candela for focused beams.
- Choose proper tools like photometers, light meters, or smartphone apps to measure light intensity accurately; always calibrate your devices for reliable results.
- Follow clear steps when measuring light: position the sensor correctly, take multiple readings, and compare them to recommended lighting levels for safety and comfort.
- Maintain consistent distance and angle during measurements to avoid errors, and keep your equipment clean and calibrated for the best accuracy.
- Good lighting improves safety and efficiency in workplaces; use quality lighting solutions like Linkewell Enclosure Light to ensure even, bright illumination in cabinets and work areas.
Light Intensity Units
Lux, Lumens, and Candela
When you start learning about how to measure light intensity, you’ll see three main units pop up: lux, lumens, and candela. Each one tells you something different about light. Let’s break it down:
| Term | Unit Symbol | What it Measures | Definition Summary |
|---|---|---|---|
| Luminous Flux | lm | Total light output (brightness) | Shows the total amount of visible light a source gives off. |
| Illuminance | lx | Light on a surface per unit area | Tells you how much luminous flux lands on a surface (lux = lumens per square meter). |
| Luminous Intensity | cd | Light in a specific direction | Measures the visible light sent out in a certain direction. |
You might wonder, what is the measure of light? Lumens show you the total brightness a light source produces. Lux tells you how well a surface is illuminated. Candela focuses on the intensity in one direction. For example, a flashlight with a tight beam has high candela but not always high lumens. If you want to know how is light measured in a room, you’ll likely use lux.
Tip: If you’re working with electrical cabinets, knowing the unit of measurement for light intensity helps you pick the right Enclosure Light for safe and clear visibility.
When to Use Each Unit
You don’t always use the same unit for every job. Here’s a quick guide to help you decide:
- Use candela when you care about the direction of the beam. This matters for things like car headlights, stage lighting, or telescopes.
- Use lumens when you want to know the total brightness, like for home lights, street lamps, or industrial fixtures.
- Use lux when you need to check illumination on a surface. This is key for offices, workbenches, or inside electrical cabinets.
If you’re asking, how do you measure light intensity or what is light measured in, remember:
- Lux is perfect for checking if your workspace is bright enough.
- Lumens help you compare the total output of different bulbs.
- Candela is best for focused beams.
In photometry, these units help you answer questions like how to measure the light, how to measure brightness of a light, or what is the measurement for light. You’ll see that measuring light intensity is not just about brightness, but also about where and how the light falls.
Tools for Measuring Light Intensity
When you want to get accurate lighting measurements, you need the right equipment. There are many tools and techniques for measuring light intensity. Let’s break down the most common ones you’ll find in workplaces, labs, and even your pocket.
Photometers and Light Meters
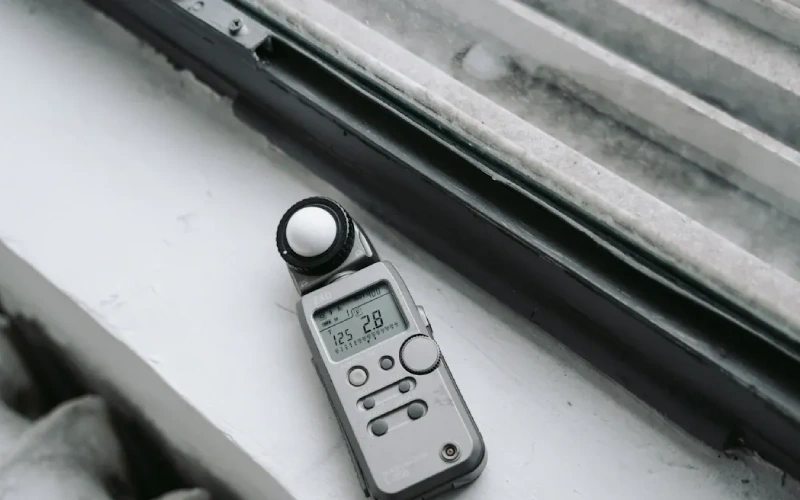
A photometer is a classic tool for measuring light intensity. You’ll see photometers in science labs, photography studios, and industrial settings. These devices use sensors that match the human eye’s response to light. A photometer converts light into an electrical signal, then shows you the result in units like lux or foot-candles. You can use a photometer to check the unit of measurement for light intensity or see how is light measured in your workspace. Some photometers measure incident light (falling onto a surface), while others measure reflected light. You’ll find photometers in many forms, from handheld gadgets to built-in camera sensors. Photometers help you answer questions like how do you measure light intensity, what is the measure of light, and how to measure the light.
A light meter works much like a photometer. It detects light with a sensor, then displays the reading in lux, foot-candles, or other intensity light units. Many light meters let you select the range, hold readings, or switch between lux and watts. You’ll use a light meter for measuring light in photography, plant growth, or checking if your office meets safety standards. Some light meters reach up to 5% accuracy, making them reliable precision tools for measuring light.
Integrating Spheres and CCD Sensors
If you need to measure total light output or color, integrating spheres are your go-to equipment. These hollow spheres scatter light evenly, so you get a uniform reading. Integrating spheres work well for measuring light intensity from bulbs or LEDs. They’re great for checking what is the measurement for light and how to measure lumen. CCD sensors, often paired with integrating spheres, capture spatial light data. You’ll see these in advanced labs or manufacturing. They need calibration but give you detailed info about light intensity and color.
| Tool | Best For | Limitations |
|---|---|---|
| Integrating Sphere | Total luminous flux, color measurements | Bulky, needs calibration |
| CCD Sensor | Spatial light distribution, color analysis | Sensitive to uniformity, calibration needed |
Smartphone Apps and DIY Methods
You don’t always need fancy gear to start measuring light. Many smartphone apps turn your phone into a basic light meter. These apps use your camera sensor to estimate light intensity. While not as precise as a photometer or pro light meter, they’re handy for quick checks. Some apps get close to pro-level accuracy, especially with good cameras and calibration. DIY tricks, like using a gray card, can help you measure reflected light. Just remember, apps may struggle with very dim light or need extra attachments for best results.
Tip: If you work in electrical cabinets or enclosures, Linkewell’s Enclosure Light gives you bright, even lighting. This makes measuring light intensity inside cabinets much easier and more reliable.
How to Measure Light Intensity
Direct Measurement Steps
If you want to know how to measure light intensity, you need the right tools and a clear process. Let’s walk through the steps for using a photometer, a light meter, and even your smartphone.
Using a Photometer or Light Meter
- Understand the Units
Before you start, check what units your photometer uses. Most display readings in lux or foot-candles. These units show how much light lands on a surface. Knowing the unit of measurement for light intensity helps you compare results and meet safety standards. - Position the Device
Hold your photometer or light meter in the area where you want to measure light intensity. Make sure the sensor faces the light source. For electrical cabinets, place the device near the components you want to inspect. - Take the Reading
Turn on the device and let it stabilize. Read the value on the screen. Move the photometer around to find the spot with the highest reading. This helps you find the brightest area and check for dark spots. - Measure Directional Light
If you need to check a focused beam, like a flashlight, keep the photometer in the brightest part of the beam. Move it sideways until the reading drops to half. Mark this spot. Repeat on the other side. Use a protractor to find the angle between these points. This tells you the beam angle. - Use a Smartphone App
Download a trusted light meter app. Hold your phone in the same spot you would use a photometer. Take a reading. Remember, phone sensors can be less accurate, so use them for quick checks, not official reports. - Interpret the Results
Compare your readings to recommended levels. Offices need about 250–500 lux. Detailed work areas may need 750–1,000 lux. If your numbers are low, consider adding more lights, like the Linkewell Enclosure Light.
Tip: Always check your device’s manual for special instructions. Some photometers need calibration before use.
Table: Quick Reference for Measuring Light Intensity
| Tool | Steps to Use | Best For |
|---|---|---|
| Photometer | Place, read, move for max, record | Cabinets, labs, offices |
| Light Meter | Place, read, compare, record | Workspaces, studios, factories |
| Smartphone App | Download, place, read, compare | Quick checks, field work |
Best Practices for Accurate Light Output Measurement
You want your light measurement to be as accurate as possible. Here are some best practices:
- Always position the light source at a fixed distance from your photometer or light meter.
- Calibrate your device before each use. Follow the manufacturer’s instructions.
- Take readings in a controlled environment. Try to block out extra light from windows or other sources.
- Keep the angle and distance the same for every measurement. This helps you compare results.
- Use certified tools when you need official reports. Devices with NIST-traceable calibration give you the best measurement accuracy.
- Document your process. Write down calibration dates, measurement logs, and any changes in setup.
Note: Avoid common mistakes like using dirty sensors, skipping calibration, or rushing the process. Take your time and double-check your readings.
Relative and Comparative Methods
Sometimes you need to compare light intensity in different places or under different conditions. You can use relative and comparative methods for this.
- Take baseline readings in a known environment, like a well-lit office or a dark room.
- Use your photometer to measure light at different spots, times of day, or weather conditions.
- Try using a digital camera with a fisheye lens to capture how light spreads in a space. This method helps you see not just the amount, but also the direction and color of the light.
- Compare your results to see how lighting changes. For example, you might notice that a cabinet with a Linkewell Enclosure Light has more even coverage than one with a standard bulb.
- Record readings at multiple points and times. This helps you spot patterns and make better decisions about lighting upgrades.
Tip: When you compare environments, look at both the numbers and how the light feels. Sometimes, the best measure of light is how comfortable and safe you feel working in that space.
Common Errors and How to Avoid Them
- Forgetting to calibrate your photometer can lead to wrong results.
- Measuring too close or too far from the light source changes the reading.
- Letting outside light affect your test area can throw off your numbers.
- Using old or faulty equipment reduces accuracy.
- Not documenting your process makes it hard to repeat or verify your results.
To avoid these mistakes, always calibrate, keep your setup consistent, and use clean, well-maintained tools. If you use a smartphone app, pick one that has been tested in labs and offers calibration features.
Remember: Good lighting measurements help you create safer, more efficient workspaces. When you know how to measure light intensity the right way, you can choose the best lighting solutions and keep your team safe.
Measuring Light Intensity in Cabinets and Enclosures
Linkewell Enclosure Light Applications
When you work inside electrical cabinets, you know how tough it can be to get the right illumination. Tight spaces, tricky wiring, and shadows make it hard to see what you’re doing. That’s where the Linkewell Enclosure Light steps in. This LED lighting solution fits perfectly into cabinets and enclosures, giving you bright, even light exactly where you need it. You can choose from different mounting options—DIN rail, magnetic base, or screws—so you always find the right fit for your setup.
Let’s look at some common challenges and how Linkewell Enclosure Light helps you solve them:
| Aspect | Challenges | Requirements and Solutions |
|---|---|---|
| Space Constraints | Limited space inside enclosures requires flexible mounting and compact fixtures. | Use flexible cable connections and 90° rotating connectors to fit lights precisely without bending wires. |
| Light Distribution | Need for precise, adjustable illumination to focus on specific areas inside the cabinet. | Use adjustable light covers that can be rotated to direct light where needed. |
| Mounting Flexibility | Enclosures vary in configuration; mounting must accommodate horizontal, vertical, or tool-less options. | Provide multiple mounting options: horizontal, vertical, tool-less clip, screw, or magnet mounts. |
| Light Source Technology | Fluorescent lights have drawbacks (warm-up time, flickering, fragile, mercury disposal). | Adopt LED lighting for brightness, energy efficiency, longevity, and color temperature variety. |
| Brightness Measurement | Lumens measure brightness, not wattage; LED brightness differs from traditional sources. | Use calibrated light meters (though specific measurement inside enclosures is less detailed). |
| Color Temperature | Different color temperatures affect object differentiation inside enclosures. | Select appropriate LED color temperatures (e.g., 4000-4500 K for natural white) to enhance visual clarity. |
| Power and Wiring | Need to minimize wiring complexity and ensure power compatibility. | Use daisy-chaining of fixtures and provide AC/DC power options (20-24 V DC, 100-240 V AC). |
| Safety and Compliance | Safety standards and certifications are critical. | Use UL-listed LED lights under appropriate category codes for industrial enclosures. |
| User Convenience | Hands-free operation and maintenance efficiency are important. | Integrate motion sensors for automatic lighting and provide built-in electrical outlets for maintenance tools. |
| Installation and Maintenance | Time-consuming installation increases costs. | Design fixtures for quick installation (e.g., under two minutes) to reduce maintenance time and costs. |
With Linkewell, you get a lighting system that meets strict safety standards and makes your job easier. You can focus on your work, knowing you have the right light intensity and coverage.
Measurement Tips for Electrical Cabinets
You want to measure light intensity inside cabinets to make sure you have enough illumination for safe and accurate work. Here are some tips to help you get the best results:
- Define your inspection goal before you start. This helps you pick the right lighting and measurement method.
- Think about how the light, objects, and your eyes or camera line up. This reduces glare and helps you see details.
- Try different lighting types, like diffuse or backlighting, to find what works best for your cabinet.
- Test your setup in the real environment. Sometimes, what works in theory doesn’t work in practice.
- Install your lighting system early. This lets you build your inspection process around the best light intensity.
- Use modular and adjustable lights. You can fine-tune the position and angle for even coverage.
- Calibrate your light meter regularly. This keeps your measure light intensity readings accurate.
- Control outside light by closing cabinet doors or using high-power strobing.
- Match your lighting to the surface type—flat, shiny, or curved—for the best contrast.
Regular calibration and the right sensor settings help you avoid errors. Too much light intensity can cause glare, while too little makes it hard to see. Always aim for even, comfortable illumination.
If you ever wonder how to measure light intensity, or how is light measured in tight spaces, just remember: the right tools and lighting make all the difference. With Linkewell Enclosure Light, you can easily measure light intensity and meet industry standards for safety and performance.
Light Intensity in Workplaces and Industry
Standards and Guidelines
You might wonder why light intensity matters so much at work. The answer is simple: good lighting keeps you safe, helps you work faster, and makes your job easier. Different workplaces need different levels of illumination. Organizations like OSHA and ANSI set rules for how much light you need in each area. These rules help you avoid accidents and meet legal requirements.
Here’s a quick look at recommended levels for various spaces:
| Workplace/Environment Type | Recommended Light Intensity (Foot-Candles) | Recommended Light Intensity (Lux) | Notes/Range/Details |
|---|---|---|---|
| Corridors | 5 (range 2.5-10) | N/A | Ensures safety and comfort |
| Open Office Areas (Desks) | 40 | N/A | Supports productivity and reduces eye strain |
| Classrooms (Typical) | 50 | N/A | Supports reading and writing |
| Assembly & Inspection (Difficult) | 50 (range 25-100) | N/A | Higher precision tasks |
| Factories, Workshops, Auto Shops | N/A | 750 lux | Higher intensity for precision and safety |
| Offices, Laboratories, Show Rooms | N/A | 500 lux | Supports detailed visual tasks and comfort |
| Lobbies, Corridors, Stairwells | N/A | 200 lux | General navigation and safety |
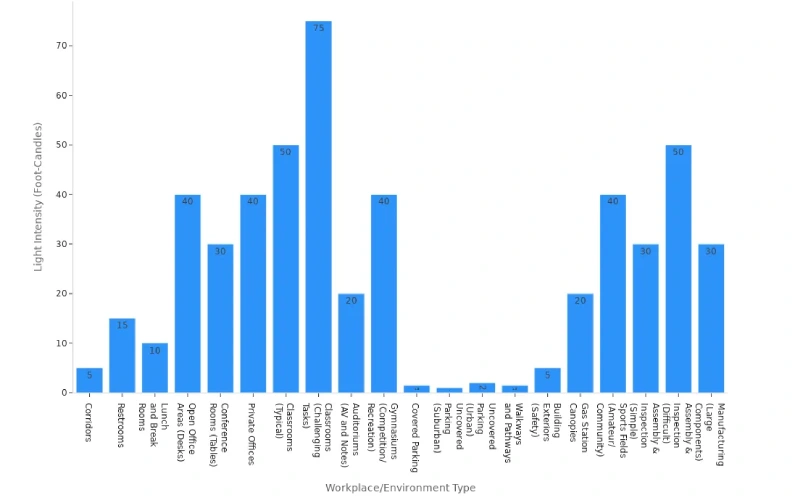
You’ll see that standardized measurement guidelines use foot-candles and lux as the main unit of measurement for light intensity. OSHA and ANSI/IES RP-7-21 both require you to follow these standards. If you skip them, you risk fines and unsafe conditions. The Factory Act in India also says you must keep work areas well-lit, with no glare or deep shadows.
Tip: Always check the latest standards for your industry. They tell you exactly how to measure light intensity and what the minimum levels should be.
Measure Light Output in Large Areas
When you need to measure light output in a big warehouse or factory, you can’t just guess. You need a plan. Start by using calibrated light meters or photometers to check the light intensity distribution across your space. These tools help you see if every corner meets the required illumination.
Here’s how you can make sure your light distribution is right:
- Use a grid pattern to take readings at different spots. This shows you the spatial light intensity distribution.
- Try photometric lighting plans. These computer simulations predict light distribution before you even install fixtures.
- For LED systems, use a light meter to check lux and an integrating sphere to measure light output in lumens.
- For fluorescent or HID lights, check for flicker and aging. These can change your light intensity distribution over time.
- Always calibrate your tools and take readings at different times. This gives you a true picture of your spatial light intensity distribution.
You want even light distribution so no area is too dark or too bright. This helps you avoid mistakes and keeps everyone safe. If you follow these steps, you’ll get accurate measuring light output results and meet all safety standards.
Remember, regular checks and good planning make measuring light output in large areas much easier. You’ll spot problems early and keep your workplace bright and safe.
Factors Affecting Measurement
Distance and Angle
When you measure light intensity, you might notice your readings change if you move your sensor or tilt it. That’s not a mistake—distance and angle really matter. If you double the distance between your sensor and the light source, the measured intensity drops to a quarter of what it was. This happens because of the inverse square law. The farther you go, the less light reaches your sensor.
The angle also plays a big role. If your sensor faces the light source directly, you get the highest reading. Tilt it, and the effective area shrinks, so the reading drops. You want your sensor as perpendicular as possible to the light source for the most accurate results. This is true whether you’re checking light intensity distribution in a cabinet or across a whole room.
Tip: Always keep your sensor at the same distance and angle when comparing different lights or checking light distribution. This helps you spot real differences, not just measurement errors.
Other things can affect your results, too:
- The type of light source (LED, sunlight, fluorescent) changes the light intensity distribution.
- Surfaces around you can reflect or absorb light, making readings higher or lower.
- Weather, dust, and even the time of day can change how much light you measure.
Calibration and Maintenance
You want your lighting measurements to be reliable every time. That means you need to calibrate your measurement tools and take care of your equipment. Calibration checks if your device gives the right numbers by comparing it to a known standard. If you skip this step, your readings might drift over time.
Here’s a simple checklist to keep your measurements sharp:
- Calibrate your measurement tools at least once a year using a trusted reference light.
- Clean your sensors and lenses regularly. Dust or smudges can block light and mess up your results.
- Replace lamps or light sources before they burn out or get too dim.
- Turn off lamps when not in use to make them last longer.
- Use software tools for automated calibration if your device supports it.
- Record baseline noise and subtract it from your readings for better accuracy.
- Align all optical parts carefully to avoid errors in light intensity distribution.
- Watch out for temperature and humidity. High humidity can cause condensation, and temperature swings can change how your device works.
Regular maintenance and calibration keep your light distribution data trustworthy. You’ll know your measurements of light are solid, whether you’re checking a cabinet or a whole factory.
You now know how to measure light intensity and why it matters. Here’s what you should do:
- Pick the right tool—like a calibrated light meter or photometer—for your task.
- Follow best practices: calibrate, measure at consistent spots, and document results.
- Understand each unit of measurement for light intensity—lux, lumens, candela—so you can answer, “how is light measured?“
- Trust Linkewell’s Enclosure Light for reliable, safe, and efficient cabinet lighting.
Accurate lighting measurements keep your workspace safe and compliant. Always choose the right method and tool for every environment!
FAQ
How do you measure light intensity in a workspace?
You use a light meter or photometer. Place the sensor where you need to check brightness. The device gives you a reading in lux, which is the main unit of measurement for light intensity. This is the best way to measure light intensity for safety and comfort.
What is the measure of light, and what units are used?
The measure of light tells you how much visible energy is present. The main intensity light units are lux, lumens, and candela. If you ask, “what is light measured in,” the answer depends on whether you want total output (lumens) or surface brightness (lux).
How do you measure the brightness of a light bulb?
To measure brightness of a light, use a light meter. Hold it near the bulb and read the value in lux or lumens. This shows you how to measure brightness of a light and helps you compare bulbs using the right unit of measure for light intensity.
What is the difference between lux and watts in lighting measurements?
Lux measures how much light hits a surface, while watts show energy use. If you want to know how is light measured for visibility, use lux. If you care about power, check watts. Both are important for lighting measurements.
How can you measure light intensity inside an electrical cabinet?
Install a calibrated light meter inside the cabinet. Take readings at different spots. This method answers “how can you measure light intensity” and ensures you meet safety standards. For best results, use a reliable LED source like Linkewell’s Enclosure Light for even light intensity.
Conclusion
Water in electrical panels is highly dangerous—it can cause short circuits, fires, and major equipment damage. These hazards threaten both safety and operational reliability. Fortunately, with proper sealing, ventilation, and waterproof enclosures, you can minimize risk. Regular inspection and quick response to signs of moisture are crucial. Linkewell offers trusted enclosure solutions to protect your control systems, ensuring long-term safety and stability across demanding environments.