You want to know how to handle low voltage cable management in a control box? Start with a solid plan for installation. Good organization keeps things safe, helps you spot problems fast, and makes future maintenance easier. Disorganized wiring can lead to voltage drops, overheating, and even electrical fires.
When you route cables neatly and separate low voltage wires from high voltage ones, you lower the risk of shocks and interference. Labeling and secure connections make every installation smoother. Linkwell offers reliable cable management solutions that help you achieve safe and efficient control box organization.
Cable Management Key Takeaways
- Plan your installation carefully by gathering the right tools and designing neat cable routes to keep wiring safe and easy to maintain.
- Use quality cable management hardware like racks, wiring ducts, and entry protection devices to organize cables and prevent damage.
- Keep low voltage cables separate from high voltage lines to avoid interference and safety hazards.
- Maintain proper bend radius and secure cables with supports and labels to protect wiring and simplify future troubleshooting.
- Test and label all cables thoroughly, keep clear documentation, and follow local codes to ensure a safe, reliable, and upgrade-ready control box.
Preparation & Planning
Tools & Materials
Before you start any installation, gather all the right tools and materials. This step saves you time and helps you avoid mistakes. For low voltage wiring in a control box, you need a solid set of supplies:
- Cable fittings (AC/MC and non-metallic)
- Conduit bodies (LB, LL, LR, T types)
- Conduit fittings (EMT, flexible metal, liquidtight, rigid)
- Conduit clamps and hangers
- Cord grips
- Bridle rings and J-Hooks for cable support
- Racks and cabinets for organizing cables
- Crimp tools for cable termination
- Cable testers for checking cable integrity
- Connectors like CAT5/5E RJ45 plugs
- Termination kits and tool bags
- Cable supports, ties, and mounts
- Floor ducts and heat shrink tubing
- Hand tools and accessories
- Electrical box hardware and accessories
When you pick your cable management tools, think about cable size, strength, cost, and the environment. Here’s a quick table to help you decide:
| Criteria | What to Consider |
|---|---|
| Cable Size | Fit for current and future low voltage wiring needs |
| Strength | Can it hold the cables without bending or breaking? |
| Cost | Balance price with long-term value |
| Environment | Will it face heat, moisture, or chemicals? |
| Flexibility | Can it handle bends and changes in layout? |
| Codes & Standards | Meets NEC and local code requirements |
Linkwell has a strong reputation for quality and compliance, so their products make a smart choice for your cable management needs.
Layout Design
A good layout makes your low voltage wiring neat, safe, and easy to maintain. Start by planning cable routes to avoid overlaps and reduce electromagnetic interference. Use wire ducts to keep cables organized. Always separate low voltage wiring from high voltage lines to prevent interference and boost safety.
- Group cables by function for easier troubleshooting.
- Secure wires with clips or ties to prevent sagging.
- Avoid sharp bends and twisting to protect the wires.
- Leave extra space for future upgrades to your low voltage systems.
- Arrange components so you can reach them easily for repairs or changes.
Proper layout design keeps your control box tidy and helps you spot problems fast. It also makes future upgrades much easier.
Safety Checks
Safety comes first in every installation. Before you touch any low voltage wiring, make sure you follow these steps:
- Confirm all conductor terminations are tight and correct.
- Check that wires are labeled and identified as required.
- Plan cable routes to avoid damage from heat, corrosion, or sharp edges.
- Pick conductors that match the current and voltage needs of your low voltage systems.
- Make sure all devices and accessories are connected properly.
- Use fire barriers and protection against heat where needed.
- Keep low voltage wiring separate from high voltage circuits.
- Install isolation and switching devices in the right spots.
- Label all switches, terminals, and protective devices.
- Display warning signs and keep wiring diagrams handy.
Tip: Always de-energize circuits and use lockout/tagout procedures before starting work. This keeps you safe from electric shock.
Local codes may have extra rules for low voltage wiring in control boxes. Permits and inspections might be required, so check with your local authority before you begin.
Cable Management Hardware
Linkwell Rack Cable Management
You want your control box to look clean and work well. Linkwell’s rack cable management solutions help you do just that. These products keep your low voltage wiring organized and easy to access. You can customize them to fit your setup, so you get the right size and style for your needs. The racks use strong materials that last a long time, even in tough environments. You get reliable performance and peace of mind.
Linkwell’s rack cable management stands out because it meets strict standards like ANSI, IEC, and TIA-942. You can trust these racks to keep your low voltage cable management safe and compliant. Many professionals choose Linkwell for projects that need high quality and durability. If you want a solution that works for low-volume, high-standard installations, Linkwell is a smart pick.
You can use horizontal and vertical cable managers, Cable Clamp, cable ties, and labeling systems to keep everything in place. These features make installation easier and help you spot problems fast. You also get better airflow, which keeps your equipment cool and running smoothly.
Tip: Plan your rack layout before installation. This makes future repairs and upgrades much easier.
Wiring Ducts & Trays
Wiring ducts and trays play a big role in low voltage cable management. You use them to route and protect low voltage wiring inside your control box. Ducts and trays keep cables separated, which cuts down on electrical interference and signal loss. You also get better airflow and heat dissipation, so your low voltage systems stay safe.
Here are some benefits of using wiring ducts and trays:
- Minimize electrical interference like EMI and RFI.
- Prevent signal loss and cross-talk between cables.
- Make maintenance and troubleshooting easier.
- Optimize space and reduce clutter in your control box.
- Help you follow industry standards for safety and inspections.
You can find different types of cable supports for your installation. Here’s a quick table to help you choose:
| Hardware Type | Examples |
|---|---|
| Cable Supports | J-Hooks, G-Hooks, Bridle Rings, Distribution Rings, Nail-On |
| Attachment Methods | Wall Mount, Overhead Mount, Beam/Edge Mount, Threaded Rod |
When you use wiring ducts and trays, label your cables clearly and keep power and signal wires apart. Secure cables firmly and check them during regular inspections. These cable management tips help you avoid mistakes and keep your low voltage wiring safe.
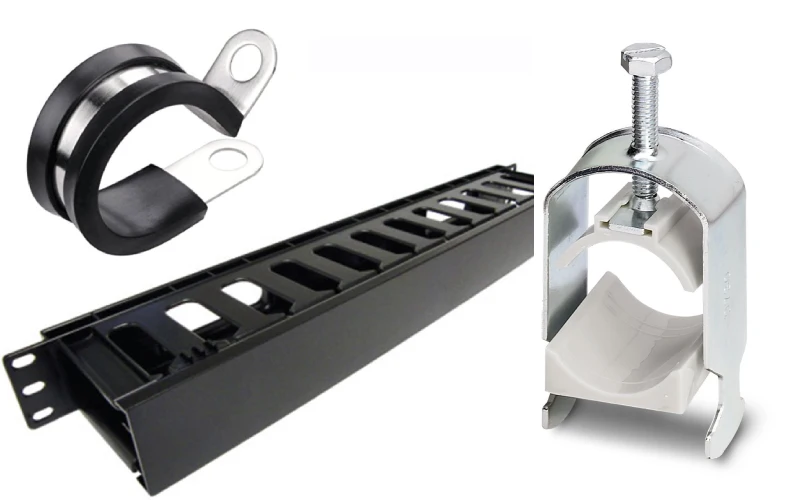
Entry Protection
Entry protection keeps your low voltage wiring safe as it enters the control box. You want to stop cables from rubbing against sharp edges or getting damaged. Devices like grommets, bushings, and cable glands protect cables from abrasion and strain.
Here’s a table showing some common entry protection devices and what they do:
| Device Type | Features and Protective Role |
|---|---|
| Snub Bushings | Nylon insulation; strain relief; protects from raw edges; UL94 V-2 rated. |
| Strain Relief Bushings | Absorb pull, push, twist forces; snap into holes; UL94 V-2 rated. |
| Armor Bushings | Protect armored cable sheathing; fits FMC, AC, MC cables; polypropylene; UL rated. |
| Braided Cable Sleeves | Protect from abrasion; frayless ends. |
| Nylon Conduit | Flexible; abrasion resistant; protects from heat and sharp edges; weather and solvent resistant. |
| Stepped Grommets | Customizable; protect cables passing through panels; act as blanking plugs until cut. |
| Cable Clamps | Secure wire harnesses; prevent tangling and movement; allow cable removal for maintenance. |
You can also use cable glands, sealing plugs, and multi-hole seals for extra protection. Make sure you pick the right size and material for your cables. Check these devices during regular inspections to keep your low voltage wiring safe.
Note: Good entry protection helps your installation last longer and keeps your control box safe from damage.
Low Voltage Wiring Installation
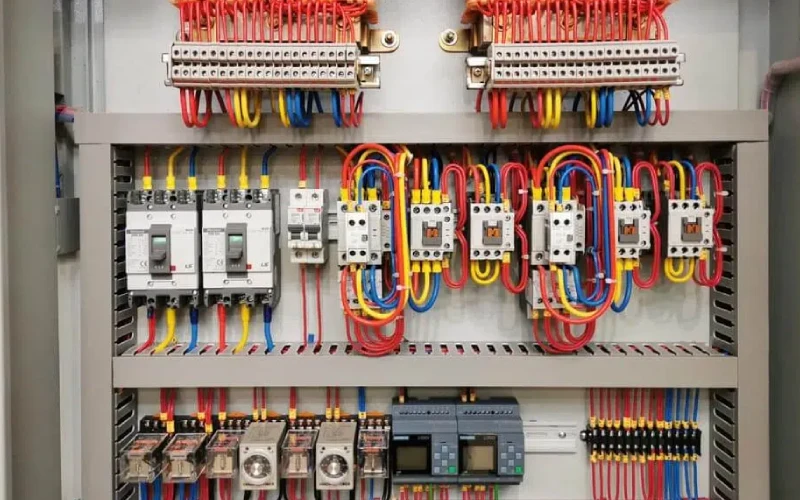
Getting your low voltage wiring installation right makes a huge difference in safety, performance, and future maintenance. You want every cable to stay secure, organized, and protected inside your control box. Let’s break down the best practices for routing, separation, and bend radius so you can avoid common mistakes and keep your system running smoothly.
Routing & Securing
You need to route and secure low voltage wiring with care. If you skip this step, you risk tangled cables, signal loss, and even physical damage. Here’s how you can do it right:
- Keep a proper bend radius for every cable. For most low voltage wiring, the minimum bend radius should be six times the cable’s diameter. This prevents damage and keeps signals strong.
- Use cable supports at regular intervals. You can choose cable bushings, clips, or clamps. These tools hold cables in place and stop them from moving or rubbing against sharp edges.
- Add strain relief at every termination point. This stops cables from pulling loose or getting stressed.
- Label each cable with a durable tag. You’ll thank yourself later when you need to trace or replace wires.
- Plan for future upgrades. Leave extra space—about 30-50% more capacity—so you can add new cables without tearing everything apart.
- Organize cables by function. Group similar wires together and keep them neat for easy troubleshooting.
- Use conduit or raceways if you need extra protection or want to cut down on interference.
- Test every cable after installation. Make sure each one works and document the routes and termination points.
Tip: Linkwell’s cable management products, like rack cable managers and wiring ducts, make routing and securing low voltage wiring much easier. They help you keep everything organized and compliant with NEC standards.
Here’s a quick look at some tools you can use to secure low voltage wiring:
| Securing Method | What It Does | Example Products |
|---|---|---|
| Cable Bushings | Protects from abrasion and strain | Snub bushings, strain relief |
| Cable Clips | Holds cables along surfaces, keeps them neat | Adhesive clips, rail clips |
| Cable Clamps | Supports bundles, prevents movement | Adjustable clamps, P-clip clamps |
You want to avoid sudden movements, sharp bends, and overcrowding. These steps keep your low voltage wiring installation safe and reliable.
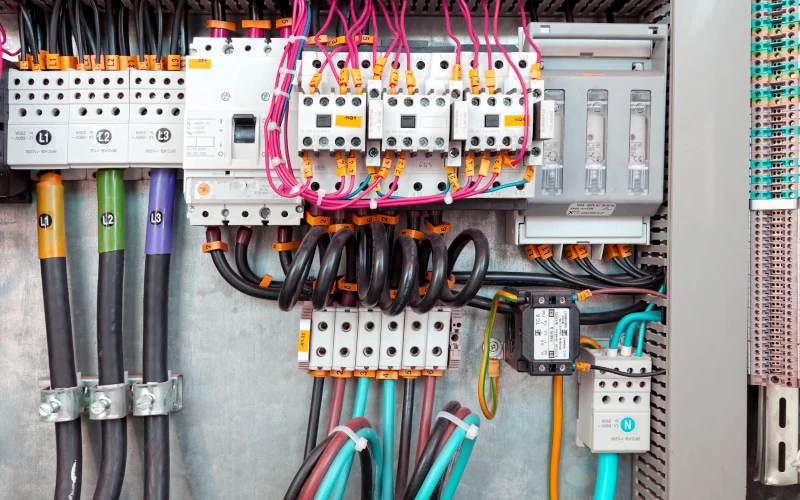
Separation from Power
Separating low voltage wiring from high voltage lines is critical. If you mix them up, you risk interference, data errors, and even electrical fires. The NEC doesn’t set strict rules for separation, but most experts recommend keeping at least 12 inches between parallel runs and 3 inches when crossing perpendicularly. Some local codes ask for 2 inches or more.
Here’s why separation matters:
| Risk / Problem | Symptoms | Common Causes | Solutions |
|---|---|---|---|
| Electromagnetic Interference (EMI) | Data errors, slow network | Motors, VFDs, poor layout | Use shielded cables, increase separation |
| Voltage Drop | Devices not powering on, dim LEDs | Long cable runs, undersized wires | Use thicker wires, add power supplies |
| Ground Loops | Humming, data corruption | Multiple grounding points | Use single-point grounding |
| Physical Cable Damage | Signal loss, short circuits | Vibration, moisture, rodents | Replace cables, add protection |
| Termination Failure | Intermittent connections | Poor crimps, corrosion | Use proper tools, re-terminate |
You want to use barriers or separate conduits if you must run low voltage wiring and power cables close together. Always follow NEC Article 725 for neat installation and protection. Linkwell’s cable management solutions support these best practices, helping you keep wiring separated and safe.
Note: Mixing low voltage wiring and power cables in the same conduit is risky. Keep them apart to avoid interference and safety hazards.
Bend Radius & Stress
Bend radius is a big deal in low voltage wiring installation. If you bend cables too sharply, you can damage the wires inside. This leads to signal loss, impedance problems, and even total cable failure. For most low voltage wiring, stick to a minimum bend radius of six times the cable diameter.
| Cable Type | Minimum Bend Radius Multiplier (times cable diameter) |
|---|---|
| Cables rated 5000 V or less (common low voltage cables) | 6 |
| Single/multi-conductor cables, >1000 V, no metallic shielding | 8 |
| Shielded cables, >1000 V | 12 |
If you go tighter than the recommended bend radius, you put long-term stress on the cable. Over time, this can break down the insulation and cause failures. Manufacturers warn that sharp bends and kinks can lead to signal degradation or complete loss. You want to support cables properly, avoid twisting, and never force them into tight corners.
Tip: Always check manufacturer guidelines for bend radius. Linkwell’s cable management hardware helps you route cables smoothly and maintain proper bend radius, so your low voltage installation lasts longer.
You want your low voltage wiring installation to stand the test of time. Stick to these best practices, use quality cable management products, and follow NEC code compliance. Linkwell’s solutions make it easy to keep your control box organized, safe, and ready for future upgrades.
Labeling & Testing
Labeling Systems
Labeling makes your low voltage wiring easy to identify and maintain. You want to label both ends of every wire. This helps you find cables fast and prevents mistakes during repairs. Use color tapes to match wire color coding. Color-coded cable ties and clamps keep things organized. Wire markers in different colors show which wires are neutral, hot, or ground. Heat shrink tubing protects repairs and keeps your color coding clear.
Here are some popular labeling methods for low voltage wiring:
- Heat shrink labels
- Thermal transfer labels
- Tie-on and slide-on labels
- Self-adhesive labels
- Stainless steel cable markers
- Software-generated labels
High-performance labels stand up to heat, chemicals, and UV light. Stainless steel markers work well in tough environments. If you use Linkwell’s cable management panels, you get clear labeling and modular layouts. Labels like “K1” or “Relay” help you spot components quickly. Wiring diagrams inside the panel door show you exactly where everything is. This makes maintenance and troubleshooting much easier.
Tip: Consistent labeling saves time and reduces downtime. You avoid unplugging the wrong cable and make upgrades simple.
Testing Procedures
Testing your low voltage wiring is a must before you finish the job. You want to check every cable for safety and performance. Start with a visual inspection. Compare your cables to the drawings and specs. Look for damage on jackets and insulation. Check that all connections match your diagrams.
Follow these steps for a thorough test:
- Inspect cable jackets and insulation for damage.
- Check bolted connections with a torque wrench or ohmmeter.
- Test insulation resistance for each conductor.
- Run continuity tests to confirm correct connections.
- Measure resistance of parallel conductors.
- Perform phasing tests at termination points.
- Test earth resistance to meet safety standards.
- Use high voltage tests to check insulation strength.
You want to use the right tools for each test. Cable certifiers help you spot shorts, reversals, and performance issues. Always label and document your low voltage wiring during testing. This makes future troubleshooting much easier.
Documentation
Good documentation keeps your low voltage wiring organized for years. You want to record every change, installation date, and performance check. Take photos or videos of your wiring setup. These help with maintenance and warranty claims. Before you disconnect anything, snap a picture. This helps you reconnect wires correctly.
Keep detailed wiring diagrams and spreadsheets. Label cables during disconnection to avoid confusion. Place labels where you can see them easily. Add records of any changes or scheduled services. Organize your wiring with wire ducts and run wires neatly. Consistent labeling and clear documentation make upgrades and repairs faster and safer.
Note: Well-kept documentation saves you time and money. You avoid mistakes and keep your control box running smoothly.
Maintenance & Compliance
Code Review
You want your control box to stay safe and reliable for years. That means following the right codes for low voltage wiring. Here are some key points you should always check:
- Use the National Electrical Code (NEC) Articles 725, 800, 760, and 411. These set the rules for low voltage wiring in control boxes.
- Pick cables with the right fire rating, like CL2, CL3, CMP, or FPL. Make sure they fit your installation space.
- Support your low voltage wiring at the right intervals. Use fire-rated cables in plenum or riser spaces.
- Ground racks and enclosures as NEC Article 250 and TIA-607-D require. This keeps your system stable and safe.
- Use code-approved junction boxes for all splices and terminations. Label everything clearly so you can pass inspections.
- Follow proper termination techniques. Avoid sharp bends and keep the minimum bend radius.
- Submit drawings and as-built diagrams if your local rules require them.
- Install overcurrent and surge protection with good grounding.
Tip: Always keep your labels clear and your documentation up to date. This helps you pass inspections and makes troubleshooting much easier.
Linkwell solutions help you meet these standards. Their products come with certifications like UL508A and IEC 61439. You also get wiring diagrams, installation guides, and ongoing technical support. This makes it easier to keep your low voltage wiring compliant and safe.
Future Upgrades
Planning for the future saves you time and money. When you set up your low voltage wiring, think about how your needs might grow. Here’s how you can make upgrades simple:
- Design your control box with extra space and accessible cable paths. This lets you add new low voltage wiring without tearing everything apart.
- Work with your team early. Document both current and future needs for low voltage wiring.
- Add enough access points and conduits from the start. You won’t need to open walls or redo work later.
- Use modular cable management systems. These make it easy to add or move cables as your system grows.
- Choose cable types that fit your environment. For example, use plenum-rated cables for fire safety.
- Bundle low voltage wiring in small groups. This reduces heat and makes troubleshooting easier.
- Color-code and label every cable. You’ll avoid confusion during upgrades.
- Keep extra cables and spare parts on hand. This helps you fix problems fast.
Note: Linkwell supports you with a one-year warranty, lifetime technical help, and fast replacement parts. Their products come with clear instructions and diagrams, so you can upgrade your low voltage wiring with confidence.
Regular maintenance is key. Test your low voltage wiring, check for damage, and keep your documentation updated. Train your team on best practices. Use Linkwell’s cable management solutions to keep everything organized and ready for the future.
You now know the key steps for a smooth installation. Start with a plan, gather your tools, and map out your cable routes. Use quality hardware for every installation. Protect cables at entry points and keep them separated from power lines. Label everything and test your work before closing the box. Linkwell products make installation easier and safer. Their cable entry systems meet strict standards, shield your wiring from dust and water, and help you achieve successful cable management. You get less downtime, better reliability, and a longer-lasting installation. For custom solutions, reach out to a pro or Linkwell’s team.
FAQ
What is the best way to keep low voltage cables organized in a control box?
You should use cable management racks, wiring ducts, and clear labels. Group cables by function and secure them with ties or clamps. This setup makes your control box look neat and helps you find problems fast.
How do I choose the right Linkwell cable management product?
Start by checking your control box size and cable count. Visit Linkwell’s website for product details. You can also contact their support team for help picking the best fit for your project.
Can I mix low voltage and high voltage cables in the same duct?
No, you should always separate low voltage and high voltage cables. Mixing them can cause interference and safety risks. Use different ducts or trays for each type to keep your system safe and reliable.
How often should I inspect my cable management system?
Check your cable management every six months. Look for loose ties, damaged cables, or blocked airflow. Regular inspections help you catch small issues before they turn into big problems.
Conclusion
Effective Low Voltage Cable Management is essential for keeping control cabinets, telecom enclosures, and data systems organized, safe, and efficient. As a manufacturer, we provide durable, customizable solutions that help wholesalers, contractors, and project managers meet demanding installation standards. With our expertise and high-quality products, you can improve system reliability, reduce downtime, and deliver superior results to your clients—boosting your business growth and market reputation.