You want your electrical cabinet to run smoothly and stay safe. Choosing trusted products like Linkwell’s DIN rails and the ETF 012 Hygrothermostat makes a big difference. When you follow the DIN rail installation guide and stick to manufacturer instructions, you boost efficiency and lower risks. Remember, planning and using quality components help you avoid headaches down the road.
Key Takeaways
- Choose quality components like Linkwell’s DIN rails and ETF 012 Hygrothermostat for a reliable electrical cabinet.
- Follow the DIN rail installation guide step-by-step to ensure safety and efficiency in your setup.
- Plan your cabinet layout carefully, separating power and control zones to reduce interference and improve maintenance.
- Label all wires and cables clearly to simplify troubleshooting and ensure safety during inspections.
- Regularly inspect and maintain your cabinet to catch issues early and extend the lifespan of your equipment.
DIN rail installation guide by Linkwell
When you start any electrical cabinet project, you want a process that’s smooth, safe, and reliable. That’s where Linkwell’s DIN rail installation guide comes in handy. Linkwell’s DIN rails are trusted by professionals worldwide because they meet strict international standards and work with almost any enclosure. Let’s walk through everything you need to know to get your DIN rail installation right the first time.
DIN rail standards and types
You might wonder why DIN rails from different brands fit together so well. The answer is the IEC 60715 standard. This international standard sets the rules for DIN rail types and dimensions. Thanks to IEC 60715, you can mount a 35mm breaker from Japan on a rail made in Germany or the USA without any trouble. Linkwell’s DIN rails follow this standard exactly, so you never have to worry about compatibility.
DIN rails come in several types. Here are the most common ones you’ll see:
- Top Hat (TH35): The most popular type, 35mm wide, perfect for most modular devices.
- C Rails: Wider and stronger, used for heavy-duty equipment.
- G Rails: Feature a G-shaped profile, often used for special mounting needs.
- Mini Top Hat: Smaller, for compact or space-limited panels.
Linkwell makes all these types, and every rail is IEC 60715 certified. You get quality, safety, and peace of mind.
Tools and materials for installation
Before you begin, gather the right tools and materials. Using the correct equipment makes your DIN rail installation guide much easier to follow and helps you avoid mistakes.
Recommended Tools:
- DIN rail cutting tool (for clean, accurate cuts)
- End clamps or brackets (to keep components from sliding)
- Spacers or separator plates (for electrical clearance and heat dissipation)
- End caps (to cover sharp edges)
- Mounting feet or adapters (for devices not designed for DIN rail mounting)
- Screwdriver and measuring tape
Common Materials:
| Material | Pros | Applications |
|---|---|---|
| Polyamide (plastic) | Lightweight, non-conductive | General use |
| Metal (zinc-coated steel, aluminum) | High strength, durable | Harsh environments |
| Stainless Steel | Corrosion resistance | Outdoor enclosures |
| Plastic | Lightweight | Indoor panels |
| Zinc-plated Steel | Budget-friendly | Durable applications |
Choose the material that matches your environment. For example, use stainless steel for outdoor cabinets where corrosion is a concern.
Step-by-step DIN rail mounting
Ready to get started? Follow these steps for a safe and efficient installation:
- Measure and Mark: Decide where you want the DIN rail inside your enclosure. Use a measuring tape to mark the exact spot.
- Cut the Rail: If needed, use a DIN rail cutter. Set the measuring guide, slide the rail into the slot, lower the guide wall, and pull the lever down slowly for a clean cut.
- Position the Rail: Place the rail on the marked spots. Make sure it’s level and straight.
- Secure the Rail: Use screws or mounting brackets to fix the rail in place. Tighten them so the rail doesn’t move, but don’t overtighten.
- Add End Clamps: Install end clamps or brackets at both ends. This keeps your components from sliding, especially during shipping or in high-vibration areas.
- Install Components: Snap your devices onto the rail. Leave space between them for airflow and heat dissipation.
- Check Everything: Double-check that all parts are secure and aligned before wiring.
Tip: Always leave a little extra space for future upgrades or changes. It makes your life easier down the road.
Common mistakes and safety tips
Even experienced installers can make mistakes. Here are some common pitfalls and how you can avoid them:
- Exceeding the weight limit of the DIN rail can cause it to bend or break.
- Neglecting neat wiring can lead to short circuits or voltage drops.
- Reversing live and neutral connections may damage your equipment.
- Loose terminal connections can cause overheating or unreliable readings.
- Using the wrong wire gauge can result in excessive voltage drop.
To stay safe, always:
- De-energize the system before starting work.
- Lock out and tag out the power source to prevent accidental energization.
- Use a multimeter to verify isolation.
- Leave space between devices for airflow.
- Use end clamps to secure components.
If you follow this DIN rail installation guide, you’ll set up your cabinet with confidence. Linkwell’s rails make the job faster, safer, and more flexible, so you can focus on what matters—keeping your systems running smoothly.
Industrial Electrical Cabinet layout planning with Linkwell components
Planning your cabinet layout is more than just fitting parts inside a box. You want your system to run reliably, stay cool, and be easy to maintain. Linkwell makes this process smoother with wiring ducts, terminal blocks, and cable management solutions that help you organize every detail.
Mapping Industrial Electrical cabinet size and components
Start by figuring out the right cabinet size and what goes inside. You need to think about the environment, power needs, and which components work best for your setup. Here’s a quick table to help you map things out:
| Factor | Description |
|---|---|
| Environmental and Compliance Standards | Pick enclosures based on where you’ll use them. Look for NEMA or IP ratings for protection. |
| Power Analysis and Distribution Strategy | Check your incoming power and calculate the maximum current. This helps you manage loads safely. |
| Component Selection | Choose parts that balance performance, reliability, and cost. Make sure everything meets standards. |
If you plan and organize your layout thoughtfully, you make maintenance easier and keep your system safe. Using certified, high-quality components like Linkwell’s terminal blocks and wiring ducts boosts reliability.
Power and control wiring zones
You want your cabinet to stay organized and safe. Separating power and control wiring zones is key. Here’s how you can do it:
| Best Practice | Description |
|---|---|
| Separation of AC and DC components | Put AC and DC parts on opposite sides to cut down on interference. |
| Keep sensitive wires away from high-power components | Keep wires like CAN bus far from high-power stuff to avoid noise. |
| Separate grounding wires from power lines | Route grounding wires separately to prevent leaks and shocks. |
Linkwell’s cable management products help you keep wires neat and separated. This reduces troubleshooting headaches and keeps your system running smoothly.
Space for expansion and documentation
Leave extra space for future upgrades. You never know when you’ll need to add new devices or change something. Good documentation is just as important. Keep records of inspections, maintenance, and wiring diagrams. Store everything in a way that’s easy to find and update.
Tip: The NFPA 70B standard recommends tracking maintenance intervals and keeping diagrams current. This helps you stay compliant and safe.
When you follow these steps and use solutions from Linkwell, you set yourself up for a reliable, easy-to-maintain cabinet. Combine this with your DIN rail installation guide, and you’ll have a system that’s ready for anything.
Mounting and wiring thermostat hygrostat
ETF 012 Hygrothermostat overview
You want your electrical cabinet to stay dry and run at the right temperature. The ETF 012 Hygrothermostat Electronic from Linkwell makes that easy. This smart device senses both humidity and temperature inside your enclosure. When things get too damp or too warm, it switches on a heater or fan to keep your equipment safe.
The ETF 012 reacts fast—about five seconds. You get an LED indicator that shows when the device is working. The compact size fits perfectly on a 35mm DIN rail, so you don’t waste space. You can trust it to last, with a service life of over 50,000 cycles. The housing uses UL94 V-O plastic, which means it’s tough and meets safety standards.
Tip: If you want to protect sensitive electronics from moisture and heat, the ETF 012 is a solid choice. You get peace of mind and less downtime.
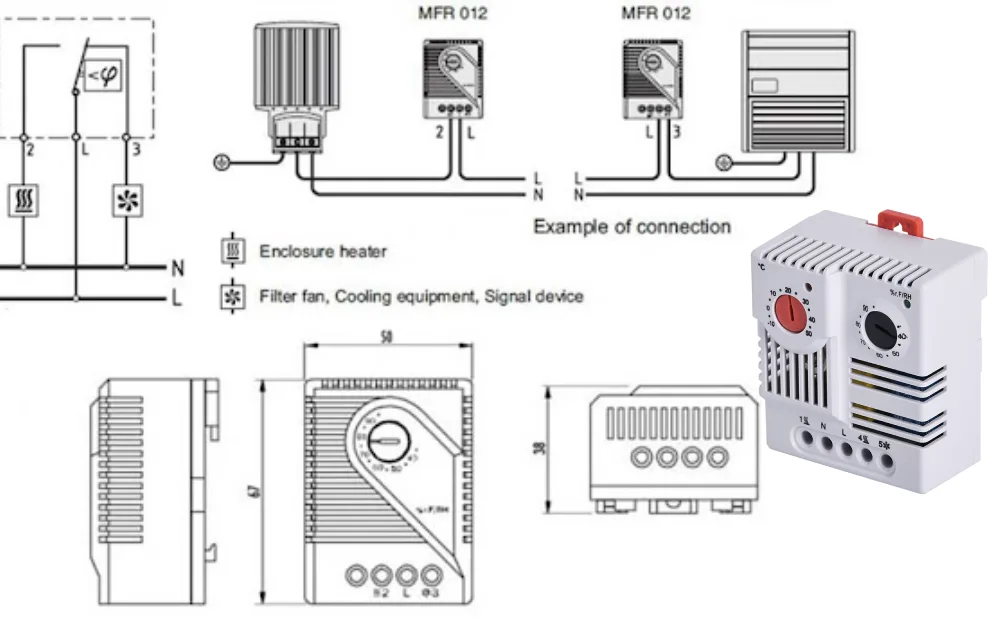
Terminal identification and wiring diagram
Before you start wiring, you need to know what each terminal does. The ETF 012 Hygrothermostat has clear markings to help you connect everything correctly. Here’s a quick guide:
| Terminal | Function | Marking |
|---|---|---|
| 1 | Power Supply (L) | L |
| 2 | Power Supply (N) | N |
| 3 | Relay Output (Normally Closed) | NC |
| 4 | Relay Output (Common) | C |
| 5 | Relay Output (Normally Open) | NO |
You’ll find a wiring diagram on the side of the device or in the manual. It shows you how to connect the power and the relay outputs to your heater or fan.
Power Supply: L (1) — N (2)
Relay Output: NC (3) — C (4) — NO (5)
Note: Always double-check the wiring diagram before you start. If you mix up the terminals, your heater or fan might not work right.
Step-by-step wiring instructions
Let’s walk through the wiring process. You don’t need fancy tools—just a screwdriver, wire stripper, and your Linkwell DIN rail.
- Turn off the power. Safety comes first. Make sure the cabinet is de-energized.
- Mount the ETF 012. Snap it onto your DIN rail. The compact design saves space.
- Prepare your wires. Strip the ends so they fit snugly into the terminals.
- Connect the power supply. Attach the live wire to terminal 1 (L) and the neutral wire to terminal 2 (N).
- Wire the relay outputs. Decide if you want the heater or fan to turn on when humidity or temperature goes above your set point. Connect your device to the appropriate relay terminals (NC, C, NO).
- Tighten all screws. Make sure every connection is secure. Loose wires can cause problems.
- Check your work. Look over each wire and terminal. Make sure nothing is crossed or exposed.
Safety Alert: Never wire the device while the cabinet is live. Always follow Linkwell’s instructions and local electrical codes.
Testing and troubleshooting
You want to make sure everything works before you close up the cabinet. Here’s how you can test and fix common issues:
- Power up the cabinet. Watch for the LED indicator. It should light up when the ETF 012 activates the heater or fan.
- Simulate high humidity or temperature. Use a humidifier or heat source to trigger the device. Check that your connected equipment turns on at the right set point.
- Check relay operation. Listen for a click when the relay switches. If you don’t hear it, double-check your wiring.
- Troubleshoot problems.
- If the LED doesn’t light up, check the power supply connections.
- If the heater or fan doesn’t turn on, make sure you wired the relay outputs correctly.
- If you see error codes or flashing lights, refer to the manual for solutions.
Pro Tip: Keep a copy of the wiring diagram and troubleshooting guide inside your cabinet. You’ll save time if you ever need to fix or upgrade the system.
You’ve now mounted and wired your Linkwell ETF 012 Hygrothermostat. You can relax knowing your cabinet is protected from moisture and heat. If you follow these steps and use quality products, your electrical system will run smoothly for years.
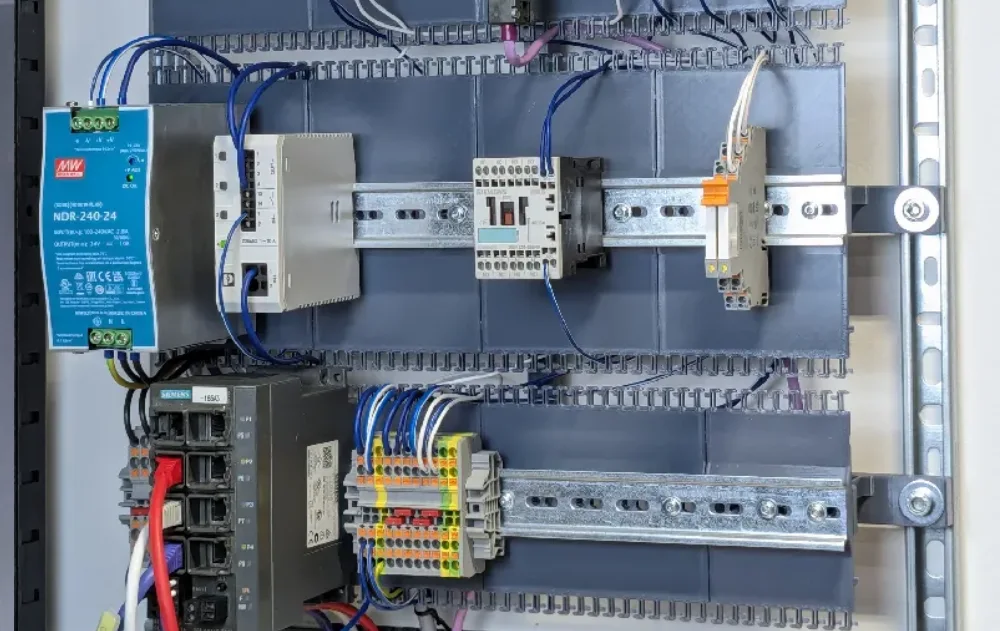
Wiring and cable management
You want your electrical cabinet to look neat and work safely. Good wiring and cable management make your job easier and your system more reliable. Linkwell’s cable management products help you organize wires, reduce hazards, and keep everything running smoothly.
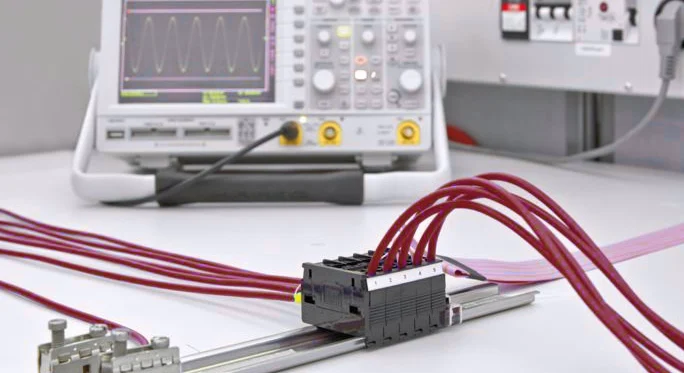
Terminal block arrangement
Terminal blocks do more than just connect wires. They create barriers between live wires, which keeps your connections safe from dust, moisture, and accidental contact. This setup lowers the risk of electrical hazards and helps your system last longer.
When you pick terminal blocks, look for modular designs. These let you add or remove sections as your system grows. Compact blocks save space in crowded panels. You can also use dual-level or multi-level terminal blocks to stack connections and fit more in a small area. Clear labeling and color coding make it easy to find the right wire during maintenance or troubleshooting.
Tip: Use terminal blocks with clear markings. You’ll spend less time searching for the right connection.
Wire routing and separation
How you route your wires matters. If you run power and data cables side by side, you can get electromagnetic interference. This can mess up signals and cause problems with your equipment.
Here’s what you should do:
- Keep electrical cables away from data lines. This reduces interference, especially near big equipment like HVAC units or lighting.
- Never route power lines and signal lines together. Keep them separate to avoid electromagnetic coupling.
- Use Linkwell’s wiring ducts to guide wires along safe paths and keep them organized.
A tidy layout makes your cabinet safer and easier to maintain.
Cable ducts and labeling
Cable ducts and proper labeling are your best friends for a clean cabinet. Cable ducts support large bundles of wires and stop them from sagging. Conduits protect cables from dust, moisture, and bumps.
Labeling each cable helps you find problems fast and keeps maintenance simple. Here’s how to label like a pro:
- Decide what goes on each label—cable number, where it goes, what it does, or voltage.
- Pick labels that fit your cable size and environment. For tough spots, use heat shrink labels.
- Clean the cable before sticking on the label.
- Use clear, short text. Place the label near the connector or terminal.
- Label both ends of every cable.
Note: Good cable management isn’t just about looks. It prevents hazards, saves time, and makes your system ready for future upgrades.
With Linkwell’s cable management solutions, you get a safer, more organized, and scalable electrical cabinet.
Thermal management in cabinets
Keeping your electrical cabinet cool is just as important as organizing your wires. If you ignore heat, your equipment can fail or even get damaged. Let’s look at how you can manage heat inside your cabinet and keep everything running smoothly.
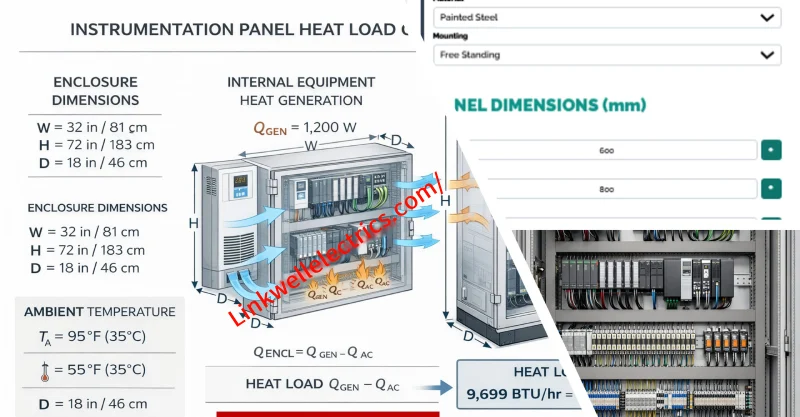
Heat sources and airflow
Every industrial cabinet has devices that generate heat. You might have power supplies, relays, transformers, or even small computers inside. These thermal units can quickly raise the temperature and change the humidity in your enclosure. If you don’t manage airflow, heat builds up and can cause condensation or overheating. You want to keep the wall temperature just below the intake air temperature. Placing high-power devices near the air inlets helps spread the heat more evenly. When you increase the intake airflow, you get better temperature balance and lower the risk of hot spots. Linkwell’s ventilation systems, fans, and filters help you move air efficiently and keep your cabinet cool.
Passive and active cooling
You have two main ways to cool your cabinet: passive and active cooling. Here’s a quick comparison:
| Aspect | Active Cooling | Passive Cooling |
|---|---|---|
| Power Use | Needs external power | No extra power needed |
| Maintenance | More frequent upkeep | Minimal upkeep |
| Noise | Fans or pumps can hum | Silent |
| Cooling Potential | High capacity possible | Limited by conduction/convection |
Passive cooling uses vents or heat sinks. It works well for low-power setups. Active cooling uses fans, filters, or even air conditioners. Linkwell offers both options, so you can pick what fits your needs.
Placement of heat-sensitive devices
Where you put your devices matters. Here are some tips to help you avoid common mistakes:
- Place heaters in the lower rear section of the cabinet. This spot helps prevent condensation and spreads heat evenly.
- Don’t point heaters directly at sensitive equipment. This can cause overheating in one area.
- Avoid installing heaters near ventilation openings. The heat can escape before it does its job.
- Keep multiple heaters spaced out. If you put them too close, you get uneven temperatures.
Tip: Always check your cabinet after installation. Make sure airflow is smooth and no device gets too hot.
With the right setup and Linkwell’s cooling solutions, you protect your equipment and extend its life.
Safety and compliance
You want your electrical cabinet to meet the highest safety standards. That’s not just about following rules—it’s about protecting your team, your equipment, and your investment. Linkwell takes safety seriously. Their products, including DIN rails and the ETF 012 Hygrothermostat, carry TUV certifications and meet strict international standards. When you use certified components, you show your commitment to quality and reliability.
Electrical standards and certifications
You might wonder which standards matter most for industrial cabinets. Here’s a quick look at the key ones you should know:
| Standard | Region | Key Requirements |
|---|---|---|
| IEC 61439 | Europe & International | Short-circuit withstand, temperature rise, dielectric strength, mechanical protection, clearances |
| UL 508A | United States | Component selection, overcurrent protection, enclosure construction, labeling, shock prevention |
| NEMA | North America | Enclosure ratings for environmental protection (NEMA 1 to NEMA 4X) |
| CE Marking | Europe | Compliance with Low Voltage, EMC, and Machinery Directives |
| CSA | Canada | CSA C22.2 for industrial equipment, often paired with UL for cross-border use |
When you choose Linkwell, you get products that help you meet these standards. That means fewer headaches during inspections and more confidence in your setup.
Final inspection and testing
Before you power up your cabinet, you need to check everything. Here’s a simple checklist you can follow:
- Visual Inspection
- Look for damaged cables or connectors.
- Make sure all safety labels are clear and easy to read.
- Check for signs of overheating, like melted spots or discoloration.
- Confirm all covers and guards are tight.
- Remove any dust or debris.
- Functional Testing
- Test every switch and button.
- Check that indicator lights and alarms work.
- Try the emergency stop to make sure it responds.
- Run a load test to see if the cabinet handles full power.
- Inspect all connections for tightness and corrosion.
- Final Testing
- Measure voltage and current to confirm safe levels.
- Record your test results for your records.
- Set and test all protective devices.
- File your documentation for compliance.
- Do one last look-over to catch anything you missed.
Tip: Regular inspections and using certified products like Linkwell’s keep your cabinet safe and compliant for years.
Conclusion
You’ve made it through the essential steps for building a safe and efficient electrical cabinet. By following this guide, you set yourself up for success. You learned how to install DIN rails, wire the ETF 012 Hygrothermostat, and organize your cabinet layout using Linkwell’s trusted products.
Let’s recap what matters most:
- Safety comes first. You always need to de-energize your cabinet before working. Double-check every connection and follow local codes.
- Plan your layout. You mapped out your cabinet, separated power and control zones, and left space for future upgrades.
- Choose quality components. Linkwell’s DIN rails, terminal blocks, and cable management solutions help you build a reliable system.
- Wire with care. You labeled cables, routed wires neatly, and used the right terminal blocks.
- Manage heat. You placed devices for good airflow and used Linkwell’s cooling products to keep everything at the right temperature.
- Test and inspect. You ran through a checklist to make sure your cabinet meets safety standards.
Tip: Regular maintenance keeps your cabinet running smoothly. Schedule inspections and update your documentation. You’ll catch problems early and avoid downtime.
If you want a cabinet that lasts, stick with certified products like those from Linkwell Electric. You get support, fast delivery, and solutions trusted by professionals worldwide. You don’t just build a cabinet—you build peace of mind.
Ready to take your next project to the next level? Visit Linkwell Electric for more info, expert advice, and the best products for your electrical systems. Your future projects will thank you! 🚀
You’ve learned how to install DIN rails, wire the ETF 012 Hygrothermostat, and plan your cabinet layout with Linkwell’s trusted products. When you focus on safety, compliance, and smart planning, you build a system that lasts. Choosing Linkwell gives you reliable solutions and ongoing support. Regular maintenance and best practices offer big benefits:
- You spot issues early and keep your cabinet safe.
- You follow safety standards and protect your team.
- You boost equipment reliability and lifespan.
- You cut downtime and save money.
- You keep records ready for inspections.
Stay proactive and your electrical cabinet will run smoothly for years.
FAQ
How do I choose the right DIN rail for my cabinet?
You want to match the rail type to your devices and enclosure size. Top Hat rails fit most modular gear. C and G rails work for heavy-duty setups. Always check your equipment specs before you buy.
Can I install the ETF 012 Hygrothermostat myself?
Yes, you can. Just follow the wiring diagram and safety steps. Turn off the power first. Mount the device on the DIN rail. Connect wires as shown. If you get stuck, check the manual or ask Linkwell for help.
What’s the best way to keep my cabinet cool?
You should use Linkwell’s fans, filters, or air conditioners for active cooling. Place heat-sensitive devices away from heaters and vents. Leave space for airflow. Regularly check for dust and clean filters to keep everything running smoothly.
Why should I label every wire and cable?
Labeling helps you find problems fast. You save time during repairs or upgrades. Clear labels also keep your cabinet safe and organized. Use short, easy-to-read tags near each terminal or connector.
Where can I get support or more information about Linkwell products?
Visit Linkwell Electric’s website. You can find product guides, contact details, and expert advice. Linkwell offers 24/7 support for all your cabinet projects.