
If you want to know how to remove din rail terminal blocks without causing damage, you’re in the right place. Start with the right tools and a focus on safety. You can trust brands like Linkwell for reliable terminal blocks and din rails. When you follow the correct steps, you avoid damage to each terminal and keep your setup in top shape. With a little guidance, you can handle terminal removal like a pro.
Key Takeaways
- Always turn off power and use a multimeter to confirm safety before working on terminal blocks.
- Use the right tools like insulated screwdrivers and release tools to avoid damaging wires or blocks.
- Identify your terminal block type—screw, spring-clamp, or push-in—to remove wires correctly and safely.
- Handle each terminal block by its housing, not the wires, and remove blocks gently from the DIN rail.
- Label wires before disconnecting and keep removed blocks organized to make reassembly easy and error-free.
Tools for Terminal Blocks
When you want to remove terminal blocks from a din rail, you need the right tools. Using the correct equipment keeps your terminal blocks safe and helps you avoid damage. Let’s look at what you’ll need.
Essential Tools
You should always start with the basics. Here’s a quick list:
- Insulated screwdriver (flat or Phillips, depending on your terminal)
- Needle-nose pliers for gripping wires or small parts
- Wire labels or markers to keep track of your connections
- A flashlight or headlamp for better visibility inside cabinets
- Certified din rail adapter if you need to reposition terminal blocks
You’ll find that Linkwell’s screw terminal products work well with these tools. The insulation and modular design make removal easier and safer. When you use certified tools, you lower the risk of electrical faults and keep your terminal blocks in top condition.
Optional Tools
Sometimes, you want a little extra help. These optional tools can make your job smoother:
- Multimeter for double-checking that power is off before you touch any terminal
- Small pry bar or plastic spudger for gently releasing stubborn terminal blocks
- Cable ties or organizers to keep wires neat after you remove the blocks
- Dust brush or compressed air to clean around the terminal blocks
Tip: Always use tools that match the size and type of your terminal blocks. This prevents slipping and damage.
Here’s a quick comparison to show why certified Linkwell terminal blocks and tools stand out:
| Aspect | Certified Terminal Blocks (e.g., Linkwell) | Non-Certified Alternatives |
|---|---|---|
| Certification | UL/IEC certified, meets safety standards | Often lacks certification |
| Safety Features | Superior insulation, prevents arcing and shorts | Basic safety, more exposed parts |
| Reliability | Handles vibration, dust, and temperature changes | Less durable in harsh conditions |
| Maintenance | Clear labeling, organized layout | Less organized, higher error risk |
| Electrical Fault Risk | Lower risk due to better insulation | Higher risk of shorts and shocks |
When you choose Linkwell’s certified terminal blocks and din rail products, you get peace of mind. You know your terminal blocks will stay safe and reliable, even in tough environments.
Preparation and Safety
Before you start removing terminal blocks, you need to make sure your workspace is safe. Taking a few minutes to prepare can help you avoid accidents and keep your equipment in good shape. Let’s walk through the steps you should follow.
Power Off
First, always turn off the power before you touch any terminal. This step protects you from electrical shocks and keeps your terminal blocks safe from damage. Use a multimeter to double-check that there is no voltage present. Never skip this step, even if you think the power is already off. It only takes a moment, but it can save you from serious injury.
Inspect Area
Next, look over the area where you plan to work. Make sure there are no loose wires or damaged parts near your terminal blocks. Check for signs of overheating or discoloration, which could mean a risk of short circuits. If you see dust or debris, clean it out with a brush or compressed air. A clean workspace helps you see each terminal clearly and prevents mistakes.
Safety Gear
Don’t forget your safety gear. Put on insulated gloves and safety glasses before you begin. These protect you from accidental contact with live parts and flying debris. If you work in a noisy environment, consider ear protection as well.
Tip: Always use certified products for extra peace of mind. Linkwell terminal blocks and DIN rail products hold UL, CE, and RoHS certifications. These certifications guarantee safety and reliability, so you can trust your equipment to perform under tough conditions.
- Linkwell products feature:
- Flame-retardant housing rated UL94 V-0
- Compliance with global safety and quality regulations
- Factory testing for mechanical protection and reliability
When you follow these steps, you lower the risk of accidents and keep your terminal blocks in top condition. Good preparation is the key to a safe and smooth removal process.
Identify Terminal Blocks
When you look inside a control panel, you’ll see many types of terminal blocks mounted on the din rail. Each type has its own features and benefits. Knowing how to spot them helps you remove the right terminal safely and quickly.
Screw Terminal Blocks
You’ll find screw terminal blocks in almost every commercial electrical panel. These blocks use a screw to clamp the wire in place. You just loosen the screw, insert the wire, and tighten it down. This method works well for both solid and stranded wires. The design uses a strong carbon steel wire cage, which keeps the connection tight even if the panel vibrates. You can trust screw terminal blocks for their reliability and long life.
| Terminal Block Type | Wire Retention Mechanism | Operation Method | Installation & Maintenance Features |
|---|---|---|---|
| Screw Terminal | Screw clamp | Tighten screw to secure wire | Reliable, needs manual screw tightening |
Tip: If you see a block with a screw head on top, you’re looking at a screw terminal block.
Spring-Clamp Blocks
Spring-clamp blocks use a stainless steel spring to hold the wire. You press a button or lever to open the clamp, insert the wire, and release the button. The spring keeps the wire secure, even if the panel shakes. These terminal blocks save you time because you don’t need to tighten any screws. They also make maintenance easier, especially if you need to move wires often.
- Fast installation
- Vibration resistant
- Easy to maintain
You’ll notice a small button or lever on these blocks. That’s your clue that you’re dealing with a spring-clamp terminal.
Push-In Blocks
Push-in blocks make wiring even simpler. You just push the wire straight into the terminal. The spring inside grabs the wire and holds it tight. You don’t need any tools or buttons. This design is great for quick jobs and works well in busy industrial settings. Push-in terminal blocks are perfect when you want to save time and reduce mistakes.
| Terminal Block Type | Operation Method | Key Features |
|---|---|---|
| Push-In Block | Push wire directly into terminal | No tools needed, quick insertion |
You can spot these blocks by their small, tool-free openings. Just push the wire in, and you’re done.
Note: Many panels use a mix of terminal blocks, including screw, spring-clamp, and push-in types. You might also see multi-level, ground, or fused terminal blocks, each with special features like color coding or LED indicators.
How to Remove DIN Rail Terminal Blocks
Removing terminal blocks from a din rail might seem tricky at first, but you can do it safely and without damage if you follow the right steps. Let’s break down the process so you can handle any type of terminal with confidence.
Disconnect Wires
Before you start, always double-check that the power is off. Use a multimeter to make sure there’s no voltage. This step keeps you safe and protects your equipment.
Now, let’s look at how to disconnect wires from different types of terminal blocks:
- Gather your tools. You’ll need an insulated screwdriver for screw terminals, a small flathead or release tool for spring-clamp terminals, and sometimes a release button or tool for push-in terminals.
- For screw terminal blocks:
- Insert your screwdriver into the screw head.
- Turn the screw counter-clockwise to loosen it.
- Gently pull the wire out. Don’t yank it—just a steady pull will do.
- For spring-clamp terminal blocks:
- Insert a small flathead screwdriver or the release tool into the opening.
- Press down to open the spring.
- Hold the spring open and gently pull the wire free.
- For push-in terminal blocks:
- If there’s a release button or lever, press it.
- If not, use a release tool if available.
- Pull and twist the wire gently to remove it.
Tip: Always label your wires before you disconnect them. This makes reassembly much easier and helps you avoid mistakes.
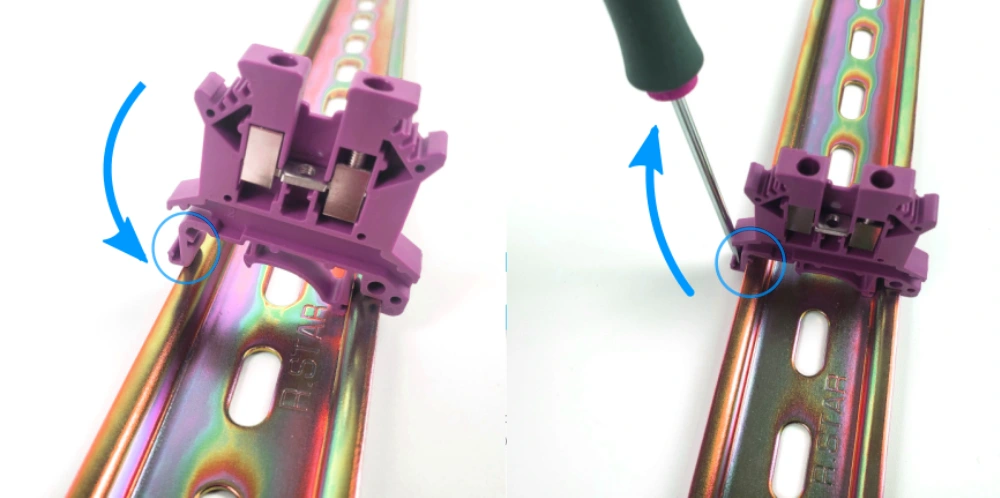
Release from DIN Rail
Once you’ve disconnected the wires, you’re ready to remove the terminal blocks from the din rail. Here’s how to do it without causing damage:
- Identify the type of terminal block. Some have a release clip or latch at the bottom, while others snap onto the rail.
- Use the right tool. For screw terminals, a screwdriver works best. For spring-clamp or push-in types, a narrow flathead or the manufacturer’s release tool is ideal.
- Operate the release mechanism gently. Don’t force anything. If the block has a latch, press or lift it to unlock the block from the rail.
- Pull the terminal block straight out. Hold the plastic housing, not the wires. Slide the block along the rail if needed, then lift it off.
- If a block feels stuck, use a thin plastic tool to gently pry near the seam. Avoid metal tools to prevent scratches or shorts.
Note: Linkwell terminal blocks are designed for easy removal. Their modular design and high-quality materials help you avoid damage during maintenance.
Multiple Blocks
Sometimes you need to remove several terminal blocks at once. Here’s how to keep things organized and safe:
- Work one block at a time. Disconnect and remove each terminal before moving to the next. This helps you avoid confusion and keeps your wiring neat.
- Keep removed blocks in order. Place them on a clean surface in the same sequence as they were on the din rail. You can use a tray or a labeled mat.
- Check for locking mechanisms. Some blocks have interlocking tabs or end stops. Release these before trying to slide blocks off the rail.
- Inspect each terminal and wire. Look for signs of wear or damage. If you see frayed wires or bent connectors, trim and re-strip the wire before reusing it.
| Step | What to Do | Why It Matters |
|---|---|---|
| Disconnect wires | Remove wires from each terminal block | Prevents pulling or damaging wires |
| Release from rail | Unlock and lift each block off the din rail | Avoids breaking the block or the rail |
| Organize blocks | Keep blocks in order | Makes reinstallation easier |
Callout: Always follow the manufacturer’s instructions for your specific terminal blocks. Linkwell provides detailed guides and support for all their products, so you can remove and reinstall blocks with confidence.
If you follow these steps, you’ll know exactly how to remove din rail terminal blocks without causing any damage. Take your time, use the right tools, and trust in quality products like those from Linkwell. You’ll keep your terminal blocks and din rail in top condition for years to come.
Prevent Damage
Best Practices
You want your terminal blocks to last and work well. Start by always labeling wires before you disconnect anything. This step saves you time during reassembly. Use the right tool for each terminal. If you use a screwdriver that fits, you avoid stripping screws or damaging the blocks. Handle each block by its housing, not the wires. This keeps the connections strong and prevents breaks.
Keep your workspace clean. Dust and debris can cause problems inside the panel. After you remove blocks, store them in a safe spot. Place them in order, so you can put them back easily. Regular maintenance helps too. Check your terminal blocks for signs of wear or corrosion every few months.
Tip: Use certified products like Linkwell for easier removal and longer-lasting blocks.
Common Mistakes
Many people rush and pull on wires to remove a terminal. This can break the wire or damage the block. Skipping labels is another big mistake. You might forget where each wire goes, which makes reassembly hard. Using the wrong tool can also crack the housing or strip the screw.
Here’s a quick table to help you avoid these mistakes:
| Mistake | What Happens | How to Avoid |
|---|---|---|
| Pulling wires | Broken wires or blocks | Use proper tools |
| Skipping labels | Confused reassembly | Label every wire |
| Wrong tool | Damaged terminal or blocks | Use correct screwdriver |
Troubleshooting
If a block feels stuck, check for hidden latches or locking tabs. Sometimes, dust or corrosion holds the block in place. Use a plastic tool to gently pry it loose. If you see bent connectors, straighten them before reinstalling. For stubborn blocks, review the manufacturer’s guide. Regular maintenance helps you spot issues early and keeps your terminal blocks in top shape.
Note: If you run into trouble, Linkwell offers support and detailed guides for all their terminal blocks.
You now know how to remove DIN rail terminal blocks safely and keep your setup in great shape. Remember these steps: power off, label wires, use the right tools, and handle each block with care. Linkwell products give you extra peace of mind with their safety features and easy-to-use design. If you ever get stuck, check this guide or reach out for help. You’ve got this!
Stay organized and patient—your blocks will thank you.
FAQ
How do I know if my terminal block is safe to remove?
Check that the power is off with a multimeter. Look for any warning labels or signs of damage. If you see anything unusual, stop and ask a professional for help.
Can I reuse DIN rail terminal blocks after removal?
Yes, you can reuse most terminal blocks if they look undamaged. Clean them before reinstalling. Linkwell blocks are built for multiple uses, so you get more value from each one.
What should I do if a terminal block feels stuck?
Don’t force it. Look for hidden latches or locking tabs. Use a plastic tool to gently pry it loose. If it still won’t move, check the manufacturer’s guide or contact Linkwell support.
Do I need special tools for Linkwell terminal blocks?
You usually need only a standard insulated screwdriver. For spring-clamp or push-in types, a small flathead or release tool helps. Linkwell designs its blocks for easy removal with basic tools.
Why should I label wires before removing terminal blocks?
Labeling wires helps you reconnect everything correctly. It saves time and prevents mistakes. You’ll thank yourself when it’s time to put everything back together!


