
A working fan motor keeps your fridge cold and your food fresh. If you notice issues, you can handle Refrigerator Fan Replacement yourself and save money. Always start with safety first. Gather your tools, remove the old fan, install the new one, and test everything.
Tip: Take photos as you go for easy reassembly!
Key Takeaways
- A failing refrigerator fan motor can cause uneven cooling and spoil your food. Look for signs like strange noises or ice buildup.
- Always unplug your refrigerator before starting repairs. This prevents electric shock and keeps you safe while working.
- Using a reliable replacement fan, like the Linkwell Axial fan, ensures efficient cooling and easy installation, saving you time and money.
Why Replace the Fan Motor
Signs of Failure
You might wonder how to spot a failing fan motor in your fridge. The signs are usually hard to miss. If you hear grinding, buzzing, or rattling noises coming from inside, that’s a big clue. Sometimes, you’ll notice uneven cooling—one shelf feels cold, another feels warm. Maybe your fridge compartment stays warm even when you set it to the right temperature. Ice can build up on the freezer walls or shelves. You might see the fan not spinning or blowing cool air. Physical damage to the fan or motor is another warning sign.
Tip: If your refrigerator runs constantly or you find obstructions stopping the fan blades, it’s time to consider refrigerator fan replacement.
Here’s a quick list of common reasons for fan motor failure:
- Loss of lubricant
- Failed run capacitor
- Bearing problems in belt drives
- Water dripping into the windings
- Voltage issues
Effects on Cooling
A working evaporator fan keeps cold air moving through your fridge. When the evaporator fan motor fails, cold air can’t reach the refrigerator compartment. Cooling efficiency drops almost immediately. You’ll notice inconsistent temperatures in both the fridge and freezer. Food won’t stay fresh as long. The compressor works overtime, which means higher energy bills and possible overheating.
- The refrigerator fan helps maintain optimal temperatures and even cooling.
- A malfunctioning fan can lead to reduced freshness and shorter shelf life for your food.
- Early detection keeps your fridge running efficiently and your groceries safe.
Tools and Parts
Tool Checklist
Before you start your refrigerator fan replacement, make sure you have the right tools on hand. You want the process to go smoothly, so grab these essentials:
- 1/4-inch nut driver
- Phillips screwdriver
- Work gloves
You might also want a flashlight to help you see inside tight spaces. A small container for screws keeps things organized. If you have a smartphone, snap photos as you work. This helps you remember how the evaporator fan assembly fits together.
Tip: Always wear gloves to protect your hands from sharp edges and electrical parts.
Choosing a Replacement (Linkwell Axial fan)
When it comes to picking a new evaporator fan motor, you want something reliable and efficient. The Linkwell Axial fan stands out as a top choice for many DIYers and professionals. It’s designed for easy installation and long-lasting performance. Take a look at what makes it special:
| Feature | Description |
|---|---|
| High Cooling Efficiency | Strong airflow maintains stable cabinet temperature in harsh industrial conditions. |
| Low Noise Design | Quiet operation ensures a better working environment in data centers and telecom facilities. |
| Durable & Reliable | Long lifespan with brushless technology, minimizing downtime and replacement costs. |
| Energy Saving | Consumes less power while delivering strong cooling performance for large enclosures. |
| Easy Installation | Compact design with plug-and-play setup reduces labor and installation time. |
You get peace of mind knowing your evaporator fan will keep your fridge cool and quiet. The Linkwell Axial fan fits most evaporator fan assembly setups, so you can finish the job quickly.
Safety Precautions
Unplugging the Refrigerator
Before you start any work, always unplug your refrigerator. This step keeps you safe from electric shock. You might feel eager to jump right into the refrigerator fan replacement, but taking a moment to disconnect the power is crucial. Never trust that the appliance is safe just because it is turned off. Electricity can still flow through the wires.
Safety Tip: Double-check that the plug is out of the socket before you touch any internal parts.
When you unplug the fridge, you also protect yourself from accidental starts. The fan motor could turn on while you are working, which can cause injury. You want to avoid surprises. Make sure the area is well-ventilated. Good airflow helps if you need to work near refrigerant components or if you notice any strong odors.
Here are some safety risks to watch out for:
- Electric shock from live wires
- Cuts from sharp metal edges
- Exposure to refrigerant fumes
- Sudden movement of fan blades
Protective Gear
You need the right gear to stay safe. Grab a pair of work gloves before you begin. Gloves protect your hands from sharp edges and small metal pieces. Use safety glasses to shield your eyes from dust or flying debris.
Pro Tip: Keep your gloves and glasses nearby so you do not forget to use them.
Wearing protective gear makes the job easier and safer. You will feel more confident as you handle screws, panels, and the fan motor. If you drop a part or bump into a sharp corner, your gear will help prevent injuries.
Refrigerator Fan Replacement Steps

Remove Shelves and Panels
Ready to start your refrigerator fan replacement? First, clear out the space so you can reach the evaporator fan motor. Here’s how you do it:
- Take out all shelves and drawers from the freezer compartment. Lift the right edge of each shelf to free it from the clips.
- Slide the shelf to the right to release the tabs on the left edge, then remove it completely.
- Repeat this process for every shelf and drawer.
- If your fridge has support rails or an ice-maker in the way, remove those too.
- Find the screws holding the rear panel in place. Use your screwdriver to unthread them.
- Carefully slide the rear panel out and set it aside.
Tip: Place all screws and small parts in a container so you don’t lose anything during your refrigerator fan replacement.
Access the Fan Motor
Now that you’ve cleared the way, you can get to the evaporator fan assembly. Make sure the refrigerator is unplugged before you touch anything inside. Safety comes first!
- Double-check that the fridge is unplugged.
- Empty the freezer compartment completely.
- Remove any trays or bins that might block your access.
- Look for the evaporator fan motor behind the rear panel. It’s usually near the center or top of the compartment.
You want to avoid damaging any wires or components, so work slowly and gently.
Disconnect and Remove Old Fan
You’re almost ready to swap out the old evaporator fan motor. Follow these steps for a smooth process:
- Locate the fan motor. It’s often attached with screws or brackets.
- Use your screwdriver or socket wrench to remove the screws holding the motor in place.
- Carefully detach the fan blade from the motor shaft. Hold the blade steady and pull it off gently.
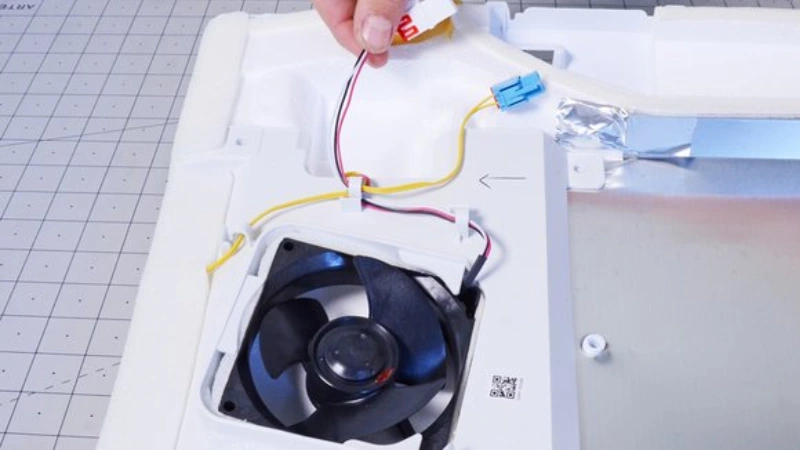
- Disconnect the wiring harness or electrical connectors. Take a photo if you need help remembering how they fit together.
- Remove the old fan motor from the evaporator fan assembly.
Note: If you see dust or debris, clean the area before installing the new fan. This helps your fridge run more efficiently.
Install New Fan (Linkwell Axial fan)
It’s time to install your new Linkwell Axial fan. This part is designed for easy installation and reliable cooling.
- Check the installation spot to make sure there’s enough space for airflow and future maintenance.
- Position the Linkwell Axial fan in the correct orientation. The airflow direction matters, so match it to the old fan’s setup.
- Secure the fan using the screws or brackets you removed earlier.
- Use flexible connections if possible. This reduces vibration and noise.
- Connect the wiring according to the manufacturer’s diagram. Make sure everything matches up with your fridge’s power system.
- Double-check all connections before moving on.
Pro Tip: The Linkwell Axial fan’s compact design makes it easy to fit into most refrigerator models. You’ll appreciate the quiet operation and strong cooling performance.
Reassemble and Test
You’ve installed the new fan. Now, put everything back together and make sure your refrigerator works as it should.
- Reattach the rear panel and secure it with screws.
- Slide shelves, drawers, and any support rails back into place.
- Plug the refrigerator back in.
- Listen for the fan motor. It should start running smoothly.
- Monitor the fridge for a few hours. Check that the cooling is consistent and the temperature stays steady.
With all panels and seals in place, your refrigerator will maintain optimal airflow and cooling efficiency. If you notice any issues, double-check your connections and make sure the fan is installed correctly.
Callout: If your fridge still isn’t cooling properly after the replacement, you may need to troubleshoot further or consult a professional.
Common Mistakes
Wiring Issues
Wiring mistakes can cause big problems when you replace your refrigerator fan motor. You might connect the wires to the wrong terminals or forget to secure them tightly. If you mix up the wiring, the fan may not run at all or could run in the wrong direction. Loose wires can lead to short circuits or even damage your new fan motor.
Tip: Take a photo of the wiring before you disconnect anything. This gives you a clear reference when you hook up the new Linkwell Axial fan.
Here are some common wiring mistakes you should watch out for:
- Using the wrong wire connectors
- Forgetting to match wire colors
- Leaving wires exposed
- Not checking for a snug fit
If you feel unsure about the wiring, ask a professional for help. You want your refrigerator to work safely and efficiently.
Assembly Errors
Assembly errors happen more often than you think. You might forget a screw or misplace a panel. Sometimes, you install the fan in the wrong direction, which affects airflow and cooling. If you rush, you could damage the fan blades or pinch a wire behind a panel.
- Always check that the replacement fan motor matches your refrigerator model. This helps avoid fit and function issues.
- Follow each step carefully. Double-check your work before you close up the fridge.
- Make sure all panels and seals are back in place. Gaps can let warm air in and reduce cooling.
Callout: Safety matters. Stick to safety precautions during every step. If you ever feel stuck, reach out for help. A small mistake can affect your fridge’s performance.
Troubleshooting
Testing After Replacement
You’ve finished installing the new fan motor, but you want to make sure everything works as it should. Start by plugging in your refrigerator and listening for the sound of the fan running. If you hear a smooth, steady hum, that’s a good sign. You can also check the airflow inside the fridge. Hold your hand near the vent where the evaporator fan sits. You should feel cool air moving through the compartment.
Want to be extra sure? Grab a multimeter and test the continuity of the fan motor. If the reading shows continuity, your motor is working. If not, you may need to replace it again.
Tip: Always double-check the wiring and connections before closing up the fridge. Loose wires can cause problems later.
What If the Fan Still Doesn’t Work
If your refrigerator fan motor still doesn’t run after replacement, don’t worry. You can troubleshoot the issue step by step:
- Unplug the refrigerator to stay safe.
- Check for obstructions around the fan. Dust, food particles, or ice can block airflow.
- Inspect the fan blades for damage or debris. Clean them so the evaporator fan can spin freely.
- Use a multimeter to test the motor again. No continuity means the motor is faulty.
- Look at the wiring and connections. Repair or replace any damaged wires.
- Check for a blocked drain or faulty defrost timer. These can cause water to refreeze and cover the fan.
Note: If you’ve tried all these steps and the fan still doesn’t work, you might need help from a professional.
You’ve learned how to replace your refrigerator fan motor safely and efficiently. Choosing a Linkwell Axial fan means fewer repairs and longer appliance life. Enjoy these benefits:
- Better energy efficiency and consistent cooling
- Less frost buildup and reduced electronic waste
- Simple maintenance keeps your fridge running smoothly
DIY repairs save money and help the environment!
FAQ
How do you know if your new fan is working?
Plug in your fridge and listen for a steady hum. Feel for cool air near the vents. If you notice both, your fan works.
Can you install a Linkwell Axial fan in any refrigerator?
You can install a Linkwell Axial fan in most refrigerators. Just check the size and voltage match your old fan before you start.
What should you do if the fan makes noise after replacement?
Try tightening the screws and checking for loose wires. Make sure nothing blocks the blades. If the noise continues, contact a professional for help.


